
Summer is just around the corner, bringing with it the joyous anticipation of sun-drenched beach days, refreshing dips in the pool, and countless outdoor adventures with the kids. These cherished moments, however, often come with a familiar parental challenge: ensuring our little ones are adequately protected from the sun, comfortably dressed, and, frankly, free from unnecessary drama. If you’ve ever found yourself wrestling a child wrapped in a cumbersome, sand-covered towel, heard the exasperated cries of “Mom, my towel is falling!” or “I can’t walk, my towel is too long!”, then you deeply understand the “towel drama” struggle. This recurring frustration can quickly dampen the spirits of a fun family outing.
But what if there was a simple, ingenious, and incredibly effective solution that not only keeps your children safe from the sun’s rays but also completely eliminates those irritating towel woes? Imagine a world where your kids can easily slip into their cover-up, move freely, and enjoy their beach day without a single complaint about their attire. Get ready to discover how to transform a basic beach towel into the ultimate DIY bathing suit cover-up – a creative project so straightforward and rewarding, you’ll wonder why you didn’t embark on it sooner!
I certainly faced this very dilemma with my own twins for several summers. The constant whining and adjustments became a predictable part of every beach trip. Enough was enough! I finally decided to tackle the problem head-on after stumbling upon a simple tutorial for making a bathing suit cover-up from a towel. Naturally, I couldn’t resist adding my own personal touch by embellishing mine with some adorable pom-pom trim, giving it an extra dose of charm and personality that my girls absolutely love.
This brilliant DIY solution is not only simple to craft but also incredibly cost-effective, requiring just a beach towel and a few basic sewing supplies. Beyond the sheer convenience, you’ll be providing your kids with an essential extra layer of protection from the sun’s harmful UV rays. Plus, you’ll be saving a significant amount of money; the average store-bought children’s cover-up can easily cost upwards of $30 to $50, making this a truly budget-friendly and practical alternative for any family.

This post contains affiliate links for your convenience. Click here for my full disclosure policy.
Why a DIY Beach Towel Cover-Up is a Game-Changer
This ingenious project offers a multitude of benefits that directly address common summertime dilemmas for parents and children alike. Embracing this simple craft means embracing a more relaxed and enjoyable beach or pool experience.
- Superior Sun Protection: Kids are naturally drawn to playing in the sun, but their delicate skin requires diligent care. A well-designed cover-up provides an essential and effective layer of protection against harmful UV rays. Wearing it during breaks from swimming, or during peak sun hours, significantly reduces the risk of sunburn, helping to keep their skin healthy and safe.
- Unmatched Comfort & Convenience: Bid farewell to the frustrating cycle of towels dragging on sandy surfaces or constantly slipping off little shoulders! A thoughtfully crafted cover-up stays securely in place, granting your child the freedom to move, play, and relax without the need for endless adjustments. It’s the perfect garment for seamless transitions, whether they’re moving from splashing in the water to enjoying a snack, or simply walking to and from the car without a bulky towel impeding their steps. This ease of wear translates directly into more independent play and less fuss for parents.
- Incredible Cost Savings: The market for children’s beachwear, especially stylish cover-ups, can be surprisingly expensive, with single items often ranging from $30 to $50 or even more. By choosing to repurpose an existing beach towel or buying one affordably, you can create a fashionable and highly functional piece for a mere fraction of the retail cost. This budget-conscious approach makes it entirely feasible to craft multiple cover-ups, ensuring you always have a clean one on hand without overspending.
- Personalized Style & Creative Expression: This project is much more than just a practical sewing solution; it’s a fantastic opportunity to unleash creativity! You have the freedom to select towels featuring your child’s favorite cartoon characters, vibrant colors, or whimsical patterns. The real fun comes with customization through unique embellishments like cheerful pom-pom trim, playful fringe, embroidered initials, or even fabric appliqué. These personalized touches result in a truly one-of-a-kind garment that your kids will be excited to show off. Involving them in the design process can foster their sense of ownership and make them even more eager to wear their new, handmade beach gear.
- Quick and Easy Crafting for All Skill Levels: Even if you consider yourself a novice sewer, this project is remarkably simple and astonishingly fast. With just a few basic materials and approximately 20 minutes of your time per cover-up, you can create a durable, adorable, and highly practical garment. It’s a deeply satisfying DIY endeavor that yields immediate and tangible results, boosting your confidence in your crafting abilities.
Materials Needed for 1 DIY Beach Towel Cover-Up
To embark on this rewarding DIY journey, you’ll need a few readily available items. The beauty of this project lies in its simplicity and minimal material requirements, making it accessible to almost anyone.
- A Beach Towel: This is the core component of your cover-up. For young children, a standard size towel (approximately 30×60 inches) is often sufficient. For older children or adults, consider a larger towel or even a “bath sheet” to ensure ample coverage and length. To accurately check the ideal length, fold your chosen towel in half and hold the folded side up to the shoulders of the person who will be wearing it. If the bottom edge doesn’t drag on the floor, you’ve likely found a good fit!
- Sewing Machine: (this is similar to my current sewing machine that I love—it’s AH-MAZING and so easy to use even if you are not an experienced sewer!) While hand-sewing is certainly an option for the determined, a sewing machine will make this project incredibly quick, efficient, and result in a clean, durable finish that withstands countless beach trips.
- Matching Thread: Select a spool of thread that closely matches the dominant color of your chosen beach towel. This will help your stitches blend in seamlessly, giving your finished cover-up a more professional and polished appearance.
- Pom-Pom Trim (Optional but Highly Recommended!): To add that extra touch of fun and whimsy, a vibrant pom-pom trim is perfect. It’s a simple addition that significantly elevates the style. (You can find various styles of pom-pom trim here).
- Sharp Scissors: A good pair of sharp fabric scissors is essential for making clean, precise cuts through the towel fabric, which is key to a neat finish.
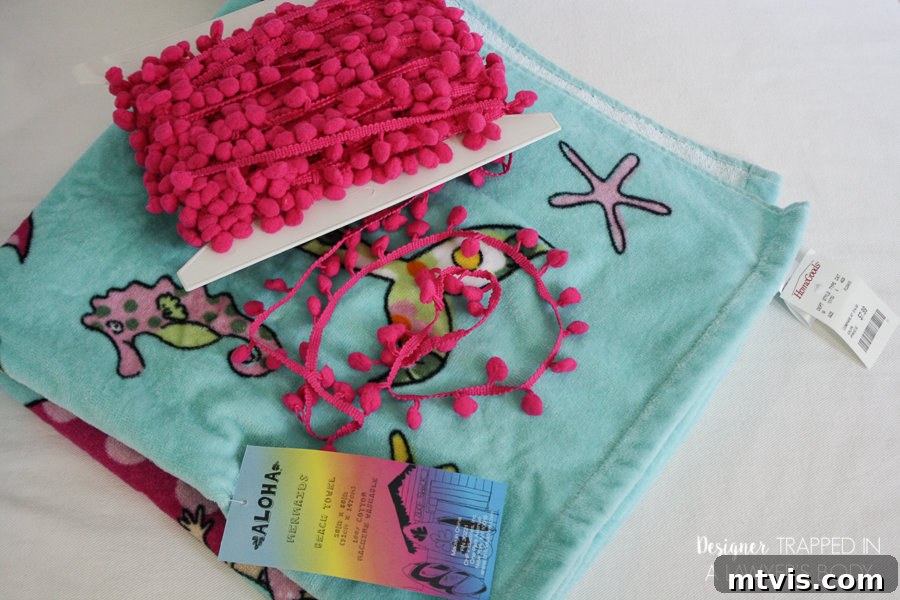
Time needed: 20 minutes
How to Make a DIY Bathing Suit Cover Up from a Beach Towel
- Step 1: Prepare Your Towel and Measure for the Head Opening.
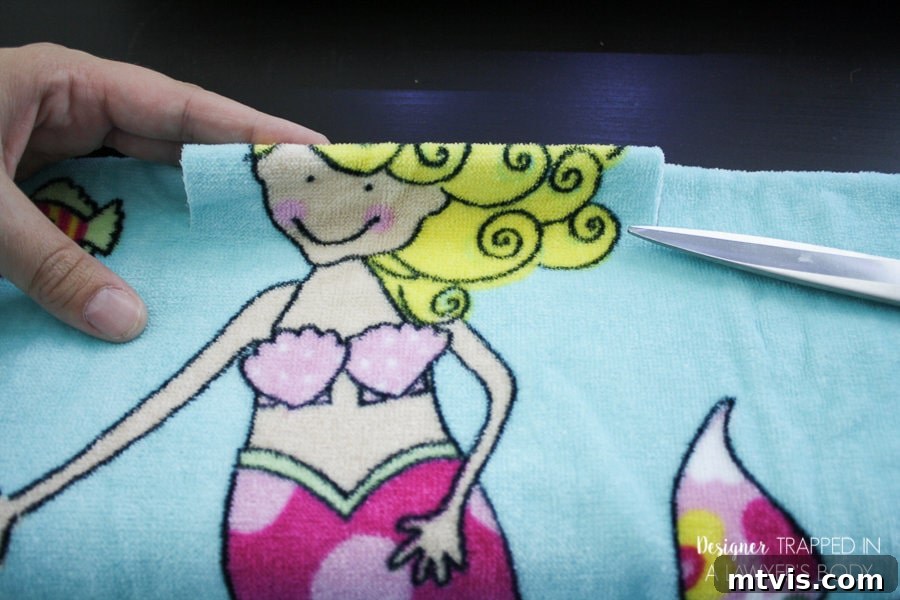
Begin by laying your chosen beach towel flat on a clean surface. Carefully fold the towel in half lengthwise, ensuring the edges are neatly aligned. This folded edge will become the top of your cover-up, where the head opening will be positioned. Next, take the folded side of the towel and hold it up to the person who will be wearing the cover-up. Gently drape it over their shoulders, aligning the fold with the top of their shoulders. Using pins or a washable fabric marker, mark two points to indicate the desired width of the head opening. These marks should be comfortably wide enough for their head to pass through easily, but not so wide that the shoulder straps will slip off. It’s always best to start with a slightly smaller opening, as you can always enlarge it if needed, but shrinking it is much more difficult.
- Step 2: Carefully Cut the Head Opening.
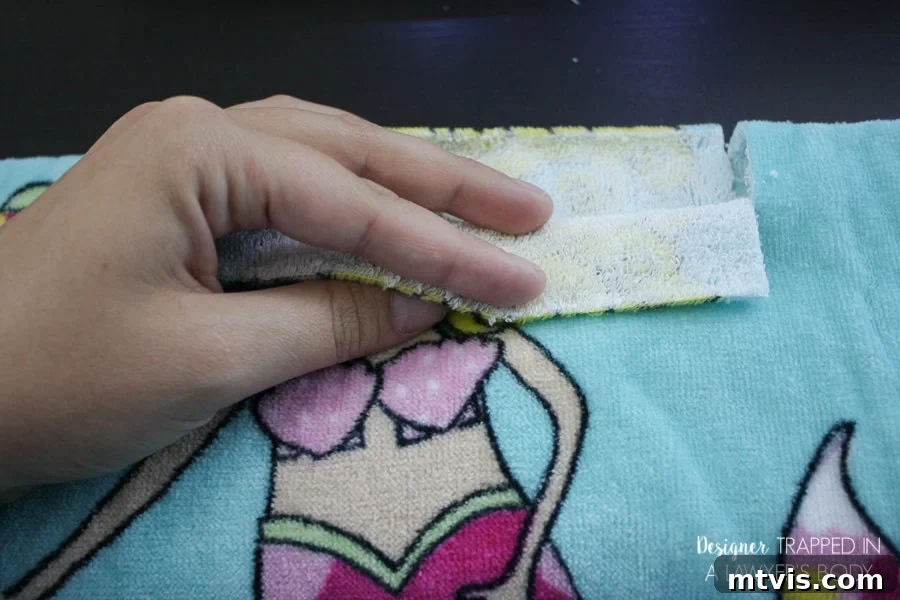
With your towel still folded in half, make two small vertical slits, each approximately 1 inch long. These slits should start from the folded edge and extend downwards at each of your previously placed pin marks. These initial cuts will help to define the sides of your head opening. Next, connect these two vertical cuts by making a horizontal cut directly along the towel’s fold. This action will create a rectangular opening in the center of your folded towel. Immediately, test the fit by carefully slipping the towel over your child’s head. If it feels too snug or difficult to get on, don’t worry! Simply extend your vertical cuts slightly, making the opening a little longer until it fits comfortably. This iterative approach ensures a perfect and comfortable fit for the wearer.

- Step 3: Refine and Prepare the Edges for Sewing.
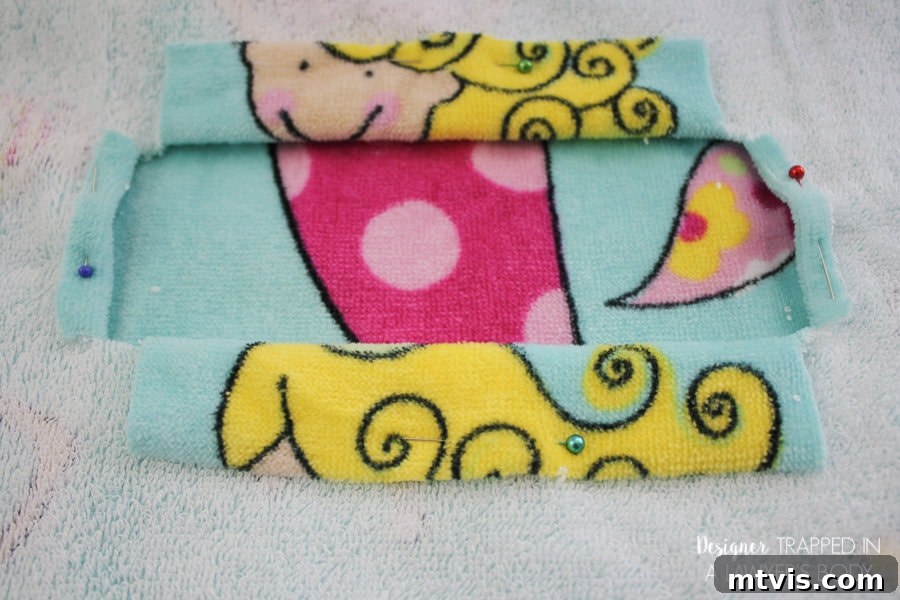
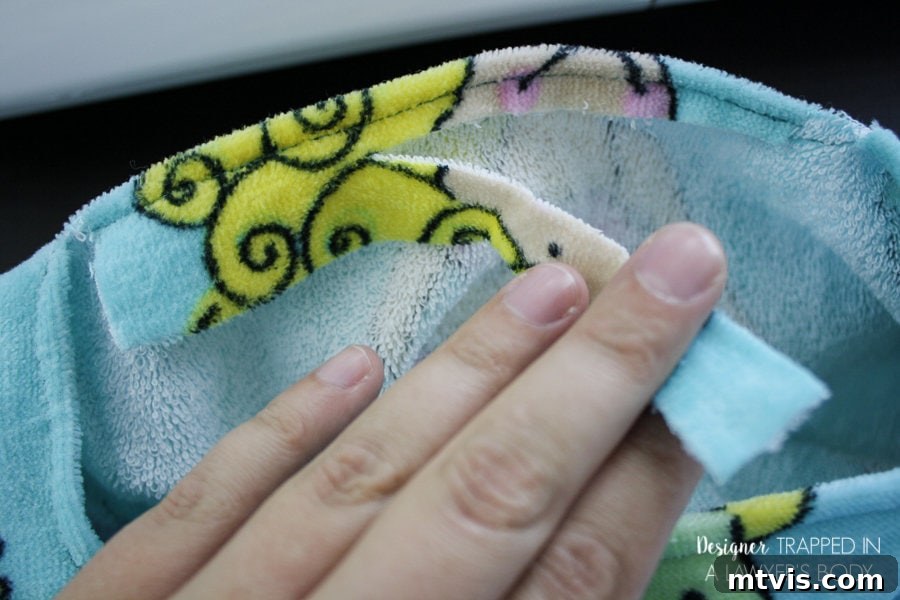
Once you are satisfied with the size and shape of your head opening, it’s time to prepare the raw edges for a neat and durable finish. At each of the four corners of your newly cut rectangular opening, make a very small diagonal snip. These tiny relief cuts, just enough to reach the corner stitching point, are crucial; they allow the fabric to fold inward smoothly without any unsightly bunching or pulling at the corners, which is common with thicker towel material. Now, carefully fold over each of the four raw edges of the head opening by approximately half an inch. Use sewing pins generously to hold these folded edges firmly in place. This meticulous pinning creates a clean hem that will prevent fraying over time and give your cover-up a professional, polished look.
- Step 4: Stitch the Head Opening Securely.
With your folded and pinned edges now ready, take your towel to the sewing machine. Select a simple straight stitch pattern. Carefully sew all four folded flaps into place, working your way around the entire head opening. It’s good practice to start and end with a backstitch to secure your seams, preventing them from unraveling with use and washing. Aim to sew close to the inner folded edge to create a neat, narrow hem. Take your time with this step to ensure your stitches are even and straight, which contributes significantly to the cover-up’s finished quality. After all four sides are sewn, meticulously trim away any excess fabric from the raw edges on the underside of the hem. This not only tidies up the inside but also reduces bulk, making the cover-up more comfortable against the skin.
- Step 5: Add the Fun Pom-Pom Trim!
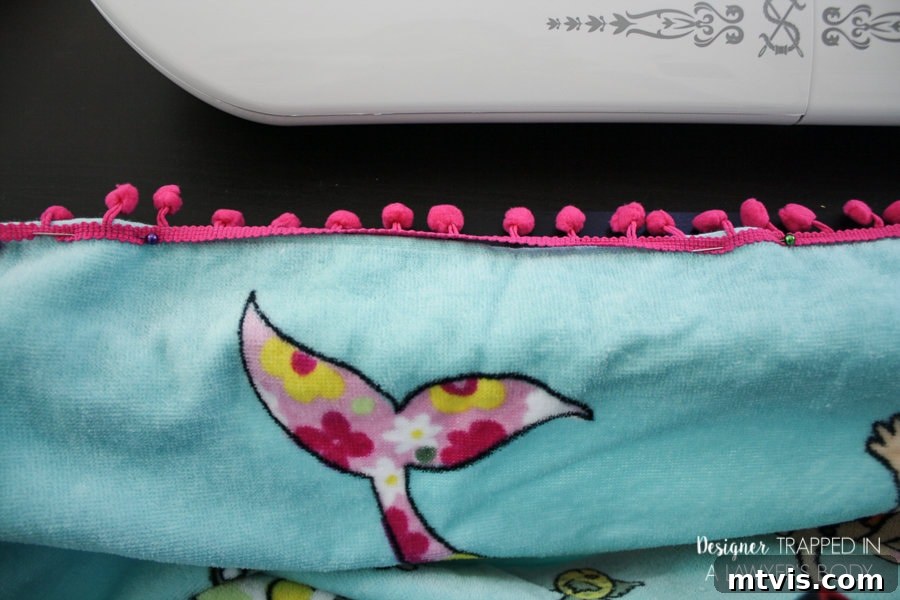
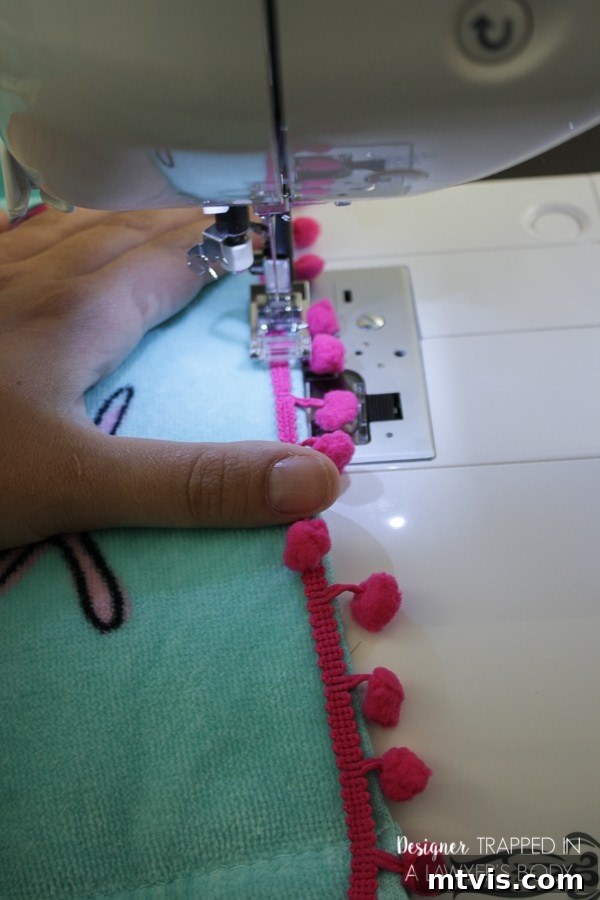
Now it’s time for the most exciting part – adding that charming pom-pom trim to truly personalize your cover-up! Unfold your towel cover-up completely. Decide where you’d like to place your trim. The most popular and impactful spot is usually along the bottom hem of the cover-up, but you could also add it around the armholes or even along the neck opening for an extra pop of color. Carefully pin the trim securely in place, ensuring that the decorative pom-poms face outwards, away from the raw edge. Once pinned to your satisfaction, take your cover-up back to the sewing machine and stitch the trim onto the towel using a straight stitch. Again, use backstitching at the beginning and end of your seam for enhanced durability. This quick and simple addition instantly elevates the entire piece from a basic towel to a stylish and adorable garment that your kids will absolutely cherish. The vibrant trim adds immense personality and makes the cover-up feel truly special and custom-made!
Your Finished, Fabulous Beach Cover-Up!
That’s it! Here is the finished product, ready for all your summer adventures. Aren’t they adorable? This quick and easy project took me about 20 minutes per cover-up to make, proving to be an incredibly smart investment of my time. My girls absolutely adore them, and I’m thrilled to report that “towel drama” is now a distant memory.


The cover-ups have become quite a hit, with other moms at the pool frequently asking me to make some for their own kids. I genuinely hope you will enjoy making one or more of these fantastic beach towel cover-ups for your kiddos – or even for yourself! This simple project delivers big on convenience, style, and sun protection, making your summer days at the beach or pool much more enjoyable and stress-free.
More Ideas for Kids & Teens
SEE ALL kid’s spaces
-
IKEA Billy Bookcase Hack for Loads of Storage
-
Fun and Stylish Playroom Décor Ideas & Tips
-
28 Dreamy Bedroom Ideas for Girls
-
How to Decorate Bedroom Doors to Look Like Apartment Doors
-
25 Unique Bedroom Ideas for Teen Boys and Girls
-
30 Genius Shared Bedroom Ideas for Kids
Wondering how I approach transforming rooms and spaces in our home? Check out Designer in a Binder®.
And if you want exclusive content and behind-the-scenes sneak peeks, be sure to subscribe before you head out!