
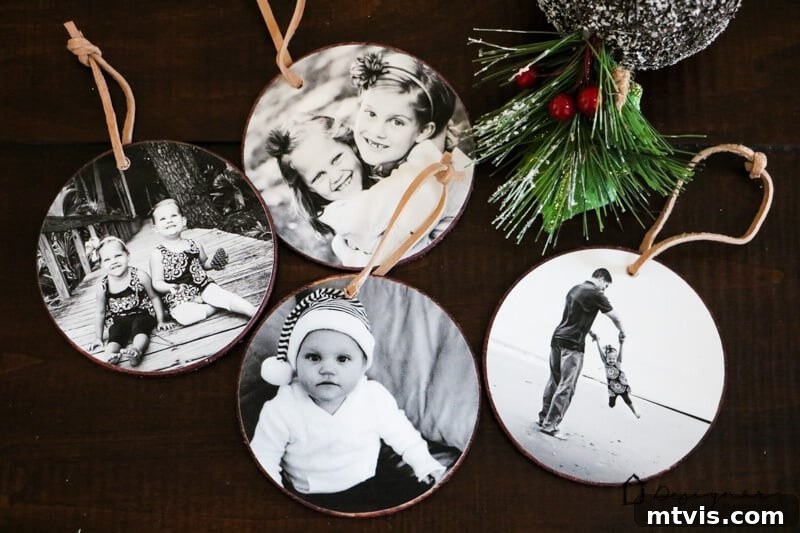
DIY Photo Christmas Ornaments: A Heartfelt Way to Display Family Memories
Thank you to DAP for sponsoring this post and providing exceptional adhesive for this project.
The holiday season is a time for warmth, joy, and reflecting on cherished memories. What better way to celebrate these precious moments than by crafting personalized DIY photo Christmas ornaments for your tree? Imagine your tree adorned not just with festive lights and store-bought baubles, but with tangible snapshots of your family’s journey, year after year. These aren’t just decorations; they’re tiny time capsules, holding laughter, love, and unforgettable milestones that transform your holiday decor into a deeply personal narrative.
I recently embarked on an ambitious but incredibly rewarding mission to handcraft every single ornament for our grand 9-foot artificial tree that proudly graces our foyer. It was a project filled with immense joy and creativity, allowing me to pour my heart into every piece. Among the various types of ornaments I created, these super easy DIY photo Christmas ornaments quickly became my absolute favorite. The process was not only simple but also incredibly rewarding, taking me on a delightful trip down memory lane as I sifted through old family photos. Each picture chosen sparked a story, a smile, or a fond recollection, making the crafting experience truly special. I even plan to add a few new photo ornaments each year, slowly transforming our Christmas tree into a living, evolving gallery of our family’s beautiful history.
This comprehensive tutorial will guide you through every step of creating your own custom photo ornaments, ensuring your holiday decor is filled with unique personal touches and immeasurable sentimental value. Whether you’re a seasoned crafter looking for a new project or a beginner eager to make a simple yet impactful creation, you’ll find these ornaments a joy to make. They are perfect for enhancing your own Christmas tree, adding a cozy, nostalgic glow, or serving as heartfelt, handmade gifts for family and friends that will be treasured for years to come. Get ready to transform your favorite photographs into beautiful, lasting treasures that tell your family’s unique story!
This post contains some affiliate links for your convenience (which means if you make a purchase after clicking a link I will earn a small commission which helps keep my blog up and running but it won’t cost you a penny more)! Click here to read my full disclosure policy.
Craft Your Own Custom Photo Ornaments: A Step-by-Step Guide
Creating these bespoke photo ornaments is a deeply rewarding experience that combines the love of crafting with the unparalleled joy of family memories. The process is straightforward, and the result is a cherished keepsake. Below, you’ll find a comprehensive list of all the materials you’ll need, along with detailed, easy-to-follow instructions to help you bring your vision to life. Let’s gather our supplies and start making some holiday magic!
Essential Materials You’ll Need:
- Inkjet Printer: A high-quality inkjet printer is crucial for ensuring your photos reproduce with vibrant colors and sharp detail. This is the printer I personally use and absolutely adore; it boasts the fantastic capability of printing large sizes, up to 13 x 19 inches, which offers incredible versatility for various craft projects beyond just ornaments. Always ensure your printer is loaded with fresh, high-quality ink for the best possible results.
- Matte Photo Paper: Opting for matte photo paper (this specific paper worked wonderfully for me) is key for achieving a professional, glare-free finish. Matte paper significantly minimizes reflections from tree lights, making your photos clearly visible from all angles on the tree and lending them a more sophisticated, artistic feel compared to glossy alternatives.
- Round Wood Discs: These natural wood slices form the charming base of your ornaments, offering a rustic and organic aesthetic. These are the exact wood discs I chose for their ideal size and smooth, ready-to-use finish. You can typically find these at most craft stores, woodworking suppliers, or online. For the best adhesion and appearance, ensure your discs are sanded smooth and clean.
- DAP Weldwood Multipurpose Spray Adhesive: A strong, reliable adhesive is paramount for ensuring your precious photos stay securely attached to the wood discs over time. This DAP Weldwood adhesive is my top recommendation due to its remarkable ease of use and incredibly powerful, long-lasting bond, which is essential for creating durable ornaments.
- Wood Stain: To enhance the natural beauty of the wood and add a touch of warmth or a festive color, wood stain is an excellent choice. I personally used this stain in the “Blood Red” color, which provided a beautiful, rich hue that perfectly complemented my Christmas decor. You have the freedom to choose any stain color that best matches your desired aesthetic, from classic browns to more vibrant tones.
- Paper Towels or Lint-Free Cloth: These are indispensable for applying and wiping off any excess stain, ensuring a clean finish, and for general cleanup throughout the entire crafting process.
- Cricut Cutting Machine or Precision Scissors & Round Template: For perfectly circular photos with crisp, clean edges, a Cricut cutting machine is highly recommended for its precision, speed, and consistency. If you don’t own one, a good pair of sharp, precision scissors along with a homemade round template (such as tracing a slightly smaller object than your disc, or using a compass to draw circles) will work wonderfully for manual cutting. For those considering investing in a cutting machine, you can read my comprehensive review of Cricut vs. Silhouette machines here and my detailed review of the Cricut Maker here.
- Suede Cord or Ribbon: This material will serve as the elegant hanger for your finished ornaments. Suede cord adds a lovely rustic and tactile touch, but you could also opt for satin ribbon, natural twine, festive yarn, or even decorative wire, depending entirely on your preferred style and the overall aesthetic of your Christmas tree.
- Drill (Handheld or Drill Press) with Small Drill Bit: You will need this tool to create the clean, precise hanging hole in the wood discs. A small drill bit, specifically chosen to match the thickness of your chosen cord or ribbon, is ideal for this task.
- Optional Embellishments: Consider adding glitter glue for a touch of sparkle, fine-tip paint pens for hand-lettering dates or names, or a clear sealant spray for an extra layer of protection and durability.
Step-by-Step Guide to Crafting Your Photo Ornaments:
Detailed Instructions:
1. Select, Size, and Print Your Cherished Photos
The first and arguably most enjoyable step is selecting the treasured photos that will adorn your Christmas tree. Take your time sifting through physical family albums, digital archives, or even recent snapshots on your phone. Look for images that evoke strong emotions, capture significant life moments, or simply bring a smile to your face. Consider a diverse mix: photos of children growing up, past holiday celebrations, beloved pets, travel adventures, or even candid everyday joys. High-resolution images will yield the best printing quality, ensuring clarity, vibrant colors, and sharp detail in your finished ornaments.
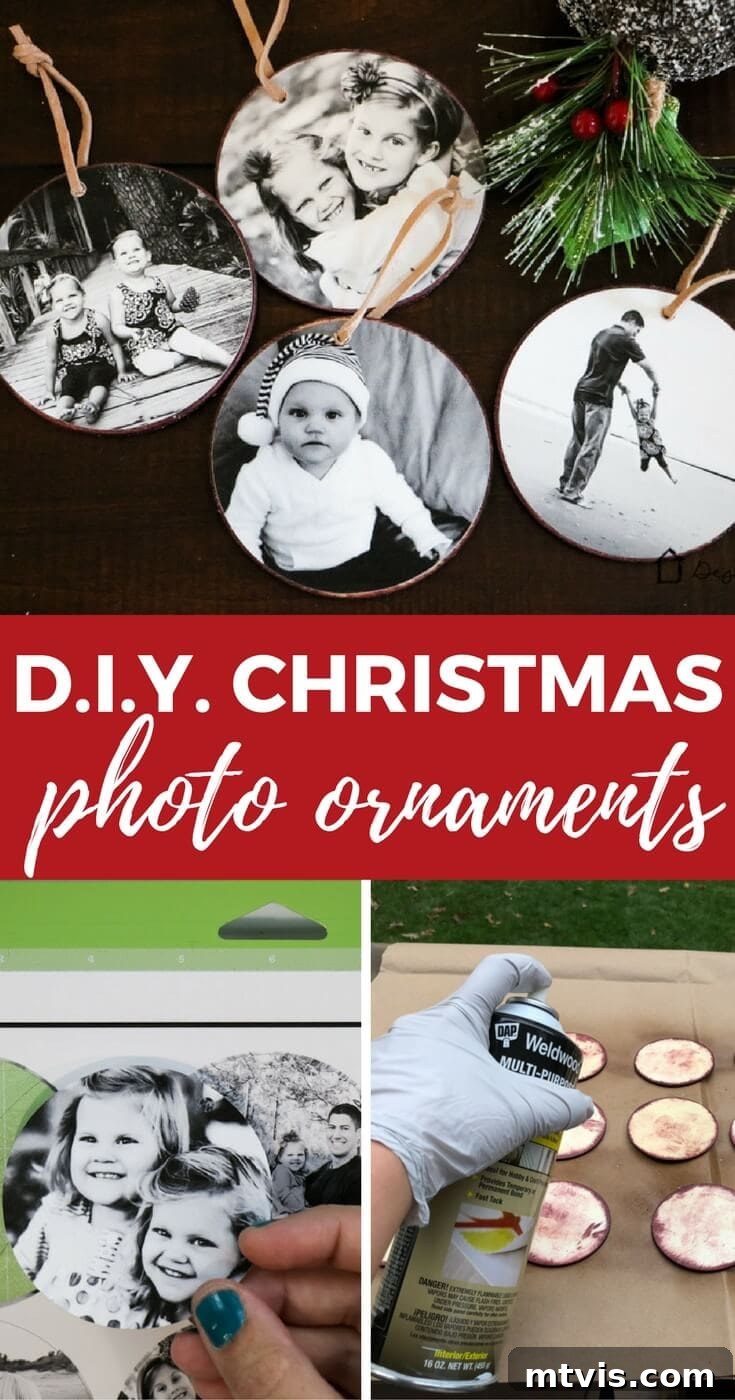
Once selected, you’ll need to size and shape your photos to fit your wood discs. They should be printed and cut just slightly smaller than the diameter of your wood discs. For instance, if your wood discs measure 3 inches in diameter, aim for your round photos to be approximately 2.9 inches in diameter. This slight difference will create a beautiful, visible border of the stained wood around your photo, adding to its charm.
If you’re cutting them by hand, print your photos and then create a round template. You can do this by tracing a coin, the rim of a small cup, or using a compass to draw a circle that is slightly smaller than your wood disc. Carefully use precision scissors to cut out each circular photo, ensuring clean and smooth edges. After cutting, use a standard hole punch to add a small hole near the top edge of each photo. This hole will serve as a perfect guide when you drill into the wood disc later, ensuring consistent placement.
For those utilizing a Cricut cutting machine, the process is incredibly streamlined and precise. While I’ve previously provided guidance on transforming images into circles directly within Design Space, I highly recommend pre-formatting your chosen photos into circular shapes before importing them into Design Space. This can be easily achieved using various online photo editing tools like PicMonkey; you can follow the steps in this tutorial for assistance. Pre-formatting saves significant time and simplifies the cutting process within Design Space. Once imported, you can efficiently arrange your circular images on the cutting mat and allow your Cricut to perfectly cut them out. Remember to utilize the “Print Then Cut” feature for accurate results, and ensure your printer is correctly calibrated with your Cricut machine for optimal precision.
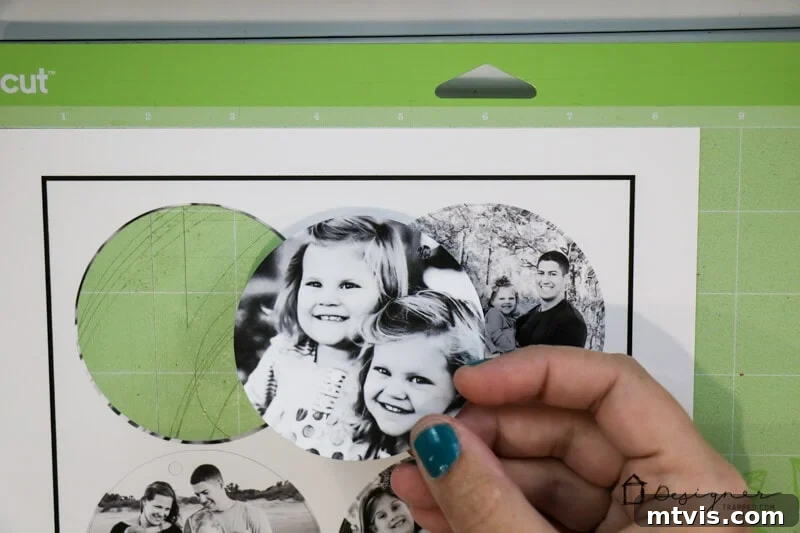
The immediate and satisfying result of using a Cricut is a stack of perfectly cut circles, uniformly sized and ready for the next stage of your ornament project!
2. Stain Your Wood Discs for a Rustic Touch
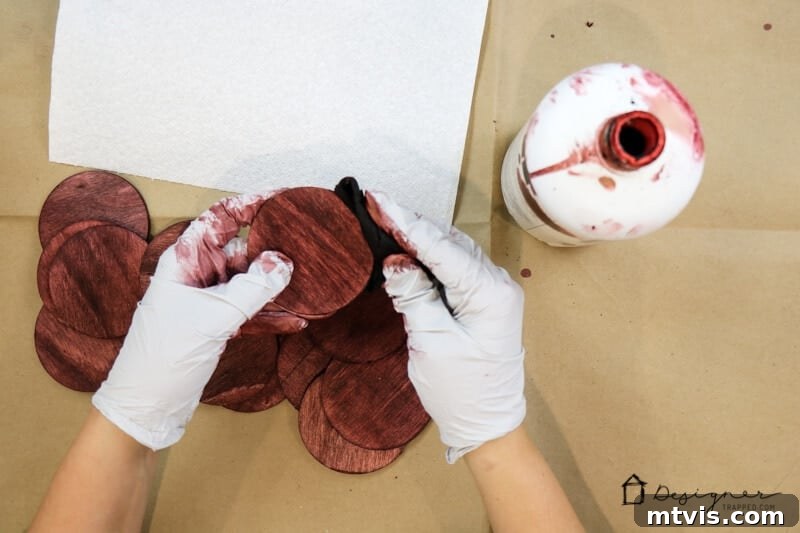
While your Cricut is diligently cutting your photos or you’re meticulously cutting them by hand, it’s the perfect opportunity to prepare your wood discs. Always choose a well-ventilated area for this step, preferably outdoors or in a workshop with open windows, as wood stains can have strong fumes. Using a clean paper towel, a foam brush, or a lint-free cloth, carefully apply your chosen wood stain to the back and around the edges of each wood disc. You have control over the depth of color; apply one coat for a subtle wash that highlights the natural wood grain, or multiple coats for a deeper, richer, and more opaque color.
I personally used the “Blood Red” stain, which provided a beautiful, warm contrast to the photos and added a cozy, festive glow that perfectly suited my holiday theme. After applying, wipe off any excess stain after a few minutes, always moving in the direction of the wood grain to prevent streaks. Allow the stained discs to dry completely according to the stain manufacturer’s instructions, which typically takes several hours. Ensuring the discs are fully dry is crucial to prevent any tackiness or unwanted transfer of stain onto your photos or hands during the subsequent steps.
3. Apply Adhesive to Secure Your Photos
Once your stained wood discs are thoroughly dry, take them outside again for this step, as spray adhesives are always best used in a well-ventilated environment. Lay your discs unstained-side up on a protected surface, such as old cardboard, newspaper, or a drop cloth, to prevent adhesive overspray from damaging your work area. Evenly spray the surface of each disc with your DAP Weldwood Multipurpose Spray Adhesive. From my extensive crafting experience, I can confidently say that this particular spray adhesive is a standout. Many craft adhesives can be messy, uneven, or difficult to work with, but the DAP Weldwood is remarkably user-friendly. It provides excellent, consistent coverage with minimal product, creating a strong and lasting bond without leaving excess residue or causing bubbling. Apply a thin, even coat across the entire surface of where your photo will be placed, ensuring edge-to-edge coverage.
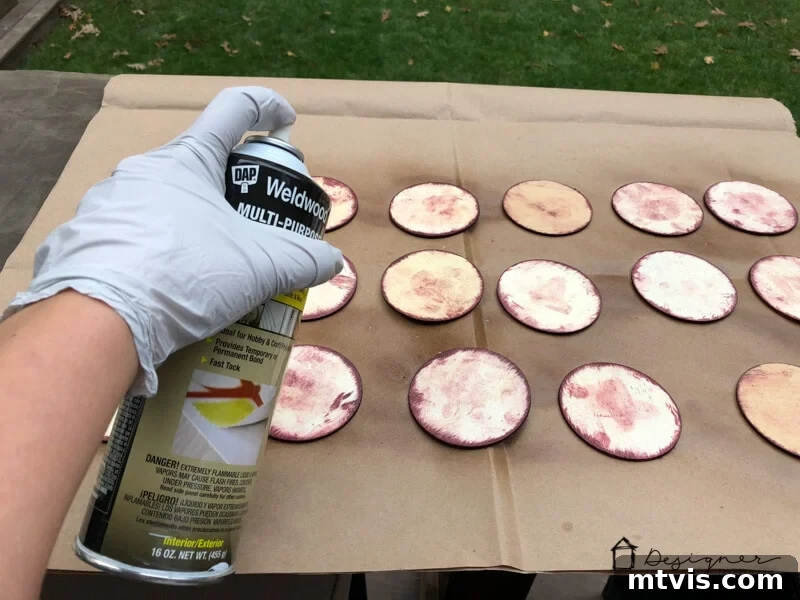
4. Carefully Place Photos onto Discs
Immediately after applying the spray adhesive, carefully place one of your pre-cut photos onto the center of each wood disc. This step requires a steady hand and a keen eye. Take your time to align the photo perfectly, ensuring an even border of stained wood is visible around the entire image. Once the photo makes firm contact with the adhesive, it adheres quite quickly and can be difficult to reposition, so try to achieve accurate alignment on your first attempt. Gently press down on the photo, starting from the center and working outwards towards the edges, to smooth out any potential air bubbles and ensure full, even contact with the adhesive. A clean credit card, a small brayer, or even just your fingertips can be useful tools for this step to achieve a perfectly flat, smooth surface.
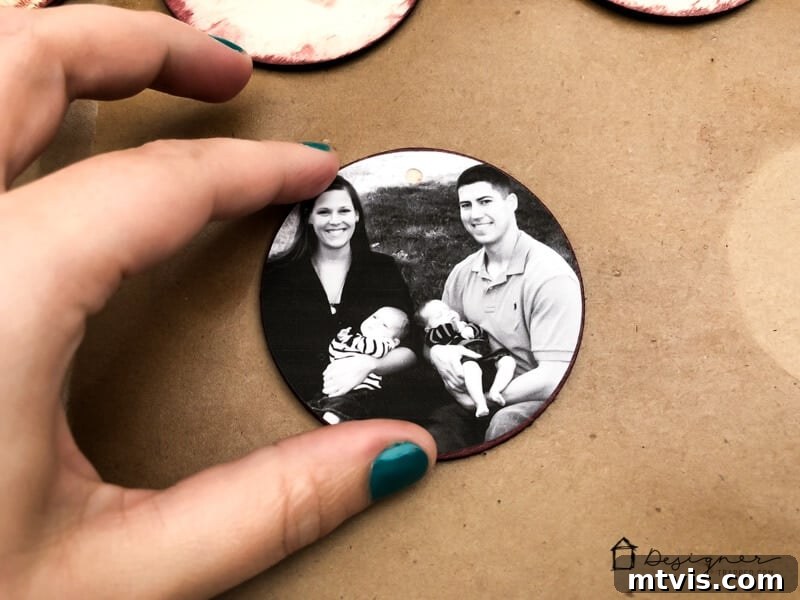
Allow the adhesive to dry completely, which typically takes at least 30 minutes to an hour, or as per the specific product’s instructions. The edges of your ornaments should no longer feel tacky to the touch once thoroughly dry.
5. Drill Holes for Hanging
With your photos securely attached and the adhesive fully dry, it’s time to create the hanging holes for your ornaments. Using the pre-punched hole in your photo (if you cut manually) or by carefully marking a small spot at the top center of your photo (if using a Cricut, as the Cricut does not punch holes through printed material), carefully drill a small, clean hole through both the photo and the underlying wood disc. I personally utilized a drill press for its precision, which helps in creating consistently straight holes, but a handheld drill with a small drill bit will work perfectly well for this task. Ensure your drill bit is slightly larger than the thickness of your chosen cord or ribbon to allow for easy threading.
Always prioritize safety during this step: wear appropriate safety glasses to protect your eyes, and if using a handheld drill, firmly secure your wood disc in a vise or clamp to prevent it from spinning. If you don’t feel comfortable drilling or lack the tools, you could also consider using small screw-in eye hooks after the project is complete, though drilling offers a cleaner, more integrated and professional-looking finish.
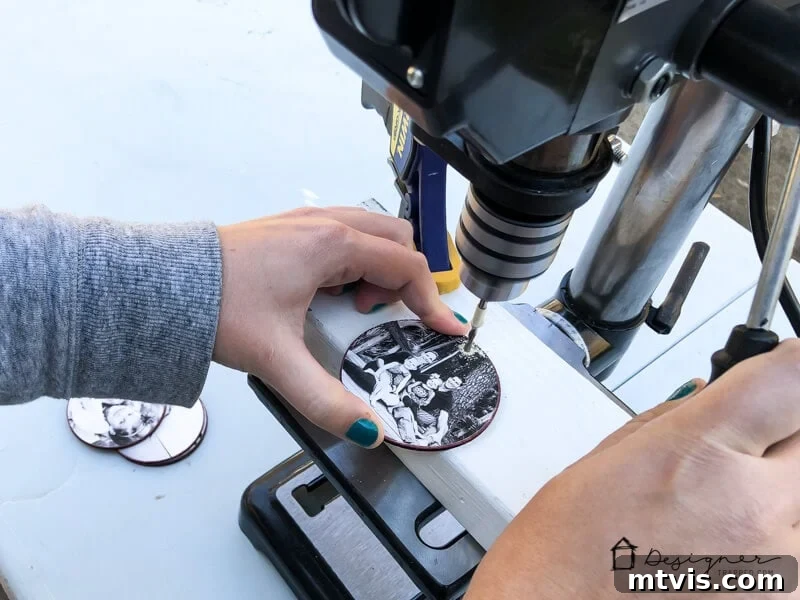
6. Add Your Hangers and Final Touches
The final and most exciting step is to add the hangers to your beautifully crafted ornaments. This is where they truly transform into ready-to-display treasures! Cut a length of your chosen suede cord (or ribbon, twine, or other material) approximately 6-8 inches long. Thread one end of the cord through the front of the ornament’s hole and then back through the same hole from the back, forming a neat loop on the front side. Bring both ends of the cord together at the top and tie them securely in a simple, tight knot to create a robust hanger. My little helpers absolutely loved assisting with this step, turning it into a truly wonderful and memorable family activity!
For an extra layer of protection and to ensure the longevity of your ornaments, consider spraying your finished pieces with a clear, matte or satin sealant. This optional but highly recommended step helps to protect the photos from moisture, potential fading due to UV light exposure, and general wear and tear over time. A good quality sealant ensures your precious photo ornaments remain vibrant and beautiful for many Christmases to come, preserving those memories for generations.
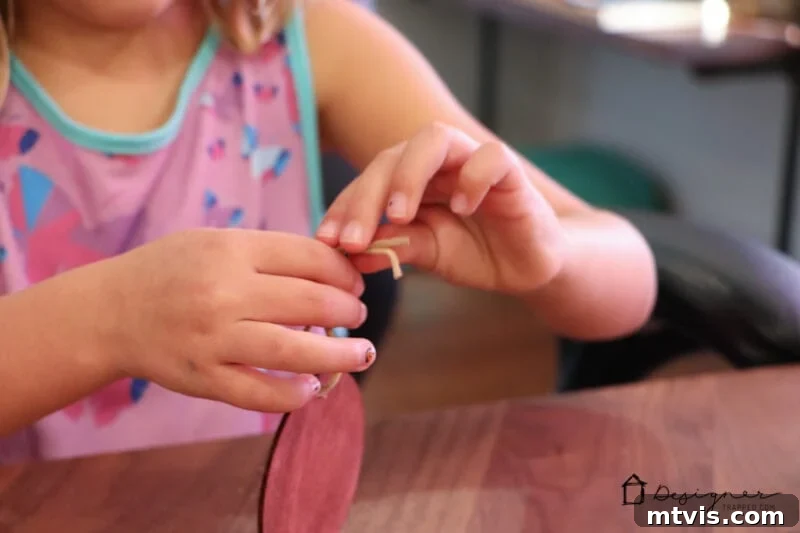
Behold Your Beautifully Personalized Photo Ornaments!
And just like that, you’ve created truly unique, heartfelt, and utterly charming decorations! I am genuinely 100% in love with how these personalized photo Christmas ornaments turned out. They add such a special, warm, and inviting touch to our Christmas tree, transforming it into a beautiful narrative of our family’s most treasured moments. Each ornament is a tiny window to the past, sparking smiles and conversation. Take a peek at the stunning results and imagine them gracing your own tree:
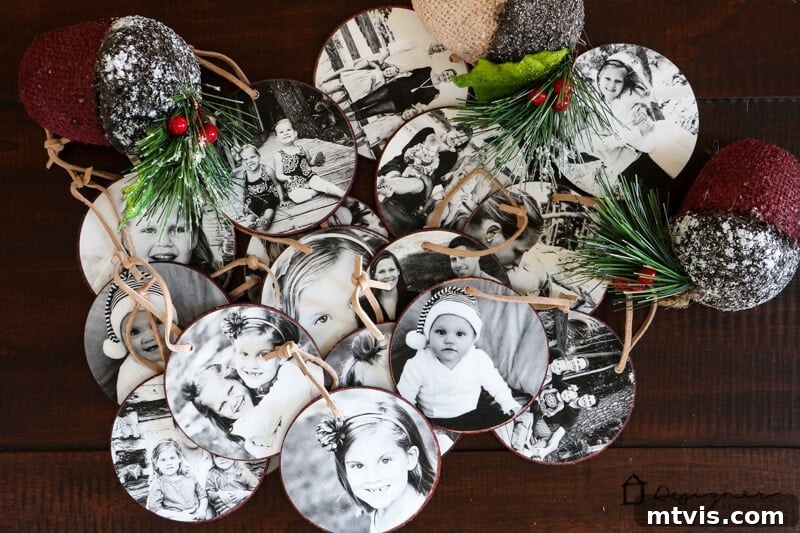
Why These Personalized Photo Ornaments Are a Must-Make This Holiday Season
In a world saturated with mass-produced holiday decor, crafting your own photo ornaments offers a refreshing departure and brings a depth of meaning that store-bought items simply cannot replicate. Here’s why you should absolutely make these a part of your holiday tradition:
- Unmatched Sentimental Value: Each ornament tells a unique story, a moment frozen in time. From a baby’s first Christmas to a beloved family vacation, a significant anniversary, or even a cherished pet, these visual narratives spark immense joy and lively conversations every holiday season. They connect us to our past and the people we love.
- Thoughtful and Unique Gifts: Struggling to find the perfect gift for loved ones? These handmade photo ornaments are incredibly thoughtful, personalized, and truly unique presents for grandparents, aunts, uncles, friends, teachers, or anyone special in your life. They are especially cherished by those who live far away, offering a tangible piece of home.
- Heirloom Quality: Crafted with durable materials and sealed with care, these ornaments are built to last. They have the potential to become cherished family heirlooms, passed down through generations. Imagine your grandchildren admiring photos of their parents and grandparents on the Christmas tree, learning about their family history through these beautiful keepsakes!
- Budget-Friendly & Rewarding Decor: While quality materials are important, creating these ornaments yourself can often be more cost-effective than purchasing high-end, custom-made personalized items. Beyond the financial aspect, the immense satisfaction and joy derived from creating something so meaningful with your own hands is truly priceless.
- Engaging Family Activity: Involving children in the selection of photos, the gentle pressing of the images, and the threading of cords makes this a wonderful family bonding activity. It’s an opportunity to create new, happy memories together while preserving old ones, fostering a sense of togetherness and shared purpose during the holidays.
Tips for Enhancing and Caring for Your Photo Ornaments
To ensure your personalized photo ornaments remain beautiful, vibrant, and cherished year after year, consider incorporating these extra tips and care instructions:
- Add Dates and Names: To enhance their historical and sentimental value, use a fine-tip permanent marker or a metallic paint pen on the back of the wood disc to elegantly write the date the photo was taken or the year the ornament was made, along with the names of the people featured in the picture.
- Experiment with Shapes: While round wood discs offer a classic and universally appealing look, don’t hesitate to experiment with other shapes! Consider using square, rectangular, or even custom die-cut wood shapes for variety and to match specific photo compositions.
- Seal for Longevity: A crucial step for long-term preservation is to apply a clear matte or satin sealant spray (such as Mod Podge Clear Acrylic Sealer or a similar clear craft sealer). This protective layer will shield your photos from moisture, prevent fading caused by UV light exposure, and guard against general wear and tear, ensuring they remain vibrant and pristine for many Christmases to come.
- Careful Storage: When the holiday season ends and it’s time to pack away your Christmas decorations, give your precious photo ornaments special treatment. Store them in a separate, padded storage box. Wrapping each ornament individually in acid-free tissue paper or soft fabric will protect the photo surfaces from scratches and prevent them from sticking together.
- Gift Presentation Matters: If you’re giving these as gifts, elevate the presentation! Present them in small velvet pouches, elegant decorative boxes, or simply tied with a beautiful coordinating ribbon and a handwritten tag. A little extra effort in presentation makes the handmade gift even more special.
Troubleshooting Common Questions About DIY Photo Ornaments
- Q: My photos aren’t sticking well to the wood discs. What might be the problem?
- A: Ensure the wood surface is perfectly clean, completely dry, and free of any dust, sawdust, or oils before applying the adhesive. Also, verify that you are using enough adhesive for full coverage and applying an even coat. After placing the photo, press firmly and evenly across its surface to ensure maximum contact and to remove any air pockets.
- Q: Can I use glossy photo paper instead of matte?
- A: While glossy photo paper can technically be used, matte is generally recommended for ornaments. Matte paper minimizes glare from Christmas tree lights and ambient room lighting, providing a softer, more professional, and easily viewable appearance from all angles. If you choose glossy, ensure your adhesive is compatible to avoid any bubbling or warping.
- Q: What if I don’t own a Cricut machine for cutting?
- A: No problem at all! You can absolutely achieve beautiful results by cutting your photos by hand. Simply print your photos and use sharp, precision scissors along with a homemade round template (as described in Step 1). It might take a little more time and patience, but the unique, handmade charm will be just as lovely. Take your time with the cutting for the cleanest edges.
- Q: How can I make this craft project child-friendly?
- A: Involve children in various age-appropriate steps! They can help enthusiastically with photo selection, carefully applying the adhesive (always under close adult supervision in a well-ventilated area), and joyfully threading the cords. For younger children, you can pre-cut the photos and use pre-drilled discs to make it safer and more enjoyable. They can also assist with ‘staining’ the wood using non-toxic paints or markers instead of traditional wood stain.
If you love this heartfelt DIY idea and the joy it brings, be sure to save it to Pinterest or share it on Facebook so you can easily find it again later! Your shares help others discover wonderful and meaningful ways to personalize their holidays and create lasting memories.
And before you go, don’t miss out on my popular and absolutely FREE Christmas printables! They’re perfect for adding even more festive cheer and decorative touches to your home this holiday season. Just click the image below and let me know what email address I should send them to.
Bring more custom charm and sentimental warmth to your holidays with these beautiful and easy-to-make photo ornaments. They’re a craft that truly keeps on giving, creating memories that hang on your tree and in your heart!

Discover More Creative Projects:
- Explore beginner-friendly Cricut ideas for home decor
- Learn advanced Cricut techniques for intricate crafts
- Browse other DIY Christmas decoration tutorials for a festive home
- Find inspiration for personalized gifts for every occasion
- Creative ways to use wood slices in your crafting