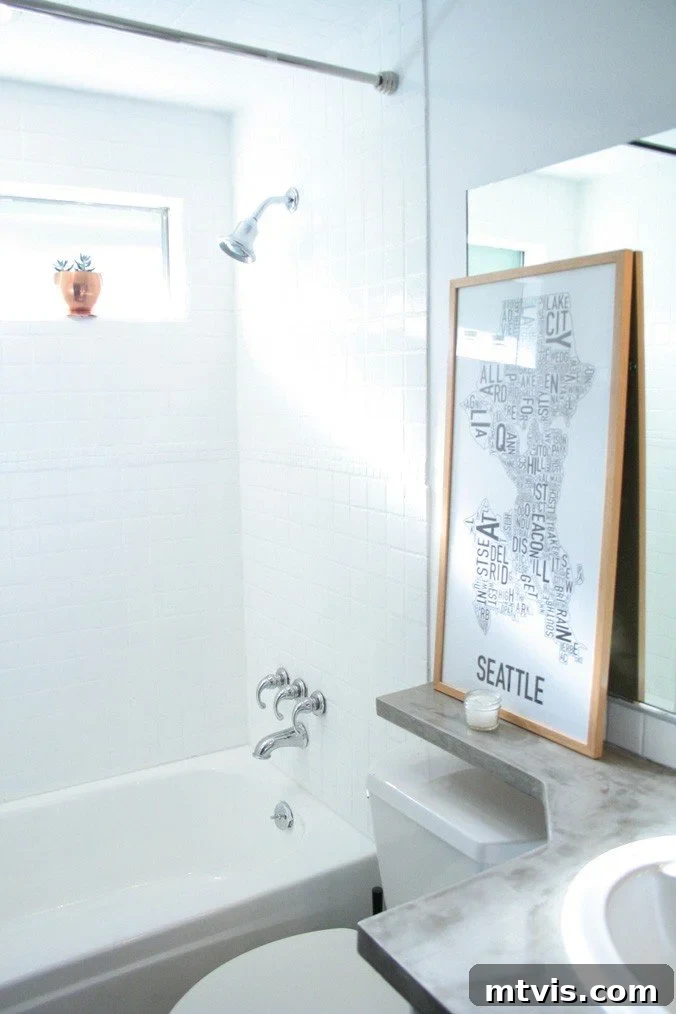
Transform Your Bathroom: A Step-by-Step Guide to Painting Shower Tiles for a Modern Look
Do you look at your outdated shower tiles and dream of a fresh, modern bathroom without the hassle and expense of a full renovation? Believe it or not, transforming your shower doesn’t require smashing tiles or breaking the bank. With the right technique and specialized products, you can paint your shower tiles to achieve stunning, long-lasting results that will make your bathroom feel brand new. This comprehensive guide will walk you through every step, ensuring you get a beautiful finish that stands the test of time.
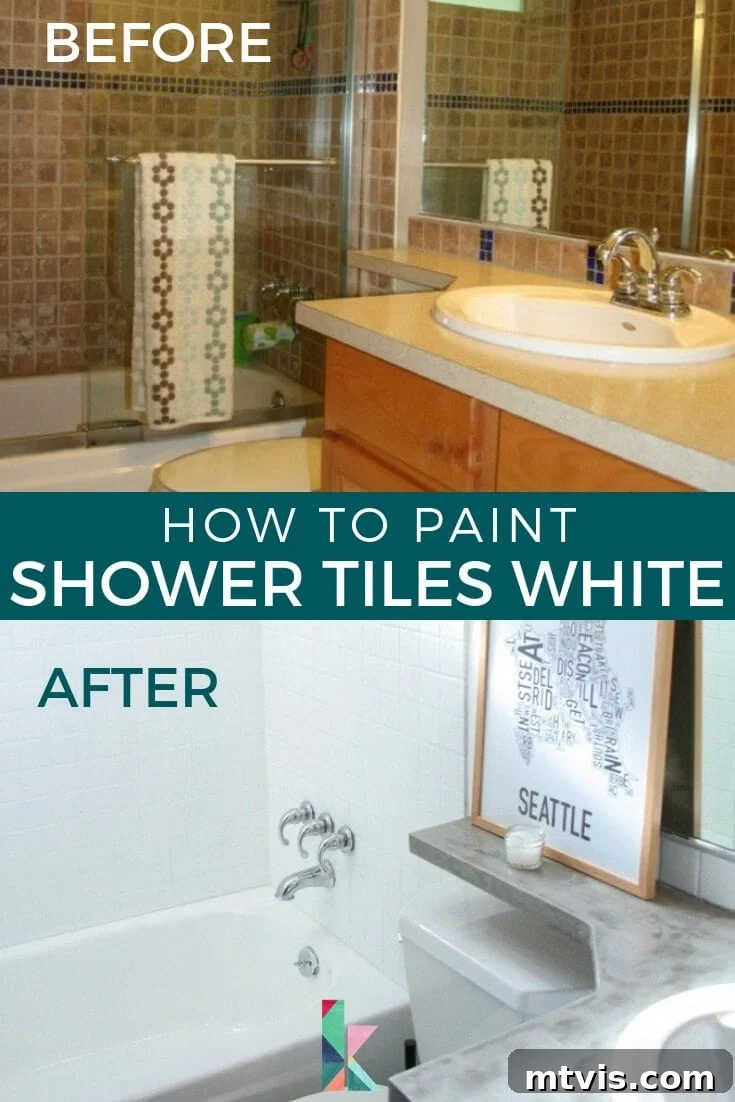
Table of Contents
Toggle
This remarkable transformation was originally shared by Karisa from Petite Modern Life, offering a real-world testament to the power of DIY ingenuity.
The Allure of Painted Shower Tiles: A Budget-Friendly Bathroom Makeover
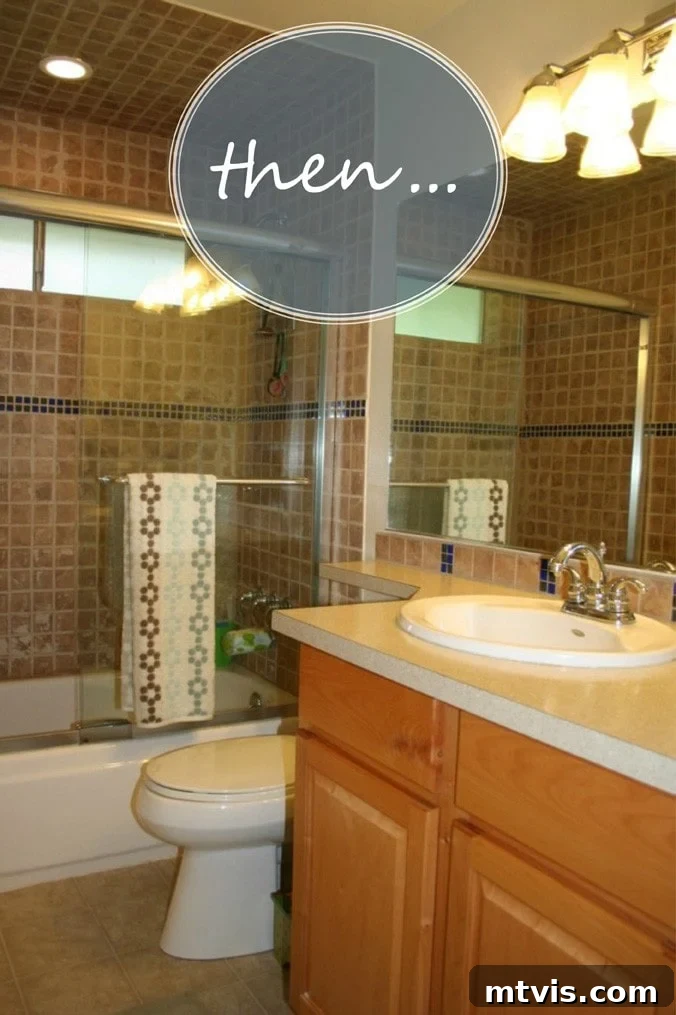
The quest for a shiny, bright bathroom is a common dream for many homeowners. Often, outdated shower tiles can be the biggest culprit making a space feel drab and tired. While the idea of a full bathroom renovation can be daunting due to the high costs, extensive mess, and prolonged disruption, painting your shower tiles offers an innovative and accessible alternative. Imagine transforming dull, dated tiles into a pristine, modern surface with just a few days of dedicated effort and a fraction of the cost of traditional remodeling. This project isn’t just about saving money; it’s about reclaiming your bathroom’s aesthetic potential with a surprisingly durable and visually impactful solution.
Why Choose Tile Paint Over Replacement?
When faced with a less-than-ideal guest bathroom, Karisa, like many of us, considered several options for an update:
1. Full Demolition and Re-tiling: This is the most traditional route, promising brand-new tiles. However, it comes with a hefty price tag, weeks of messy demolition, potential damage to waterproofing, and the need for skilled labor. The disruption to daily life can be significant, making it an impractical choice for many budget-conscious DIYers.
2. Replacing Only Accent Tiles: A less drastic approach, this involves removing only specific decorative tiles to introduce a brighter element. While it reduces some of the mess and cost, the overall impact might be limited, and you’re still dealing with grout removal and reapplication.
3. Painting Over the Tiles: Initially, this might seem like a risky idea, but with specialized products, it’s a game-changer. This option stood out as the least messy and most cost-effective. The key to its success lies in finding a product specifically designed for this purpose, such as the Rust-Oleum Tub And Tile Refinishing 2-Part Kit, White. This particular kit consistently garners positive reviews for its durability and ease of application, making it a reliable choice for transforming ceramic surfaces in wet environments. At a fraction of the cost of new tiles, it provides an opportunity for a dramatic visual upgrade without the typical renovation headaches.
This post contains some affiliate links. Click here to read my full disclosure policy.
Essential Materials for a Flawless Tile Paint Job
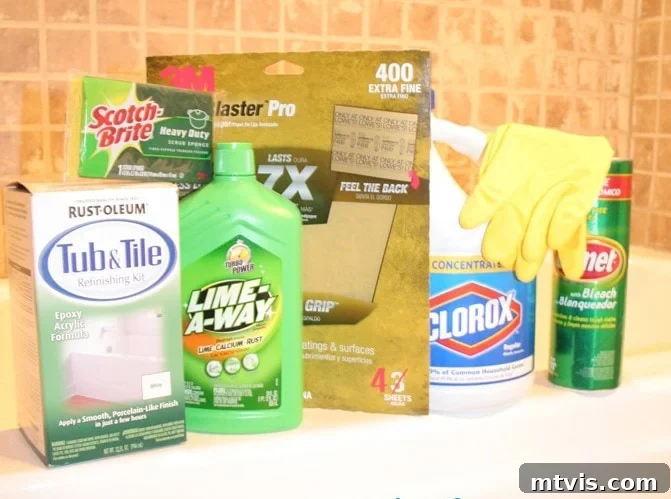
Achieving a professional-looking, durable finish requires the right tools and materials. Don’t skimp on quality, especially when it comes to safety equipment and cleaning supplies. Here’s what you’ll need to successfully paint your shower tiles:
- Rust-Oleum Tub And Tile Refinishing 2-Part Kit, White: This is the star of the show. A two-part epoxy acrylic paint specifically designed for ceramic, porcelain, and fiberglass surfaces. Its durability and waterproof properties are crucial for shower applications. You’ll likely need multiple kits depending on the size of your shower.
- Utility knife / X-Acto knife: Essential for precisely cutting and scoring old caulk and glue, ensuring clean removal without damaging the tiles.
- Flathead screwdriver: Useful for prying off stubborn caulk or glue remnants, especially in tight corners.
- 400-grit sandpaper: Not just any sandpaper; this fine grit is perfect for lightly scuffing the tile surface to create a microscopic texture. This mechanical etching is vital for the paint to adhere properly.
- Fan: Crucial for ventilation during and after painting, helping to dissipate fumes and accelerate drying times. Consider a powerful exhaust fan or a box fan directed out a window.
- Multipurpose Respirator: A non-negotiable safety item. The fumes from the epoxy paint and strong cleaners are potent and potentially harmful. Ensure it’s rated for organic vapors.
- Cleaning gloves + extra: Protect your hands from harsh chemicals and paint. Have several pairs on hand as they may get damaged or covered in paint.
- Scotch-Brite heavy-duty sponge: For vigorous scrubbing during the cleaning phase. Its abrasive surface helps remove stubborn soap scum and grime.
- Lime-A-Way: Specifically targets and dissolves hard water stains and mineral deposits, leaving a perfectly clean surface.
- Bleach: Essential for killing mold, mildew, and bacteria that might be lurking in grout lines or on tile surfaces.
- Comet with bleach powder: An abrasive cleaner that helps scrub away embedded dirt, soap scum, and prepares the surface for painting.
- Small high-density foam paint roller and paintbrush: High-density foam rollers minimize stippling and create a smooth finish. Use a good quality brush for cutting in edges and working on grout lines. Since this paint is very adhesive and difficult to clean from tools, it’s wise to use inexpensive brushes and have extra rollers available.
- Small paint tray: For mixing and holding the paint.
Step-by-Step Guide to Painting Your Shower Tiles White
Time needed: 2 days (active work + drying/curing time)
Transform your outdated shower tiles into a pristine, white haven with this detailed, step-by-step guide. Proper preparation and application are key to a durable and beautiful finish!
- 1. Preparation is Key: Removing Old Caulk & Glue
The first critical step is to thoroughly remove any existing caulk, silicone, or adhesive that is touching the tiles you intend to paint. This includes around the shower pan, corners, and where the tiles meet other surfaces. We decided to remove our entire glass shower door, planning to use a curtain instead, which meant a significant amount of old glue needed to be meticulously scraped off the walls. Using an X-Acto knife or utility knife to score the caulk, followed by a flathead screwdriver (or even a hammer with the screwdriver for stubborn areas), meticulously peel and scrape every bit away. A clean, smooth surface is absolutely vital for the new paint to adhere properly and create a seamless, professional seal. This stage can be surprisingly time-consuming and physically demanding, so consider tackling it a day in advance if possible. This is also an opportune moment to address any minor cracks in existing tiles or crumbling grout lines; repair them now for a flawless foundation.
- 2. Deep Cleaning for Optimal Adhesion
This is perhaps the most important phase for the longevity of your painted tiles. The paint will only adhere well to a perfectly clean, scuffed surface. Follow the paint kit’s instructions for surface preparation, as they often specify certain cleaners. Due to the tough chemicals involved, always don your multipurpose respirator and cleaning gloves, and ensure your fan is running before you begin these steps. Proper ventilation is paramount.
- Vacuum: Start by vacuuming the entire shower area to remove any loose dust, hairs, or debris. Rinse the surface afterward.
- Bleach Treatment: Apply bleach liberally across all tile surfaces. Scrub thoroughly with a heavy-duty sponge to kill mold, mildew, and sanitize. Allow it to sit briefly, then rinse extensively. Using a garden hose pulled through a window can be incredibly effective for a complete rinse, reaching every nook and cranny, including ceiling tiles if you’re painting them.
- Comet Scrub: Next, spread Comet with bleach powder across the tiles. This abrasive cleaner will tackle soap scum, body oils, and embedded grime. Scrub vigorously, then rinse thoroughly until no residue remains.
- Lime-A-Way Application: Finally, apply Lime-A-Way to remove any hard water stains and mineral deposits. Let it sit for the recommended 5 minutes, then scrub and rinse meticulously. The goal is an absolutely pristine, scuffed surface. After these intensive cleaning steps, lightly scuff all tile surfaces with 400-grit sandpaper. This creates a fine texture that the paint can grip onto, significantly improving adhesion.
- 3. Ensuring Complete Dryness
After the rigorous cleaning and rinsing, it is absolutely crucial that your tiles are bone dry before painting. Any residual moisture will compromise the paint’s adhesion and lead to peeling or bubbling down the line. Allow your tile to air dry for a minimum of 90 minutes, or even longer if the humidity is high. Using a fan directed at the shower will help accelerate this process, but resist the urge to rush. You can gently wipe down surfaces with a clean, lint-free cloth to remove any remaining water droplets, but ensure the cloth itself is not introducing moisture.
- 4. Critical Ventilation & Safety Measures
The fumes from the refinishing kit are extremely strong and potentially hazardous. Proper ventilation is not just a suggestion; it is a critical safety measure. Ensure you have the best possible airflow. Ideally, set up a fan to exhaust air *out* of an open window, preventing fumes from circulating into the rest of your home. If you must enter the bathroom during application or drying, your multipurpose respirator should be worn constantly and correctly. Even a brief removal can expose you to potent fumes that can cause dizziness or discomfort. Consider the project timing carefully; some individuals prefer to do this just before going on vacation to allow maximum ventilation and curing time without exposure. While the strong smell will linger for a few days (often 3-5 days), keeping the bathroom door shut and fans running continuously will significantly mitigate the issue for the rest of your home.
- 5. Mixing Your Refinishing Kit
With your gloves and respirator firmly in place, it’s time to prepare the paint. The Rust-Oleum kit typically consists of two parts: an activator and a base. Shake both cans vigorously to ensure the components are well-mixed individually. Then, carefully pour the entire contents of the activator can into the base can, or mix according to the specified ratios if you’re only using a portion. Stir thoroughly for several minutes until the mixture is uniform. At this stage, the paint may appear surprisingly watery, but rest assured, it transforms into a durable, glue-like coating upon application. Be mindful of the “pot life” – once mixed, this type of epoxy paint has a limited working time (typically 4-6 hours) before it begins to harden and become unusable. Only mix what you can reasonably apply within that window.
- 6. Mastering the Art of Painting
Now for the transformative part! Start by using a high-quality paintbrush to meticulously “cut in” around the edges, corners, and especially the grout lines. The grout can be tricky to cover evenly, so take your time to work the paint into all crevices. For the broader tile surfaces, use your small high-density foam roller. Apply the paint in thin, even coats, moving in one consistent direction to minimize roller marks. It’s crucial to “feather” your edges as you go, meaning to apply lighter pressure at the end of each stroke to blend it seamlessly with the next, preventing harsh lines. This paint dries quickly, so work efficiently in small sections. If you notice any drips or runs, address them immediately by gently brushing or rolling them smooth before the paint sets. Don’t worry if the first coat doesn’t provide full coverage; subsequent coats will build opacity.
- 7. The Curing Process: Drying & Recoating
Allow the first coat to dry for approximately 2 hours, or as directed by the product instructions. During this time, wrap your paintbrush and roller securely in plastic wrap to prevent them from drying out if you plan to use them for subsequent coats. After the initial drying period, apply your second coat using the same meticulous technique. For the third coat, the manufacturer typically recommends a longer waiting period, often 24 hours, to allow for more complete drying and hardening of the previous layers. However, remember the mixed paint’s pot life; if you didn’t mix an entire kit, ensure you’re using fresh batches for later coats if necessary. For our project, we found that 3 coats, plus a final touch-up session, were needed to completely obscure the original tile color and achieve a solid, opaque white finish. We also realized our tub was originally a biscuit color, so we purchased another kit and applied two coats to the tub for a uniform, bright white appearance.
That’s it! Just look at how much painting my shower tiles transformed our bathroom!
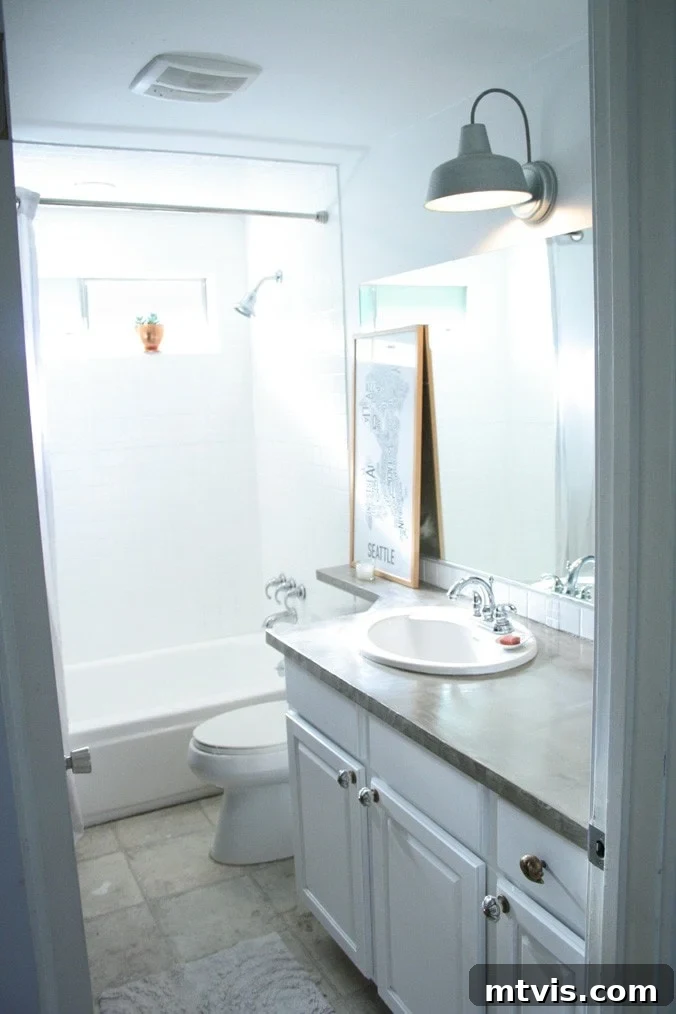
Caring for Your Newly Painted Shower Tiles
Once your shower tiles are painted, the transformation is evident, but the work isn’t quite finished. Proper care and patience during the curing process are essential to ensure the longevity and durability of your new finish. While the paint may feel dry to the touch within hours, it typically takes several days (usually 3 to 7, depending on the product and environmental conditions) for the epoxy to fully cure and reach its maximum hardness and water resistance. During this crucial curing period, avoid using the shower or allowing any water contact with the newly painted surfaces. Premature exposure to moisture can lead to bubbling, peeling, or a compromised finish.
Once fully cured, caring for your painted shower tiles is relatively straightforward. To maintain their pristine appearance and prevent damage, always use mild, non-abrasive cleaners. Harsh chemicals, scouring powders, abrasive pads, or stiff brushes can scratch, dull, or even remove the painted finish. Opt for soft cloths or sponges and gentle bathroom cleaners specifically designed for refinished surfaces. Regular cleaning will prevent soap scum and hard water buildup, which can be tougher to remove later. With proper application and consistent, gentle care, your newly painted shower tiles can remain beautiful and fresh for years to come, truly proving the lasting impact of this budget-friendly DIY project.
Common Questions About Painting Shower Tiles (FAQs)
Painting shower tiles is a popular DIY project, but it often comes with a few common questions. Here are answers to some frequently asked questions to help you feel more confident:
Q: Is painted tile really durable in a shower environment?
A: Yes, when using a high-quality, specialized two-part epoxy kit like Rust-Oleum Tub and Tile Refinishing Kit, and following all preparation and application instructions meticulously, the finish is incredibly durable and designed to withstand the wet, humid conditions of a shower. The key is thorough cleaning, proper surface etching (sanding), and allowing adequate cure time.
Q: Can I paint shower floor tiles?
A: While the paint is durable, painting shower floor tiles, especially in high-traffic areas, is generally not recommended due to the constant friction and standing water. The finish on floor tiles may wear down faster than on wall tiles. If you do decide to paint floor tiles, ensure excellent preparation and be prepared for potential touch-ups.
Q: What if my tiles are textured? Can they be painted?
A: Yes, textured tiles can be painted. However, you might find that textured surfaces require more paint to achieve full, even coverage, and you’ll need to use a brush more often to ensure paint gets into all the grooves and irregularities. The final finish will retain the original texture of the tile.
Q: How long does the painted finish typically last?
A: With proper preparation, application, and ongoing gentle care, a painted tile finish can last for many years, often 5-10 years or even longer. Avoiding harsh abrasive cleaners and maintaining good ventilation in the bathroom will help extend its lifespan.
Q: Is painted tile prone to chipping or peeling?
A: Chipping or peeling typically occurs due to inadequate surface preparation (e.g., not cleaning thoroughly, not scuffing the surface), improper mixing of the epoxy, or not allowing sufficient cure time before exposure to water. If the steps are followed correctly, the paint forms a strong bond that resists chipping and peeling.
Q: What if I want to change the color again in the future?
A: You can generally repaint over the existing refinished surface using the same type of epoxy paint, provided the surface is still in good condition. For significant color changes or if the surface is damaged, you might need to lightly sand it down again before reapplying.
If you love this project, be sure to pin it so that you can refer back to it later 🙂
Next on the list for our home are the floors! We’re planning to go with a sophisticated dark grey rectangle tile. I cannot wait to see this bathroom’s complete transformation! I hope you’re inspired to tackle your own dated or “just not right” bathroom too!
If you liked this post, you’ll love the other ones on my blog, Petite Modern Life!
Isn’t it amazing what a difference painting the shower tiles made in Karisa’s bathroom?! We hope you loved her guest post and found it incredibly inspiring for your own home projects.
More Budget-Friendly Bathroom Renovation Ideas
- The Easy Way to Update Bathroom Tile Without Replacing It!
- Affordable Primary Bathroom Remodel REVEAL
- Attley’s Budget-Friendly Bathroom Makeover REVEAL
- Avery’s Budget-Friendly Bathroom Makeover REVEAL
Wondering how I approach transforming rooms and spaces in our home? Check out Designer in a Binder®.
And if you want exclusive content and behind-the-scenes sneak peeks, be sure to subscribe to our newsletter today to stay updated on all our latest DIY projects and design tips before you head out!