
Embrace a Clutter-Free Life: Your Comprehensive Guide to Going Paperless the Easy Way
Transforming your home into a sanctuary of calm often begins with tackling one of the most pervasive forms of clutter: paper. Despite our increasingly digital world, paper still seems to find its way into every corner of our lives – from endless junk mail and utility bills to school forms, work documents, and countless receipts. This constant influx can quickly lead to overwhelming stacks, disorganized piles, and the frustrating feeling of drowning in paperwork.
If you’re tired of the paper shuffle and dream of a more streamlined, efficient, and clutter-free existence, then embracing a paperless lifestyle is your answer. While the idea of “going paperless” might sound daunting, it’s far simpler than you imagine. This comprehensive guide will equip you with effective strategies to significantly reduce your paper clutter, transition to secure digital storage, and enjoy easy access to all your important documents, anytime, anywhere. Get ready to reclaim your space and your peace of mind!
This post contains affiliate links for your convenience. Click here for my full disclosure policy.
Table of Contents
Toggle
What Does It Mean to “Go Paperless”?
The term “going paperless” can sometimes conjure an image of an utterly paper-free existence, which, for most households, feels overwhelming and unattainable. In reality, going paperless isn’t about eradicating every single piece of paper from your home. Instead, it’s a strategic shift towards a digital-first approach for managing your important documents and information. It means prioritizing digital storage and organization for the vast majority of your paperwork, significantly reducing the need for physical copies.
This lifestyle embraces technology to create a secure, accessible, and searchable digital filing system. Imagine needing a child’s vaccination record, an important receipt, or a household bill. Instead of sifting through overflowing file cabinets or disorganized stacks, you can instantly pull up the document on your computer or even your smartphone. It’s about creating efficiency, saving space, and ensuring your vital information is always at your fingertips, safely stored and easily retrievable, without the physical clutter.
How to Reduce Your Paper Clutter
Reducing paper clutter starts with changing your habits and establishing a clear system for handling paper as it enters your home. By being intentional about where paper goes and how it’s processed, you can stop piles from forming before they even begin.
Designate a Spot for Your Paper
The first and most crucial step in managing paper clutter is to create a single, dedicated home for all incoming paper. This isn’t just about having a place; it’s about having a *visible* place. Tucking papers away in a drawer or a file cabinet out of sight often leads to them being forgotten and accumulating unaddressed. A visible spot serves as a constant reminder that these papers need to be processed.
This designated spot could be a simple stack on a counter, a stylish letter tray like the DIY desk organizer trays I made years ago, or a decorative basket. The key is consistency. Make it a habit for every piece of paper that enters your home – mail, school notices, receipts – to go directly to this one spot. Initially, it might feel like an adjustment, but by centralizing your paper, you gain control and eliminate those scattered piles that tend to pop up everywhere.

Set Up a Family Command Center
A family command center is an absolute game-changer for busy households and is integral to a paperless strategy. It serves as the organizational hub for your daily life, and for managing paper that needs attention. Without one, the sheer volume of information can easily lead to chaos and missed deadlines.
Our command center, strategically located in our kitchen, acts as a “check-in” and “check-out” point for everyone in the family. It’s the central sorting station for any paperwork that crosses our threshold. Here, we have clearly labeled sections: one for items to shred, another for bills to pay, a spot for records to file digitally, and a tray for receipts to scan. It’s also where essentials like car keys are always hung, preventing those frantic searches just before heading out the door. The consistent use of this system ensures that everything has a home and nothing important gets lost in the shuffle.
Setting up a family command center is straightforward, but its effectiveness hinges on daily commitment. Make it a non-negotiable routine for everyone to use it. Even if one family member initially struggles, persistent encouragement and making the system as user-friendly as possible will eventually turn it into a collective habit. This consistency eliminates stress, keeps everyone informed, and dramatically reduces paper accumulation.
For context, in our previous home, we utilized a Pottery Barn Daily System in black, which we’ve had since 2006. This system has been instrumental in keeping us organized and sorting paper long before we even had children. We’ve since moved and reinstalled it in our new house, where it’s conveniently located in the hallway area between the garage and the mudroom, just off the kitchen.

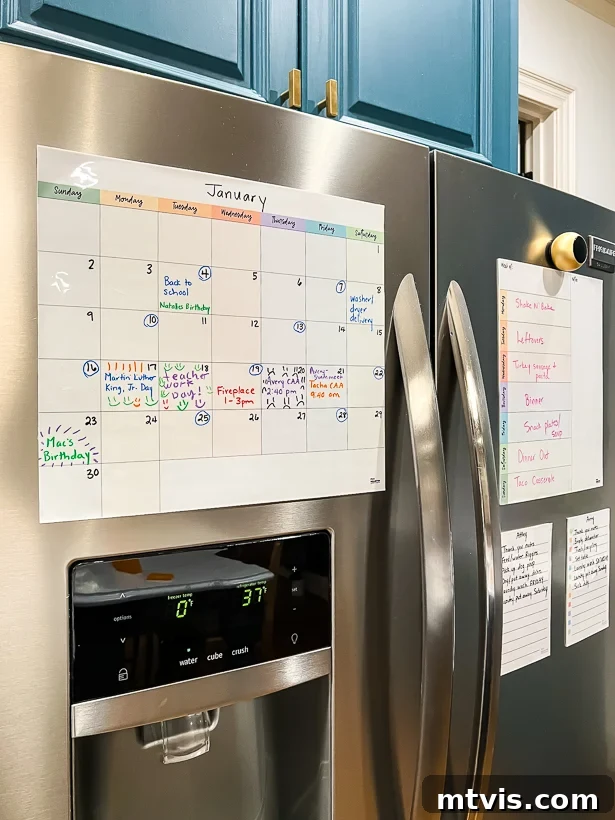
Additionally, we’ve found MC Squares Reusable White Boards to be an incredible asset. These innovative boards adhere to any shiny surface – cabinets, mirrors, refrigerators – and come in a vast array of options. I raved about them on Instagram, and they quickly became a favorite. They’re perfect for dynamic information like to-do lists, shopping lists, meal planning, and chore charts. We use wet or dry-erase markers (one is included with a bundle), and they are effortlessly cleanable. When any scheduling-related paper arrives – permission slips, party invitations, swim meet details – we immediately transfer the key dates to our dry-erase calendar and then discard the physical paper. This simple step eliminates a huge category of transient paper clutter.
Deal With Your Daily Paper
The secret to staying on top of paper clutter is to process it daily. Don’t let it sit and accumulate. A few minutes each day is far more effective than an overwhelming session once a week or month.
Daily Mail & Paper Sorting
Every day, as mail arrives or papers come home from school, we immediately sort them into three distinct categories: Keep, Trash, and Shred. This systematic approach ensures that paper is handled promptly and appropriately.
- Trash/Recycle: Anything that is clearly junk mail, expired coupons, old flyers, or unnecessary notifications gets immediately tossed into the recycling bin. Don’t let it even enter your home beyond the initial sorting point.
- Shred: Any documents containing personal identifiable information (PII) such as account numbers, addresses, names, or other sensitive details, are added to our shred bin. This includes old bills (once paid and digitally filed), credit card offers, bank statements, or anything that could be used for identity theft. We commit a few minutes to shredding when the bin is full, rather than letting a pile of shreddable documents grow unwieldy.
- Keep: This category is reserved for “action required” papers. These are items that demand further attention before they can be filed or discarded. Examples include bills that need to be paid, forms that need to be filled out and returned (like school permission slips), invitations requiring an RSVP, or documents that need to be reviewed.
For these “action required” papers, it’s crucial to have a designated “action tray” within your command center or on your desk. This ensures they don’t get lost and serve as a visual reminder. The key rule: paper only stays in this tray until the required action is completed. Once a bill is paid, it’s scanned and filed digitally, then shredded. Once a form is filled out and returned, it’s scanned (if a record is needed) and then disposed of. Resist the urge to keep paper copies of bills you’ve already paid online – the digital record is sufficient and often more easily accessible.
For items like coupons or temporary notes that you *think* you might need, consider if they truly need to be physical. With digital tools, many coupons can be accessed via apps, and notes can be captured digitally, eliminating another source of paper clutter.
Reduce the Amount of Mail You Receive
An effective way to minimize paper clutter is to cut it off at the source. The less paper that enters your home, the less you have to manage. Start by tackling your mail.
Firstly, prioritize online bill management. Many utility companies, banks, and service providers offer the option to receive and pay bills digitally. We’ve set up many of our bills for automatic monthly payments, meaning we don’t even receive a paper statement. For the few that arrive physically (often by preference for quick review), they are paid online and then immediately shredded after payment. There’s no need to retain paper copies of paid bills when a digital record exists.
Next, wage war on junk mail. Unwanted catalogs, credit card offers, and solicitations consume space and your time. Services like PaperKarma and Catalog Choice allow you to easily opt-out of receiving unwanted mail from specific senders. You can also visit the Direct Marketing Association’s (DMA) consumer opt-out page to reduce the amount of unsolicited mail you receive. This simple proactive step can significantly reduce the daily volume of paper you need to process. Also, evaluate your magazine and newspaper subscriptions. Could you read them digitally instead? Many publications offer digital subscriptions, allowing you to enjoy the content without the physical clutter. Canceling physical subscriptions for digital alternatives is a powerful step towards going truly paperless.
How to Go Paperless With What You Can’t Just Trash or Recycle
Once you’ve managed the incoming flow of paper and established systems for daily processing, the next critical step is digitizing documents that need to be kept long-term but don’t require a physical copy. This is where technology truly shines.
All You Really Need is a Smartphone
The barrier to entry for going paperless has never been lower. In the past, digitizing documents often required an expensive, dedicated scanner. Today, the powerful camera in your smartphone is all you really need. Modern smartphone cameras, combined with the right apps, can capture high-quality scans of documents quickly and efficiently.
This capability still amazes me! We use our smartphone cameras in conjunction with apps like Evernote to scan documents directly into Evernote. This means everything from a simple receipt for a warranty claim, a multi-page tax document, a child’s school project, or even a swim meet schedule can be digitized in seconds. Your smartphone becomes your personal portable scanner, allowing you to process documents on the go and prevent them from ever piling up at home. You can even capture photos of whiteboards, handwritten notes, or business cards and integrate them into your digital system.
Learn to Use Evernote
Evernote, in my humble opinion, is one of the most indispensable apps for anyone serious about going paperless. Think of it as an intelligent, digital filing cabinet that not only stores your documents but also makes them incredibly powerful and accessible. Its secret weapon is OCR (Optical Character Recognition) technology. This means that when you scan a document into Evernote, the app actually *reads* the text within the image, making every word on that document searchable. Mind-blowing, right?
Years ago, we started using Evernote primarily for receipts, tax documents, and various contracts or insurance policies. But its capabilities extend far beyond that. Imagine snapping a photo of a coupon you might use, saving it to Evernote, and then immediately discarding the physical paper. No more coupon binders! You can also save web pages (perfect for recipes or articles you want to reference later), voice memos, and even manage shopping lists within the app. The versatility of Evernote makes it a central hub for all kinds of information, not just scanned paper.
The best part is that Evernote offers a FREE personal version that meets 99% of most people’s needs. We used the free version for years before upgrading to a paid plan for specific business functionalities. This means you can start your paperless journey without any financial investment.
The true power of Evernote lies in its ubiquitous accessibility. With the app on our phones and computers (and a web browser version available), every important document is always at our fingertips. Need your child’s vaccination records for camp registration while you’re at the doctor’s office? No problem – a quick search for “vaccination” in Evernote will instantly pull up the document, thanks to that incredible OCR technology. This level of immediate access and organization eliminates so much stress and wasted time.
While Evernote is intuitive, there can be a slight learning curve when you first start. My friend Abby Lawson, who was my initial guide in my paperless journey, offers extensive tips for going paperless. She and her husband, Donnie, have refined their paperless system over a decade and have distilled their knowledge into an incredible course called Paperless Made Simple. This course provides a practical, step-by-step roadmap to building and utilizing your digital filing cabinet with Evernote. Integrating their straightforward workflow into your daily routine will be a total game-changer, allowing you to eliminate paper clutter effortlessly. Once you grasp the process, going paperless becomes second nature – you’ll do it without even thinking.
Even better, you can access the “getting started” lessons from the Paperless Made Simple course for free! These free introductory lessons include:
- A “Getting Started” video to outline expectations and highlight the benefits of a paperless lifestyle.
- An overview of their proven paperless workflow, demonstrating the entire process from start to finish.
- A detailed guide for setting up Evernote correctly from day one.
- A bonus gift as a thank-you for exploring the free introductory class!
A Word About Digital Security
It’s completely normal to have concerns about the security of storing important personal and financial documents digitally. However, reputable digital organization platforms like Evernote prioritize security with robust measures. Evernote, for instance, employs strong built-in security features designed to protect your data.
These features typically include encryption for both uploaded and downloaded content, ensuring your data is secure in transit and at rest. Furthermore, Evernote offers two-factor authentication (2FA), which adds an extra layer of security by requiring a second form of verification (like a code sent to your phone) in addition to your password. You can also set up a passcode specifically for the mobile app, preventing unauthorized access if your phone falls into the wrong hands. While no system is 100% impervious, digital storage with these precautions is often more secure and less vulnerable to physical threats like fire, flood, or theft than a cluttered physical filing cabinet in your home.
What to Do With Old Paper In Your House
Once you’ve implemented systems for managing new paper, it’s time to tackle the existing backlog. Most of us have old file folders, boxes, or even entire drawers stuffed with paperwork we no longer need or that could be digitized. Here’s how to approach that task strategically. DISCLAIMER: The suggestions below are general guidelines. Opinions on record retention vary, and it’s always wise to consult a financial or legal professional for specific advice regarding your personal situation.
What to Scan & Then Shred/Trash
This category includes documents that you need for a certain period (e.g., tax purposes, warranty claims) but do not require permanent physical retention. Once digitized and confirmed readable, these can be safely shredded or trashed.
Using your smartphone and an app like Evernote, this process can be surprisingly quick and efficient. Just ensure the scan is clear and legible before discarding the physical copy. Here’s a list of common documents you can scan and then get rid of:
- Paid Bills: Keep for the past year (or as advised by your accountant for tax-deductible items). Once digitized, shred.
- Important Receipts: Hold onto receipts for large purchases, warranties, or tax-deductible expenses for about a year. Scan and then shred.
- Magazine Articles, Recipes, and Inspiration: If you love a recipe or design idea from a physical source, snap a photo or scan it. Once it’s in Evernote, the paper is obsolete.
- Medical Receipts and Claims: Keep for at least a year after the claim is processed, or as long as your insurance company advises. Digitize for easy access.
- Car Repair Documentation and Receipts: Useful for maintenance records or potential resale. Keep digitally for the life of the car.
- School Calendars & Notices: These are often temporary. Scan important dates to your digital calendar or Evernote, then discard.
- Insurance Documentation: Policies, statements, and communication. Keep current documents digitally. Shred old ones.
- Dependent Care Documentation: Records related to childcare or elder care expenses. Keep for tax purposes, then digitize and shred.
- 401(k)/Investment Statements: Keep annual statements for the past year. Monthly or quarterly statements can often be accessed online. Scan annual summaries.
- Bank Statements: Review monthly statements, then scan and keep annual summaries for a year. Most banks offer online access to historical statements.
- Immunization Records: Crucial for school, camp, or medical needs. Scan for easy digital access; you may also want a physical copy.
What to Scan & Keep in a Fire-proof Box and/or Safe Deposit Box
While the goal is to go mostly paperless, some documents are so critical that they warrant keeping physical copies in a secure, fire-proof location (like a home safe or a bank safe deposit box) in addition to digital scans. These are typically documents that are difficult or expensive to replace, or serve as proof of identity/ownership.
For these items, you should still scan them into your digital system (like Evernote) for easy access. This way, if you need a reference, you don’t have to retrieve the physical document from a secure location. However, the original physical document should be kept in one of the following secure places:
- Birth and Death Certificates: Essential for identity, legal proof, and family history.
- Social Security Cards: Vital for identification and employment.
- ID Cards and Passports: While you carry your ID, the physical passport should be secure.
- Marriage Licenses and Divorce Decrees: Legal proof of marital status changes.
- Annual IRA or Other Investment Contribution Statements, Pension/Profit-Sharing Informational Returns: Long-term records for retirement and investment tracking.
- Business Licenses and Legal Documents: Articles of incorporation, permits, contracts.
- Legal Claims and Documents: Any court documents, judgments, or settlements.
- Military Discharge Papers (DD-214): Important for veteran benefits.
- Original Insurance Policies: While you can access policy details online, the original physical document can be important.
- Wills, Living Wills, and Powers of Attorney: Absolutely critical legal documents that dictate your final wishes and medical care.
- Vehicle Titles: Proof of ownership for your vehicles.
- Loan Documents: Mortgage papers, personal loan agreements, deeds of trust.
- House Deeds and Mortgage Documents: Proof of home ownership and loan agreements.
That’s it! If this whole process seems overwhelming right now, I assure you it’s not. Your initial reaction might simply be due to encountering new concepts like Evernote. I felt the same way when I first started my journey to go paperless years ago. But once you establish a routine and get into the groove, it becomes incredibly quick and painless. In fact, it’s significantly easier and more efficient than the traditional method of physically filing documents in cabinets or boxes!
Other posts you may enjoy for further organization inspiration:
- How to Organize Your Life With Work + Kids
- Learn How to Declutter Your Home: A Realistic Guide
- How to Conquer the Emotions of Decluttering
- Mind-Blowing Alexa Hacks that Make Life Easier
- 5 Organizing Mistakes That Make Your House Look Messy (and How to Fix Them)
If you’re wondering how I approach transforming rooms and spaces in our home, be sure to check out Designer in a Binder®.
And for exclusive content and behind-the-scenes sneak peeks into our latest projects and tips, don’t forget to subscribe before you leave!