Have you ever spent countless hours decorating a room in your home, only to step back and feel a profound sense of disappointment with the final outcome? It’s a common frustration that can leave you feeling like you’ve wasted both precious time and hard-earned money. If you’re eager to navigate the exciting world of interior decoration without these costly missteps, then mastering the art of creating an interior design mood board is an absolute game-changer. This simple yet powerful visual tool will not only guide your decisions but also ensure your design vision comes to life exactly as you imagined, saving you from future decorating regrets.
The beauty of creating your own interior design mood boards lies in its accessibility and ease. You might be surprised to learn that you can craft highly effective and professional-looking design boards in just a few minutes, leveraging readily available tools. Forget about needing expensive, complex software, specialized mood board creator applications, or extensive graphic design expertise. The process is far more straightforward than most people anticipate, and it is, without doubt, a pivotal step towards developing a truly cohesive and harmonious design plan for any space. As an experienced decorator, I can confidently say that I never embark on a room makeover, redesign project, or even a major renovation without first meticulously compiling a mood board. It serves as my foundational blueprint, ensuring every element aligns with the overarching aesthetic.
In this comprehensive guide, I will walk you through the entire process of how to create a mood board, focusing specifically on Canva. My recommendation for Canva stems from its unparalleled speed, simplicity, and user-friendly interface, making it the quickest and easiest way for anyone to bring their design ideas to life. What’s even better is that Canva offers a robust free version, providing a completely cost-free and intuitive platform to make stunning and effective mood boards that will transform your home decor planning.
Table of Contents
Toggle
This post contains affiliate links for your convenience, meaning I may earn a small commission if you make a purchase through my links, at no extra cost to you. Click here for my full disclosure policy.
Before we dive deep into my best tips and tricks for crafting an exceptional interior design mood board, let’s address some of the most frequently asked questions I receive on this topic. Understanding the fundamentals will equip you with the knowledge and confidence to start your own design journey.
What is an Interior Design Mood Board?
An interior design mood board, often interchangeably called a design board, inspiration board, or even a vision board, is fundamentally a powerful visual compilation. It’s a curated collection of images and elements that collectively illustrate your desired aesthetic and functional vision for a particular room or space. Think of it as a sneak peek into the future of your decor project, a visual symphony composed of all the components that will eventually come together to form your dream space.
Historically, interior designers would meticulously create physical mood boards for their clients. These tangible boards were often crafted from foam core or cork and adorned with actual paint samples, fabric swatches, wallpaper snippets, and printed images of furniture, lighting, and decorative accessories. This hands-on approach allowed clients to touch and feel the proposed elements, providing a truly immersive experience. However, with the advent of digital technology and user-friendly software, digital mood boards have largely surpassed their physical counterparts in popularity. These digital versions offer unparalleled flexibility, ease of sharing, and the ability to rapidly make changes, making them an indispensable tool in modern home decor planning.
Ultimately, a well-executed mood board resembles a sophisticated collage. It’s a dynamic visual narrative that helps you articulate and refine your thoughts on various design aspects, including textures, patterns, specific color palettes, overall color schemes, furniture styles, lighting choices, and much more. By investing time in creating a detailed design board, you gain incredible clarity about the direction of your room design. This vital step allows you to solidify your vision and make informed decisions *before* you commit any significant time, effort, or financial resources, thereby preventing costly decorating mistakes and ensuring a harmonious result.
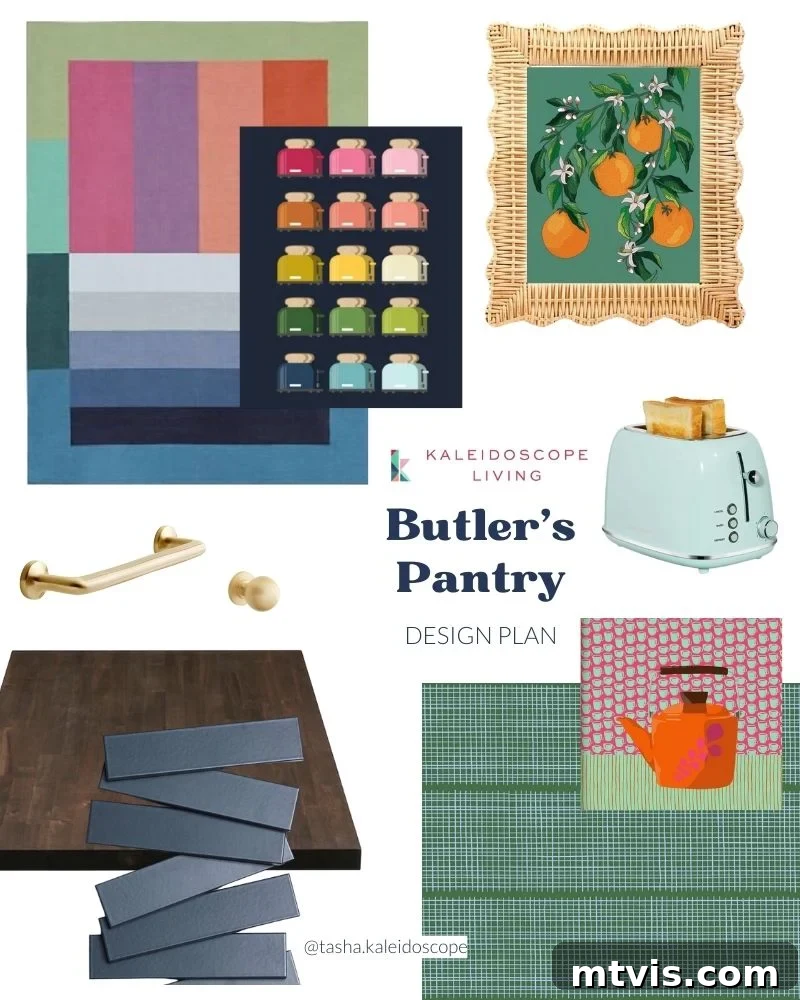
To further illustrate its effectiveness, here is an example of a mood board I recently compiled during the design phase for our butler’s pantry area. It showcases how various elements converge to form a coherent vision for a functional and beautiful space.
Why are Mood Boards Crucial for Your Home Decor Project?
My approach to designing and transforming spaces in my own home follows a very structured and specific design process. This comprehensive methodology, which I detail extensively in my eBook and workbook, Designer in a Binder, always incorporates the creation of a detailed mood board as an essential component. Its value is particularly evident when working with my husband, who, like many individuals, finds it challenging to fully visualize a design concept without first seeing all the proposed elements harmoniously arranged together.
This challenge isn’t unique to my husband; it’s a common human trait. The vast majority of people struggle to accurately picture how a space will look and feel until they have a tangible or visual design board to review. This is precisely why one of my absolute top interior design tips is to always allocate dedicated time to creating a design board for every single space you intend to decorate or renovate in your home. Skipping this critical step is, in my professional observation, one of the biggest and most frequent interior design mistakes individuals make. You can delve deeper into other common design pitfalls I frequently encounter in this insightful post.
So, if mood boards are so beneficial, why do people often bypass this crucial stage? There are typically two primary reasons: 1) A fundamental lack of understanding about what an interior design mood board truly is and the immense value it brings to a project, and/or 2) The erroneous assumption that special, expensive software and advanced graphic design skills are prerequisites for creating one. The excellent news, which I am thrilled to share, is that you can create highly effective digital design boards completely for FREE and without needing any specialized software or previous design training. This accessibility truly democratizes the design process, allowing anyone to plan their home decor with confidence and precision.
Which Program Should You Use to Create a Digital Mood Board?
While there is a wide array of programs available that can be utilized for creating a mood board, catering to various levels of expertise and project scales, it’s important to choose one that aligns with your needs. For instance, advanced design professionals might opt for sophisticated Adobe software like Photoshop or Illustrator, which offer granular control and a vast suite of tools for intricate design work. Similarly, dedicated platforms such as DesignFiles are popular among interior design professionals because they seamlessly integrate mood board creation with client management, source lists, and easy sharing capabilities. These tools are tailored for complex projects and client collaboration.
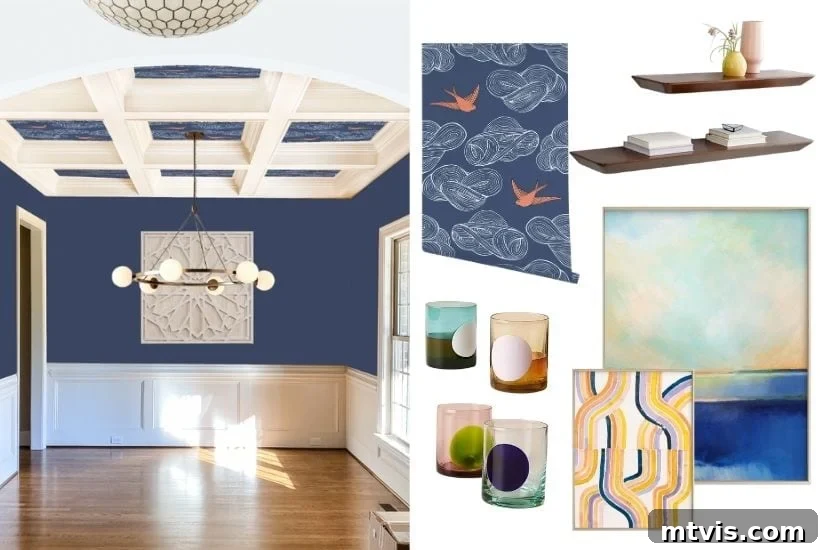
However, for the vast majority of homeowners, DIY enthusiasts, and budding decorators, I wholeheartedly recommend using Canva to create your interior design mood boards. Its intuitive interface and powerful features make it the ideal choice. All you need to do is sign up for a free account, and you’re ready to start designing. It’s incredibly straightforward. In fact, I recently created the striking mood board for my dining room using Canva just this week, demonstrating its efficiency and effectiveness even for experienced designers. Its accessibility and robust free tier make it unmatched for personal home decor projects.
Do I Need Graphic Design Skills to Make Effective Design Boards?
Absolutely not! This is one of the biggest misconceptions that deter people from attempting to create their own design boards. Let me put your mind at ease: you do not need any prior graphic design skills or experience. The beauty of modern design tools like Canva is their incredible user-friendliness, specifically engineered for individuals without a design background. I can even offer a “pinky promise” that my twin daughters were capable of creating their own delightful and coherent mood boards by the time they were just 8 years old. This anecdote perfectly illustrates just how intuitive and accessible the process can be for anyone, regardless of age or experience level. Of course, being comfortable with basic computer operations and file management will certainly help you navigate the platform and complete your mood board as efficiently as possible, but it’s far from a requirement for artistic or technical skill.
Essential First Steps Before Creating Your Mood Board
Before you even open a design program, it’s crucial to lay a solid foundation for your interior design project. Begin with introspection: take time to thoughtfully consider what you currently like and dislike about your room. How do you envision using this space? Is it a cozy sanctuary for relaxation, a vibrant hub for entertaining, or a productive home office? What mood or feeling do you want the space to evoke—perhaps calming and serene, or energizing and inspiring? Equally important, establish a clear budget early on. These initial considerations will act as your guiding principles throughout the design process.
Once you have a clear understanding of your needs and aspirations for the space, the next exciting step is to actively hunt for inspiration. Platforms like Pinterest are invaluable resources for this stage; I highly recommend creating a dedicated board for the specific room you’re working on and saving every image that captivates you. Don’t limit yourself to Pinterest; browse interior design magazines, blogs, and even real estate listings for ideas. After you’ve amassed a diverse collection of inspirational images, take the time to truly study them. Look for recurring themes, common color palettes, styles of furniture, and decorative elements that consistently draw your eye. This analytical phase is a remarkably effective way to uncover your true design preferences and tastes without overthinking or second-guessing your instincts. It reveals a subconscious pattern of what you genuinely love.
If you find yourself struggling to navigate these initial, foundational steps on your own, rest assured that I’ve got you covered. My comprehensive workbook, part of Designer in a Binder, features separate, easy-to-follow worksheets that will guide you through each of these critical stages, ensuring you build a strong and coherent vision before moving on to the visual creation of your mood board.
What Key Elements Are Needed in an Interior Design Mood Board?
With your inspiration gathered and a clear vision in mind, the practical phase of collecting materials for your design board begins. This involves either shopping around for potential new pieces you’re considering for the room or gathering high-quality photos of items you already own and plan to incorporate into the new design. The key is to have images of *everything* readily available and saved to a dedicated folder on your computer. These digital assets will be the building blocks of your visual masterpiece. Think of your mood board as a digital shopping cart and existing inventory display, allowing you to see how all items will interact before making any purchases or commitments.
Below is a comprehensive list of essential design elements that you should consider including images of on your interior design mood board. Including these diverse elements will provide a holistic view of your proposed space:
- Flooring: Whether you’re planning new hardwood, tile, or keeping existing carpets, a visual representation of your chosen flooring is crucial. If you’re not changing your existing flooring and don’t have a suitable image, you can often find excellent stock images within Canva that closely mimic its appearance and texture.
- Paint Color Swatch: A digital swatch or sample of your chosen wall color will anchor your mood board and influence all other color decisions. Consider different lighting scenarios.
- Rug(s): If incorporating area rugs, include images of their patterns, colors, and textures. Rugs significantly define zones and add warmth.
- Textiles: This category is expansive and vital for adding depth and comfort. Include images of curtains or drapes (fabric and style), throw pillows (patterns and textures), blankets or throws, upholstery swatches for furniture, and bedding if it’s a bedroom. These soft elements are key to establishing the room’s feel.
- Light Fixtures: Include images of ceiling lights, floor lamps, table lamps, and wall sconces. Lighting is not just functional; it’s a critical design element that sets the mood and highlights features.
- Furniture and/or Appliances: Essential pieces like sofas, chairs, tables, beds, bookshelves, and major appliances (if applicable, e.g., in a kitchen or laundry room mood board). Focus on scale, style, and material.
- Hardware: Details matter! Images of cabinet pulls, door handles, and curtain rod finials contribute to the overall aesthetic and feel.
- Decor and Accessories: The finishing touches! Think wall art, mirrors, vases, planters, sculptures, books, and other decorative objects. These items infuse personality and complete the look.
Step-by-Step Guide: How to Make a Mood Board Using Canva
Before you dive into the hands-on process of creating your very own mood board, I highly recommend watching the detailed video tutorial I’ve prepared for you. There’s truly nothing as beneficial as observing a live demonstration to grasp the nuances and shortcuts. Feel free to expand the video to full-screen mode for a clearer and more immersive viewing experience. Following the video, you will find comprehensive written instructions outlining each step, ensuring you have all the guidance you need.
Time needed: 15 minutes
Follow these clear and concise directions below to effortlessly create your professional-looking mood board using Canva!
- Step 1: Create or Log Into Your Free Canva Account.
Your first action is to either create a brand-new free account on the Canva website or simply sign in if you already have one. This account will be your central hub for all your design projects.
- Step 2: Select a “Canvas” or Template for Your Mood Board.
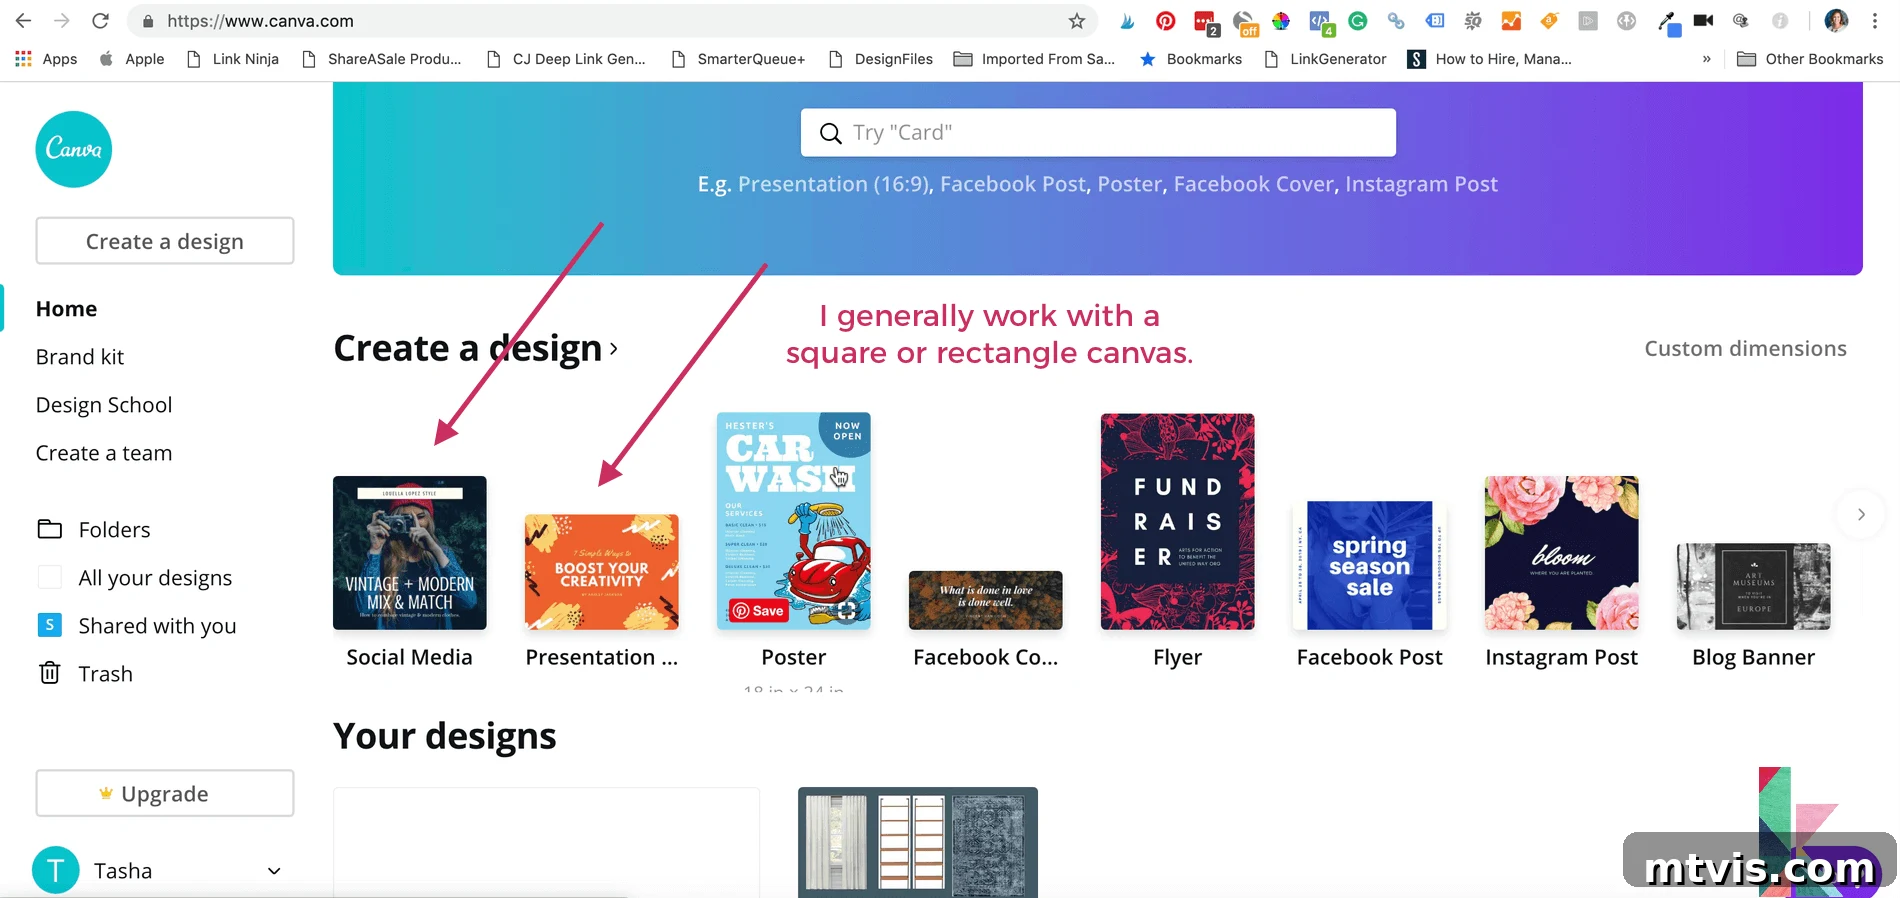
Once logged in, you’ll need to choose the appropriate canvas size for your mood board. For most interior design mood boards, I find that a square or rectangular canvas offers the most versatile layout options. However, if you plan to share your mood board on platforms like a blog or social media where vertical images perform better, you might opt for a vertical template to maximize engagement and visibility. Canva offers a wide array of dimensions to suit any purpose.

- Step 3: Organize and Save All Your Design Images.
Before uploading, ensure that all the images of the items you wish to include in your design—from furniture and fabrics to paint swatches and accessories—are neatly saved into a dedicated folder on your computer. Naming these files clearly will also significantly aid in organization and quick retrieval.
- Step 4: Upload Your Curated Images to Canva.
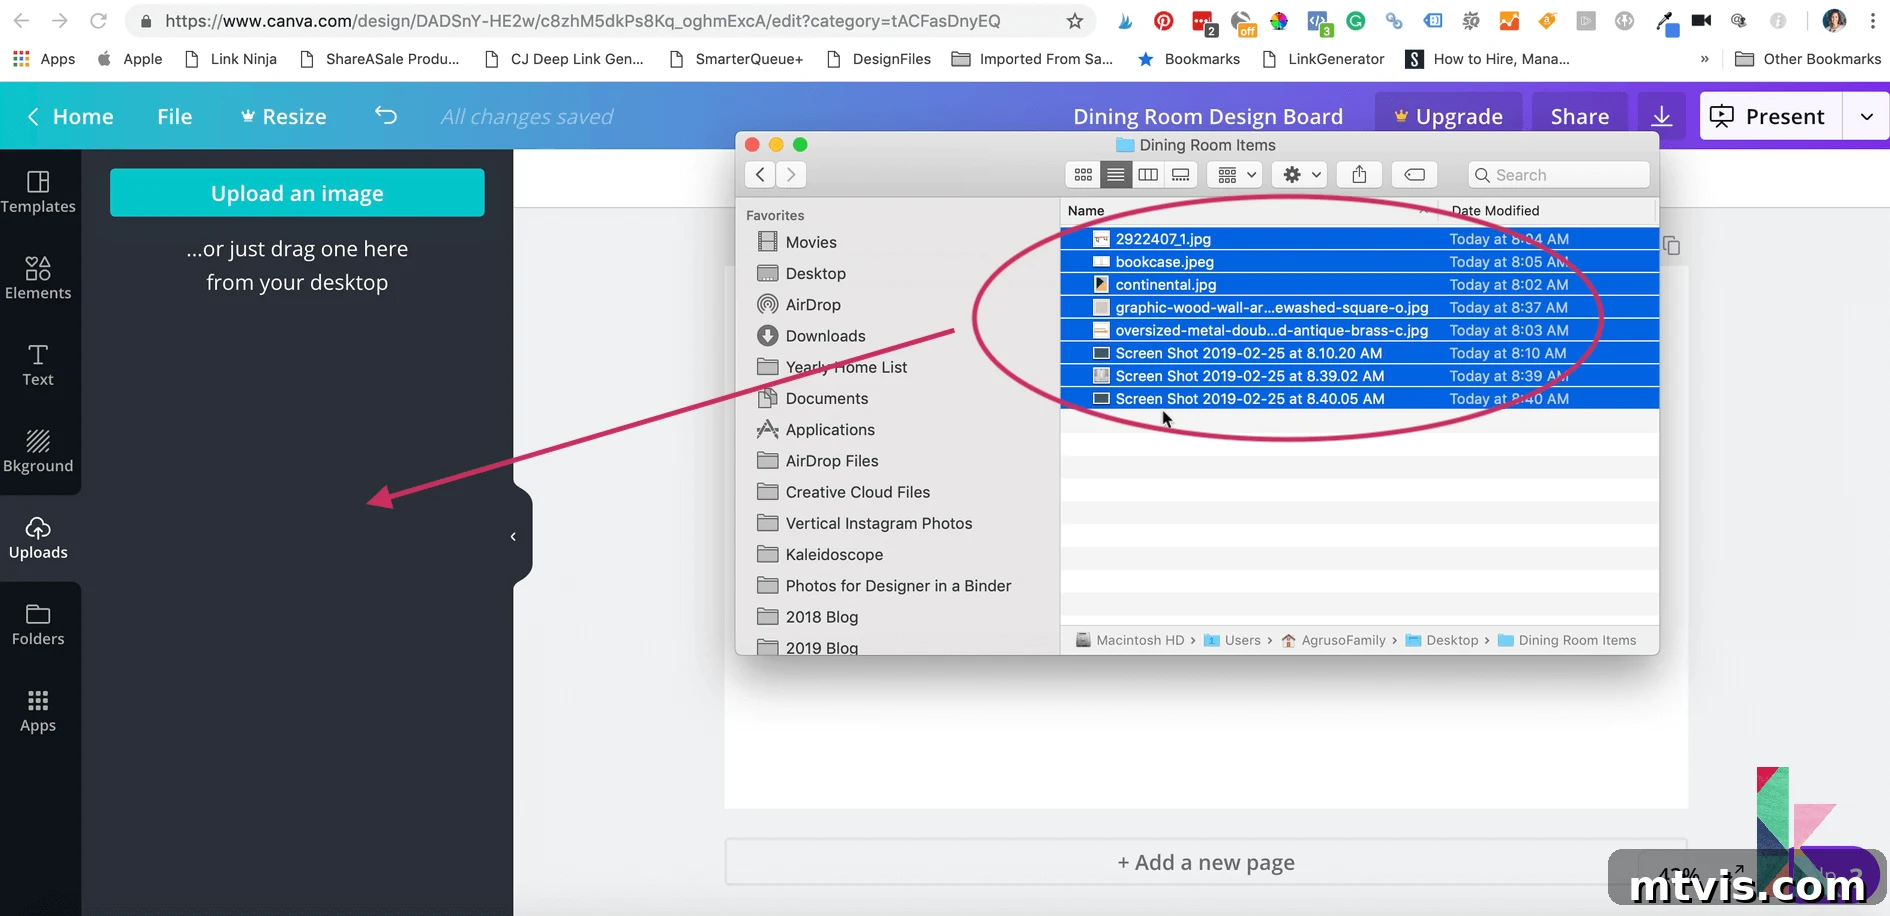
Now, it’s time to bring your images into Canva. Navigate to the “Uploads” section within Canva’s interface. From there, you can simply click and drag all your saved photos directly from your computer folder into the designated upload area. Canva will then process and store these images, making them accessible for your mood board project.
- Step 5: Artfully Place Your Images onto Your Digital Canvas.
Begin assembling your mood board by dragging and dropping each individual item from your uploaded collection onto your blank canvas, one at a time. Once an image is on the canvas, you have full control to resize it by simply clicking and dragging its corners. Additionally, make use of Canva’s intuitive crop and rotate tools to make any necessary adjustments, ensuring each element fits perfectly into your evolving design narrative.
- Step 6: Refine and Adjust Until Your Mood Board is Perfect.
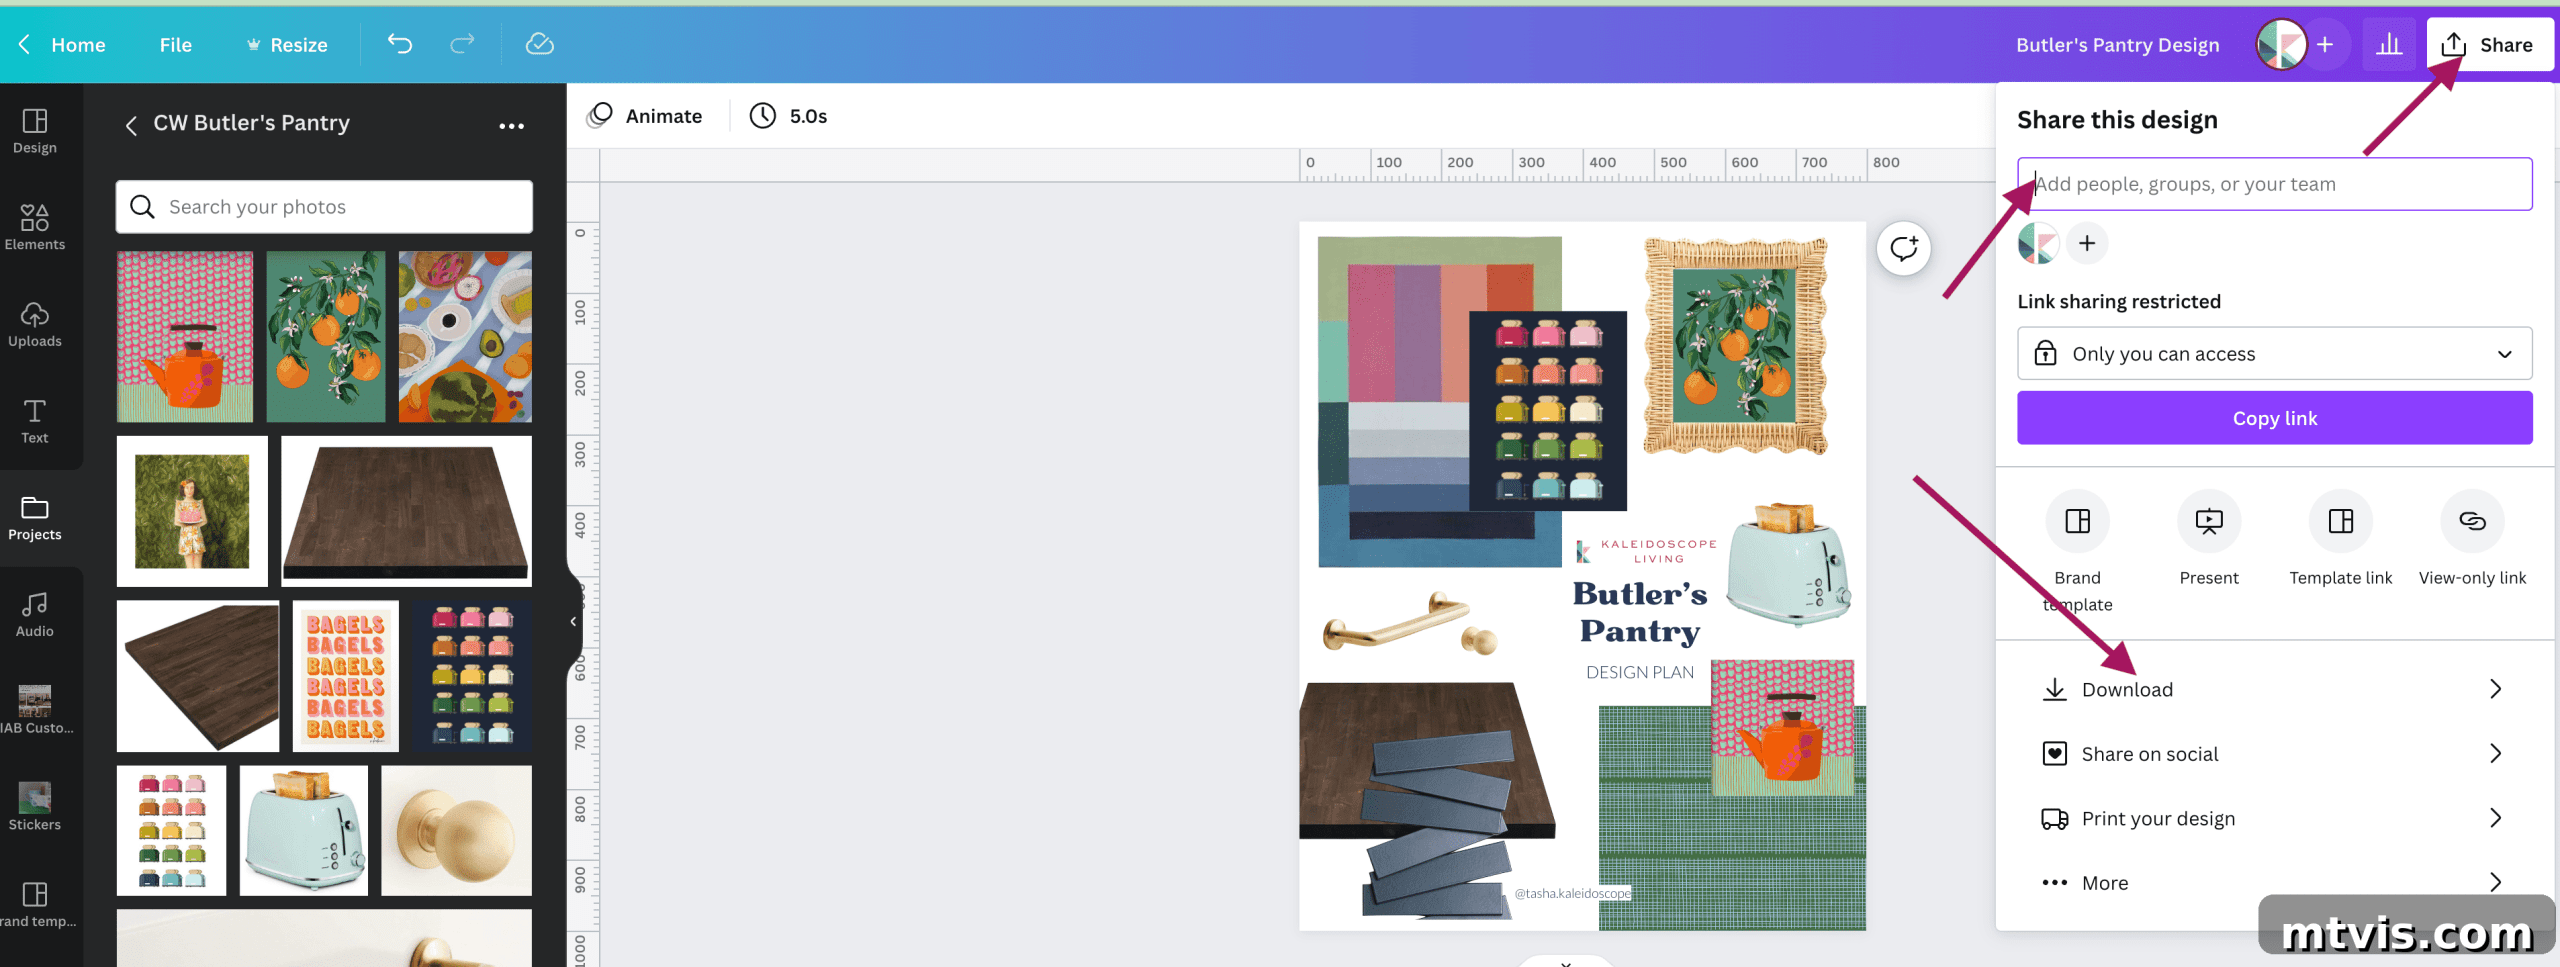
This is the creative phase where you move, resize, layer, and arrange all the elements until you are completely satisfied with the visual harmony and overall composition of your design board. Experiment with different placements to see how furniture, colors, and textures interact. Once your mood board perfectly reflects your vision, locate the “Download” button (usually found next to the “Share” button in the upper right-hand corner). Click it to save a high-quality .jpg image of your completed design board to your preferred location on your computer. Remember, your design is always saved in your Canva account, allowing you to log back in and edit it at any time.
- Step 7: Enhance Clarity by Removing Image Backgrounds.
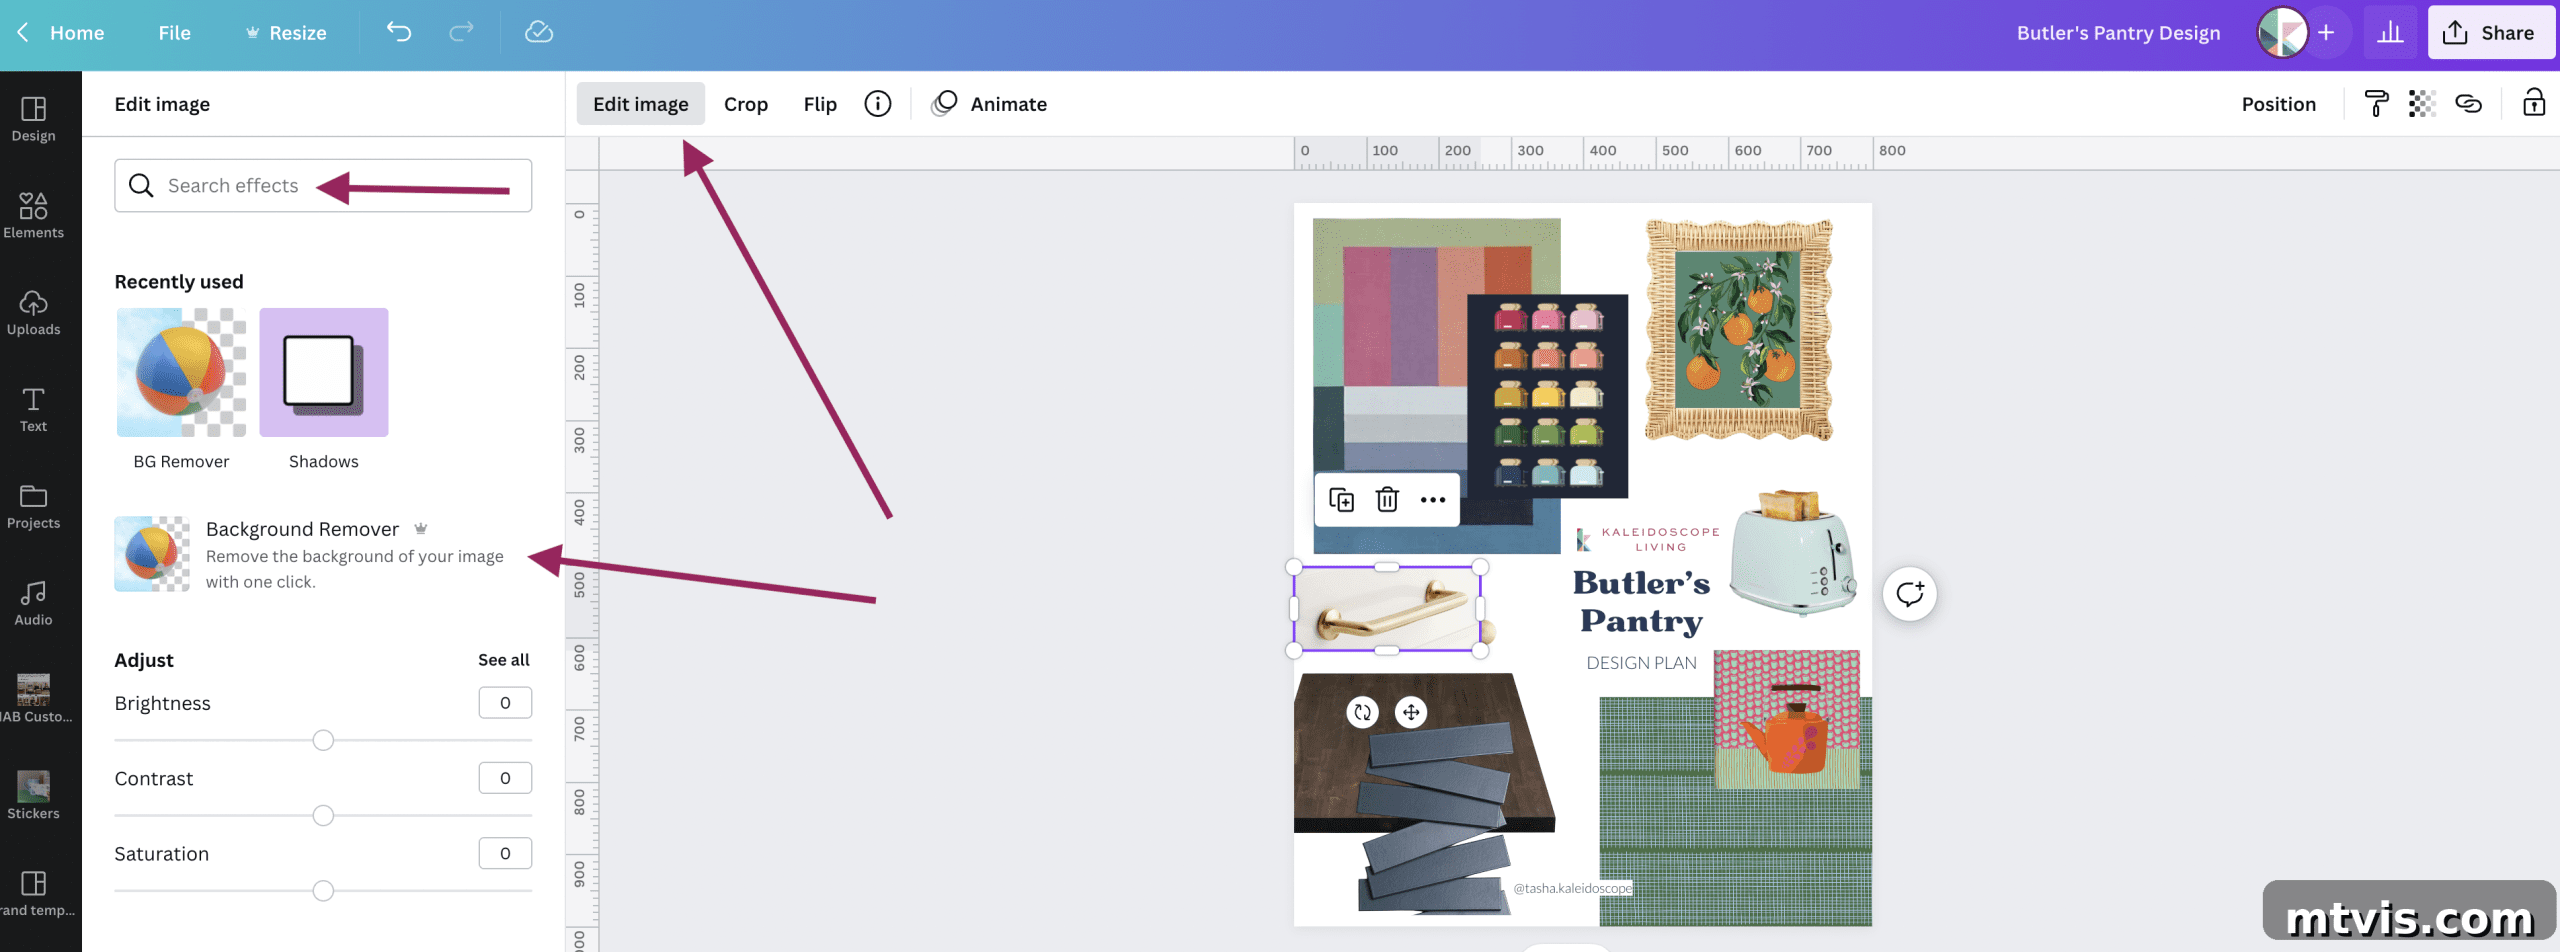
To achieve a polished and professional look for your mood board, I highly recommend removing distracting backgrounds from your product images. This allows the focus to remain solely on the design elements themselves. If you are a Canva Pro subscriber, this step is incredibly simple: select an image, click “Edit Image,” and then use the search box to find “background remover.” With a single click, Canva’s AI will efficiently remove the background, leaving you with a clean, isolated image. So easy!
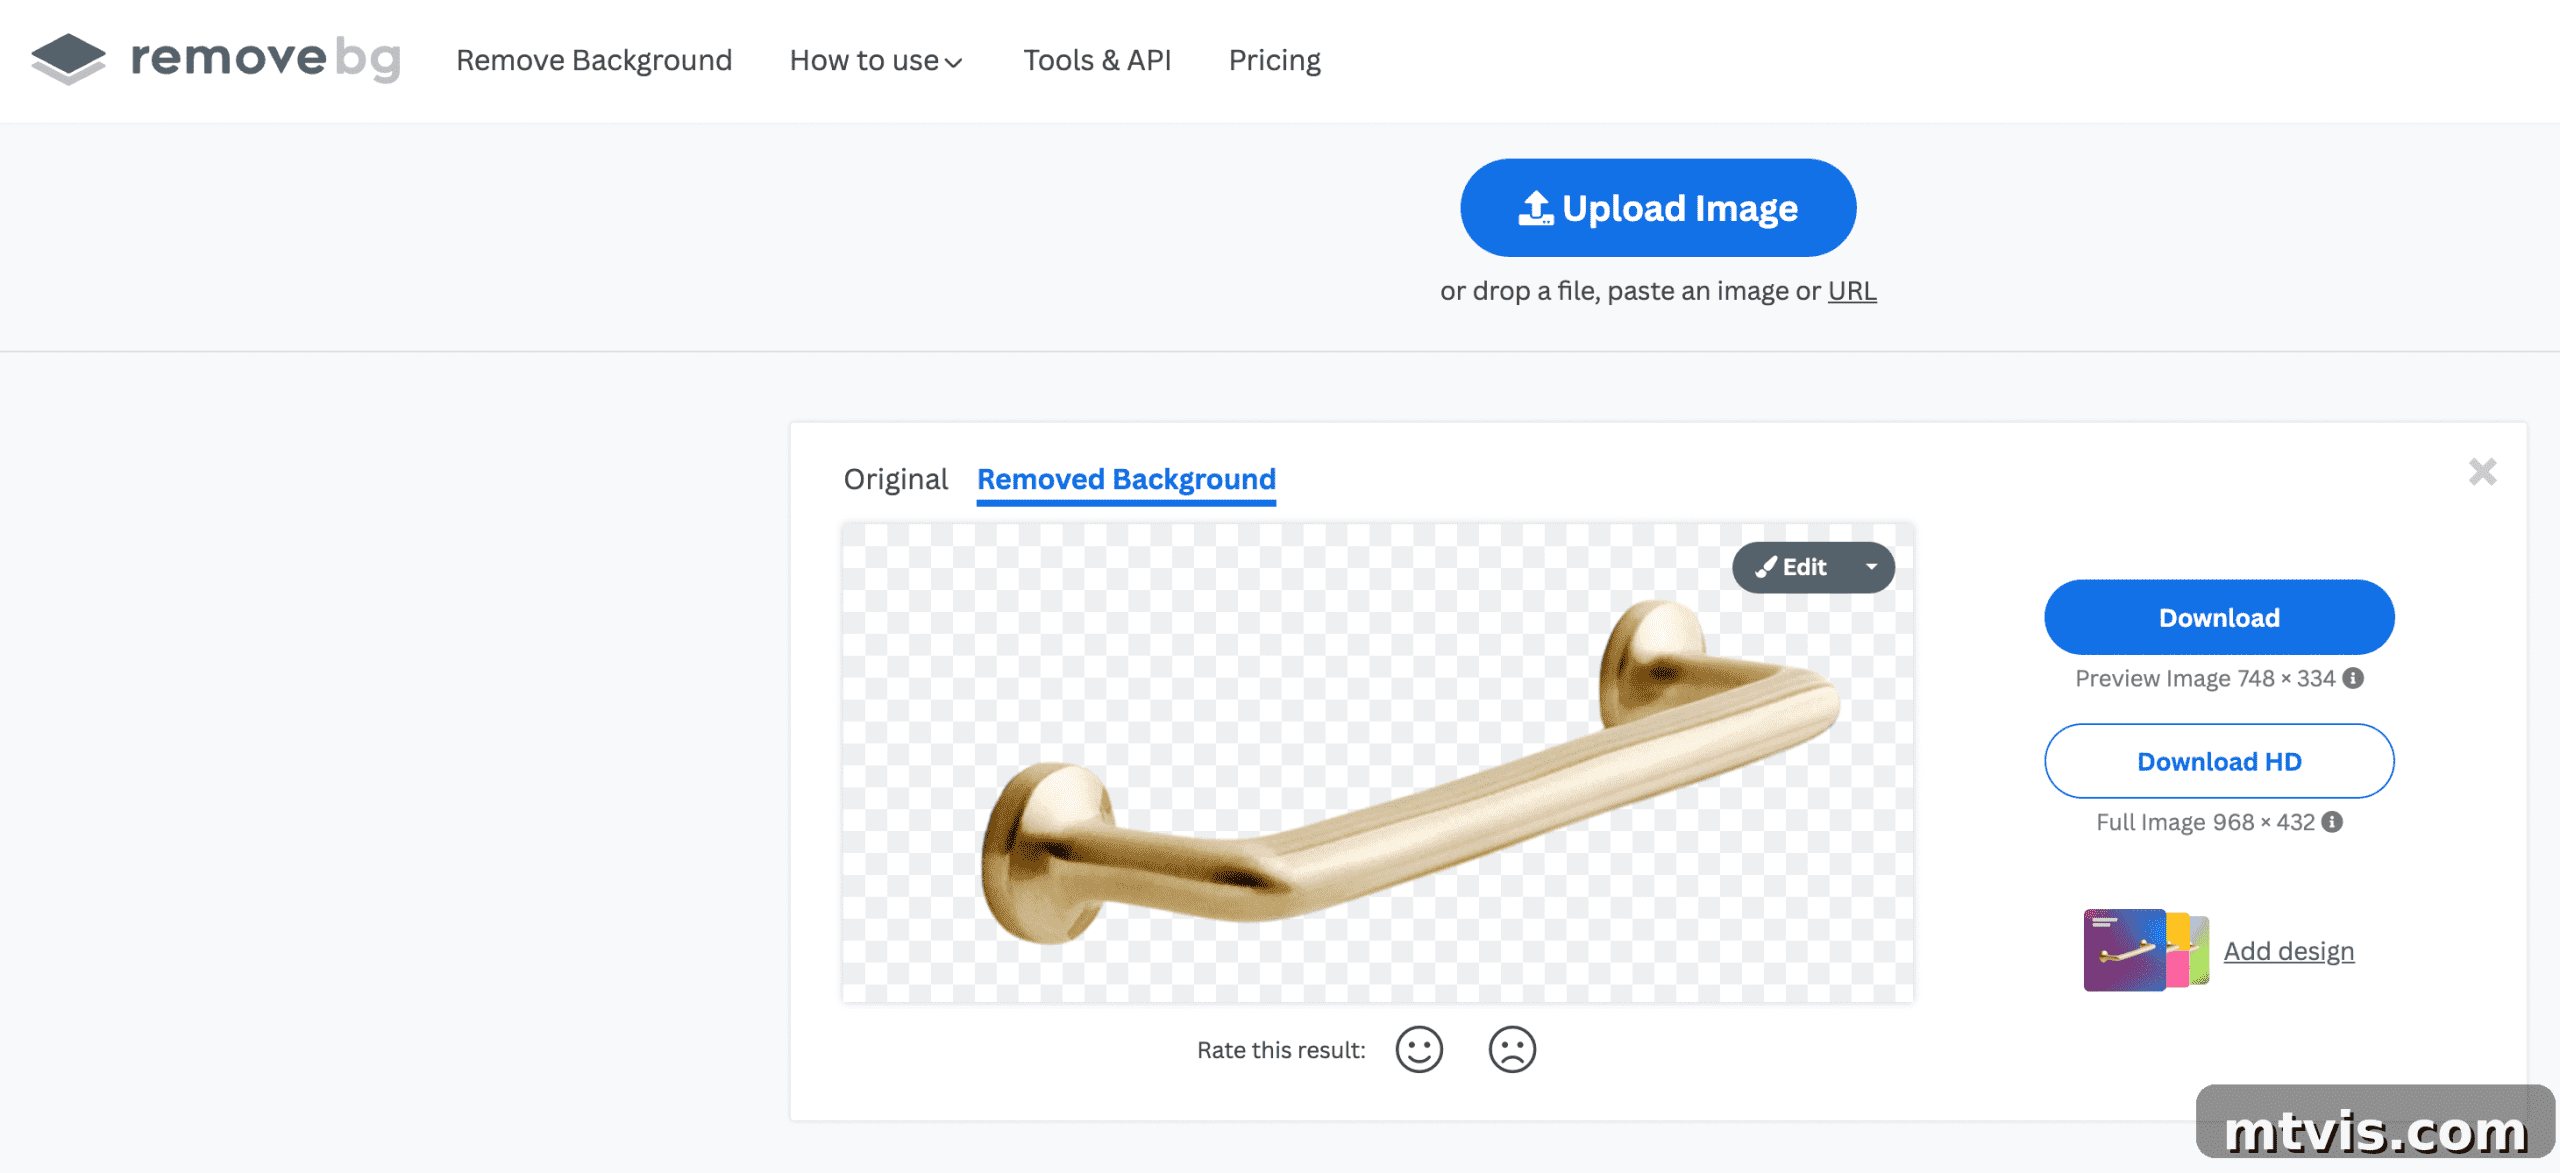
For those utilizing the free version of Canva, an excellent alternative is to use remove.bg. This fantastic free website requires no account creation or login. Simply upload your photo, and with one click, it will expertly remove the background. You can then download the background-free image and seamlessly upload it into your Canva project, ensuring a clean and professional appearance for all your design elements.
- Step 8: Download or Share Your Completed Mood Board.
Once your interior design mood board is complete and you’re delighted with the result, head to the “Share” button located in the upper right-hand corner of your screen. From here, you have several options: you can easily share your design directly with others via their email address, or you can download your finished design to save it securely on your computer. This final step allows you to keep a visual record of your plan or collaborate with family and friends.
I genuinely hope you found this guide incredibly helpful and empowering! My greatest wish is that from now on, you’ll make creating an interior design mood board a standard practice for every space you envision and design in your home. This simple step truly unlocks a world of design confidence and ensures beautiful, cohesive results.
Before you head out, I’ve curated some other valuable posts you may find inspiring and informative for your home decor journey:
- 8 Common Interior Design Mistakes You Don’t Even Know You are Making (and How to Fix Them)
- How to Choose Paint Colors for Your Home: 5 Simple & Effective Tips to Follow
- The Ultimate Guide to Choosing an Area Rug: Placement & Size Tips for Every Room
- Unlock Space: How to Make a Small Room Look Bigger with 9 Simple Tricks
Curious about how I systematically approach transforming rooms and spaces in our own home, from concept to completion? Discover the secrets and structured methods within Designer in a Binder® – your ultimate guide to decorating with purpose and confidence.
For exclusive content, behind-the-scenes sneak peeks, and fresh design inspiration delivered straight to your inbox, be sure to subscribe to my newsletter before you leave!