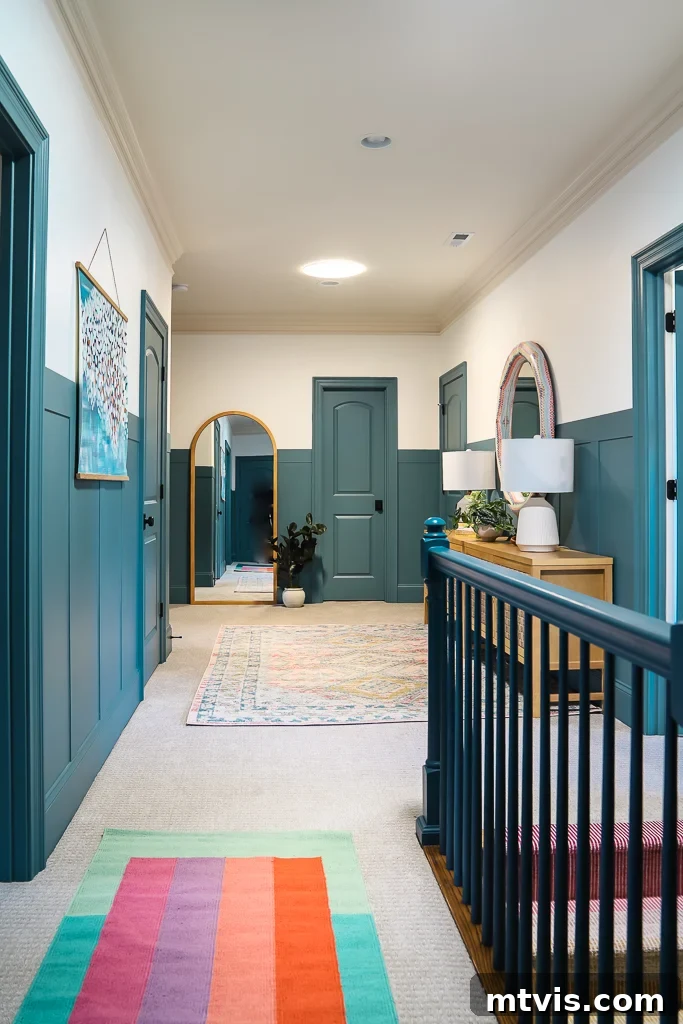
Unleash Natural Light: Transform Your Home with Velux Sun Tunnels
A heartfelt thank you to Velux for collaborating with us on this illuminating project. As always, every opinion shared is 100% my own. I am committed to partnering only with companies and recommending products that I genuinely believe in and love.
Our recent home renovation project brought a dramatic transformation to our staircase and upstairs hallway. We embarked on a complete overhaul, meticulously installing elegant board and batten paneling, laying down a sophisticated stair runner, upgrading our stair railing, and refreshing virtually every surface with a fresh coat of paint. Yet, without a doubt, the most profoundly transformative element of this entire renovation was the strategic installation of four Velux Sun Tunnels. It might sound overstated, but these ingenious additions have utterly revolutionized the aesthetic and feel of our home's entire upper level. More significantly, introducing sun tunnels has fundamentally altered our emotional connection to the second floor, turning once gloomy spaces into areas of joy and vitality. Before delving into the specific reasons behind our choice of Velux Sun Tunnels and showcasing the incredible impact they've made, let's explore the foundational aspects of these brilliant daylighting solutions.
What Exactly Are Sun Tunnels, and How Do They Work?
A sun tunnel, often referred to as a tubular skylight or sun tube, is an innovative daylighting system designed to channel natural sunlight from your rooftop directly into interior spaces that lack traditional windows. Imagine a highly reflective circular duct, typically crafted from polished aluminum, that connects a dome-shaped collector on your roof to a diffuser on your ceiling. The dome captures sunlight, which is then magnificently amplified and directed down this incredibly reflective tunnel, distributing bright, natural light into the room below. This ingenious design means that even the darkest, most secluded areas of your home – think interior hallways, bathrooms, walk-in closets, or laundry rooms – can be bathed in abundant daylight, significantly reducing the need for artificial lighting during the day. Beyond just illumination, sun tunnels introduce the numerous benefits of natural light, such as improved mood, enhanced productivity, and a more vibrant living environment, making them a truly phenomenal and energy-efficient solution for brightening your home.
Sun Tunnels vs. Skylights: Understanding the Key Differences
While both sun tunnels and skylights are excellent solutions for introducing natural light from your roof, they differ significantly in their design, function, and application. Understanding these distinctions is crucial for choosing the right daylighting option for your specific needs and home architecture.
Skylights: Classic Daylighting Solutions
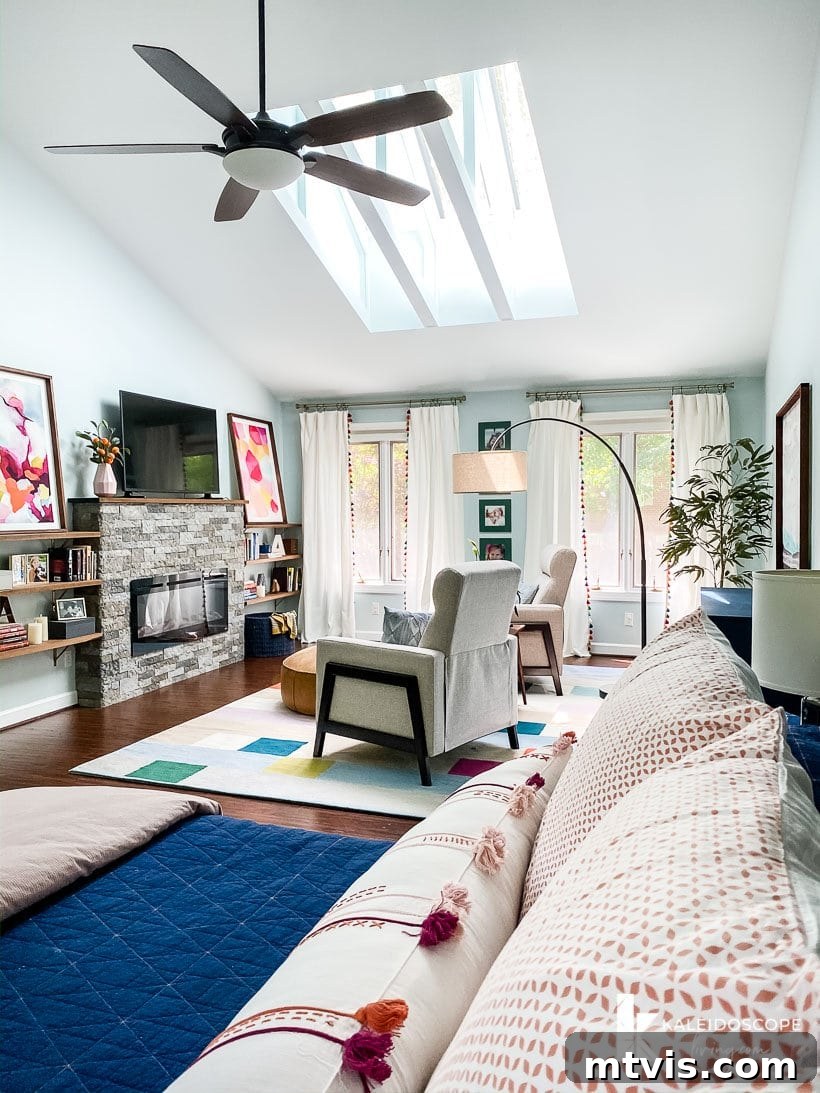
A traditional skylight functions much like a window integrated into your roof. It provides expansive views of the sky, allowing you to gaze at clouds by day and stars by night. Modern skylights often offer additional features such as the ability to open and close for ventilation, as well as remote-controlled blinds for light control and privacy. From an aesthetic perspective, skylights can serve as significant architectural features, adding character and visual interest to your home's ceiling and overall interior design. In our previous home, we had Velux skylights installed, and they were nothing short of magical. The sheer volume of light and the open feeling they created were incredible. They were not only a beloved feature for us but also proved to be a major selling point when we listed our old house for sale. You can see the stunning Velux skylights we enjoyed in our former primary bedroom below, showcasing their ability to transform a space completely.
Sun Tunnels: Versatile and Efficient
In contrast, a sun tunnel employs an acrylic dome on your roof to capture daylight. This light is then efficiently magnified and channeled through a highly reflective tube that passes through your attic space and into the room below, culminating in a discreet diffuser on the ceiling. One of the most significant advantages of sun tunnels is their incredible versatility. Their compact size and flexible or rigid tubing allow them to fit into smaller, tighter spaces and easily maneuver around common attic obstructions that would pose insurmountable challenges for traditional skylights. This adaptability makes sun tunnels an ideal solution for areas where skylights are simply not feasible.
While sun tunnels excel at delivering abundant natural light, they operate differently from skylights in several key aspects. You won't get a direct view of the blue sky through a sun tunnel; their primary function is pure illumination. They are also not designed to be opened for ventilation, nor can you install blinds within them. Furthermore, they generally do not offer the same level of architectural enhancement to a room's aesthetic as a large skylight might. However, these distinctions contribute to their main benefits: sun tunnels are an exceptionally cost-effective and practical method for infusing natural light into dark, interior spaces. Their installation is remarkably swift; a single sun tunnel can often be installed within a single afternoon, making it one of the quickest and most budget-friendly ways to dramatically enhance your home with daylight. For our project, we had four sun tunnels fully installed over just one and a half days, a testament to their efficient installation process.
Investing in Daylight: The Cost of Velux Sun Tunnel Installation
The total cost to purchase and install a Velux Sun Tunnel can vary depending on several factors, including the length and type of reflective tubing required (e.g., rigid for maximum light transfer versus flexible for easier maneuvering around obstacles), and the specific model of sun tunnel you select (such as a low-profile design or one with flat glass). However, as a general guideline, you can typically expect to invest anywhere from $650 to $2,150 per installed sun tunnel. This price range includes both the product and professional installation services. It's important to note that this cost is significantly more affordable than the investment required for traditional installed skylights, especially if you desire advanced Velux skylight models that feature opening and closing capabilities, integrated blinds, or other premium functionalities.
To help homeowners navigate their options and make informed decisions, VELUX offers a complimentary virtual consultation service. Through a phone or video conference, you can connect with a knowledgeable daylight design consultant who can answer your questions, discuss the best skylight or sun tunnel options tailored to your home's unique layout and your personal preferences. Additionally, if you've decided that sun tunnels are the perfect solution for your home's dark areas, you can easily locate a certified installer in your area directly through the Velux website. Utilizing these resources ensures you receive expert advice and professional installation, maximizing the benefits of your new daylighting system.
GIVEAWAY ALERT: Win Velux Sun Tunnels for Your Home!
Exciting news! Through the end of July, you have the chance to win two VELUX Sun Tunnel® Skylights, complete with professional installation! Don't miss this incredible opportunity to bring more natural light into your home. Click HERE to enter the Velux Daylight to Night Light Sweepstakes today!
Addressing Concerns: Do Sun Tunnels Leak?
When I initially shared our plans to install sun tunnels on Instagram, a common concern that frequently surfaced was the potential for leaks. I believe that older generations of skylights and roof windows may have contributed to a lingering perception that any roof penetration is inherently prone to leakage. However, modern daylighting technology has advanced significantly, and I can confidently say we have absolutely no concerns about leakage with our Velux Sun Tunnels.
Firstly, sun tunnels inherently carry a lower risk of leakage compared to traditional skylights due to their design. Their smaller, relatively low-profile dome on the roof allows rainwater to drain efficiently around them, minimizing potential vulnerabilities. Beyond this design advantage, Velux is renowned for its commitment to leak-proof solutions. Even with the skylights in our previous home, we were never worried about leaks because Velux manufactures "No Leak Skylights" that incorporate three robust layers of water protection. This advanced engineering provides exceptional defense against the elements.
Crucially, proper installation is paramount. Even the highest quality Velux products can be compromised by incorrect installation or sub-par contractors, potentially leading to leaks and other performance issues. When VELUX Sun Tunnels are installed correctly by certified professionals, they provide an absolutely weather-tight seal. The installation process is meticulously designed: installers apply highly adhesive mastic to securely bond the flashing piece to the roof deck, which is then further reinforced with screws. These screws and the upper portion of the flashing are meticulously sealed. An all-weather underlayment is then installed over the flashing to ensure optimal drainage of rainwater, protecting against moisture intrusion. Finally, the roofing material is carefully reinstalled over the flashing and around the sun tunnel, creating a seamless and watertight integration with your roof. To guarantee this level of precision and peace of mind, always use a VELUX-certified installer.
Both our current sun tunnels and the skylights in our old home were expertly installed by a VELUX Signature Skylight Specialist, Natural Home Lite. If you reside in North Carolina, I cannot recommend them highly enough. Their team is a dream to work with, and we place our complete trust in their expertise and the quality of their installation.
Our Personal Choice: Why Velux Sun Tunnels Were Perfect for Our Home
Our journey to choosing Velux Sun Tunnels for our current home began with a strong desire to replicate the incredible natural light experience we had with Velux skylights in our previous residence. We absolutely adored those skylights, so it was natural for us to consider them for the upstairs project in our new home. However, upon initial assessment, we discovered a crucial architectural limitation: the depth of our attic space here simply wasn't conducive to installing traditional skylights. This was a slight disappointment, but it quickly led us to explore viable alternatives.
That's when we learned about Velux Sun Tunnels. The initial discussions suggested that sun tunnels would very likely be a perfect fit for the specific locations we had in mind. Eager to confirm this, we promptly scheduled a site visit with Natural Home Lite. Their team meticulously inspected our attic and the interior spaces, confirming with certainty that, yes, we could indeed install two 14-inch sun tunnels in our main hallway and two 10-inch sun tunnels in our girls' bathrooms. I truly couldn't contain my excitement at this prospect.
Of course, like many homeowners, we had to navigate some Homeowners Association (HOA) limitations. Our initial plan, which proposed installing two flat glass sun tunnels on our front roofline, was unfortunately rejected by the HOA. However, the expert team at Natural Home Lite proved invaluable. They worked diligently to devise an alternative solution, expertly figuring out a way to strategically position all four sun tunnels on our rear roofline. This revised plan was then submitted to our HOA and, fortunately, received full approval! This adaptability and problem-solving expertise made the entire process smooth and ultimately successful, allowing us to bring glorious natural light into our previously dark upstairs.
A Glimpse into the Past: Our Upstairs Before Sun Tunnels
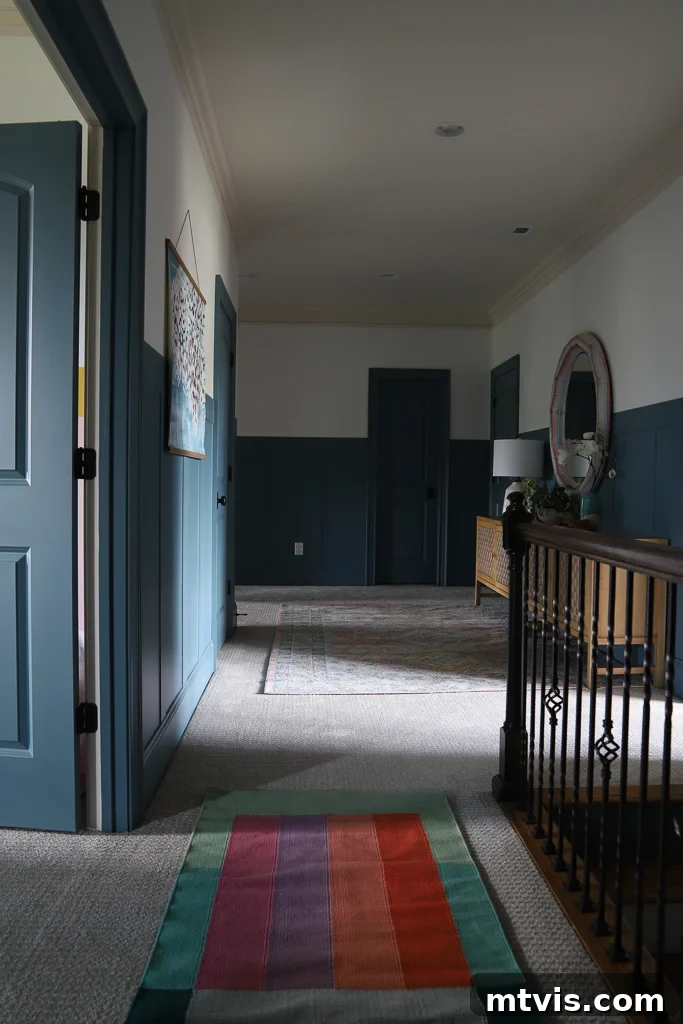
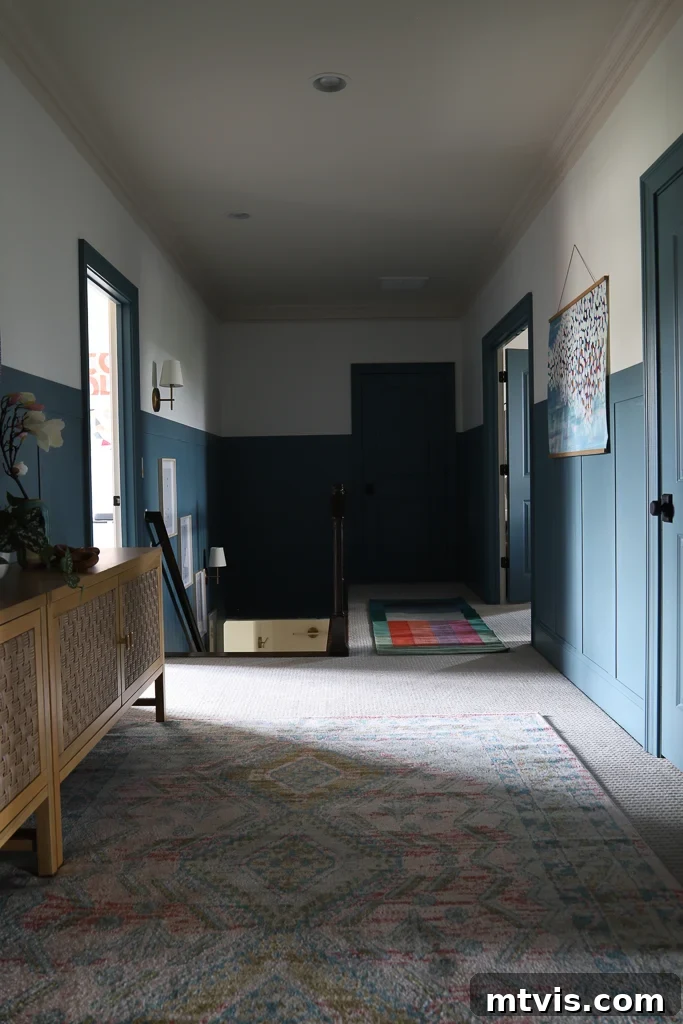
We purchased this home almost two years ago, and I must confess, the pervasive darkness and cave-like ambiance throughout much of the second floor nearly deterred us from making an offer. The upstairs hallway, despite its generous size, was entirely devoid of a single window or any direct source of natural light. The only way any daylight managed to penetrate this central artery of our home was by keeping the doors to the upstairs bedrooms wide open. However, in a busy household, these doors are frequently closed, especially during the day. With the doors shut, navigating the hallway without turning on an artificial light was a genuine challenge – a stark reality that made the space feel unwelcoming and gloomy. You can truly grasp the extent of this darkness by watching the video I shared earlier in this post, which vividly illustrates the "before" state.
Even with the doors to the adjoining rooms open, the hallway remained remarkably dim, as you can see in the images below. It was a truly crazy amount of darkness for a main thoroughfare in a home.
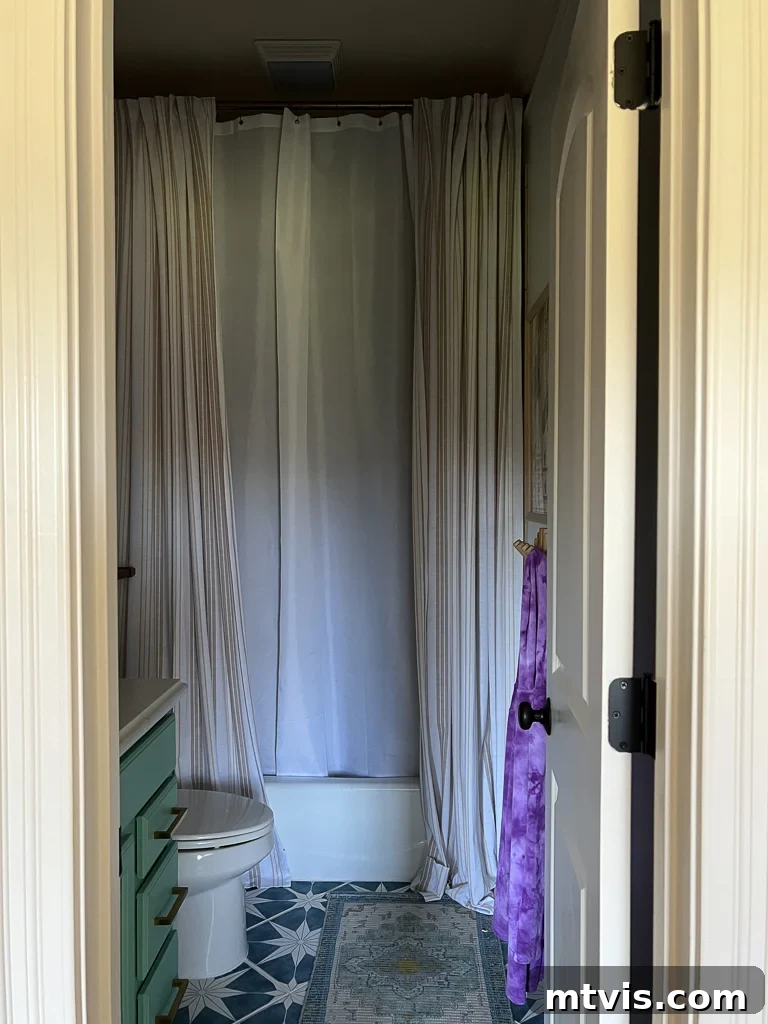
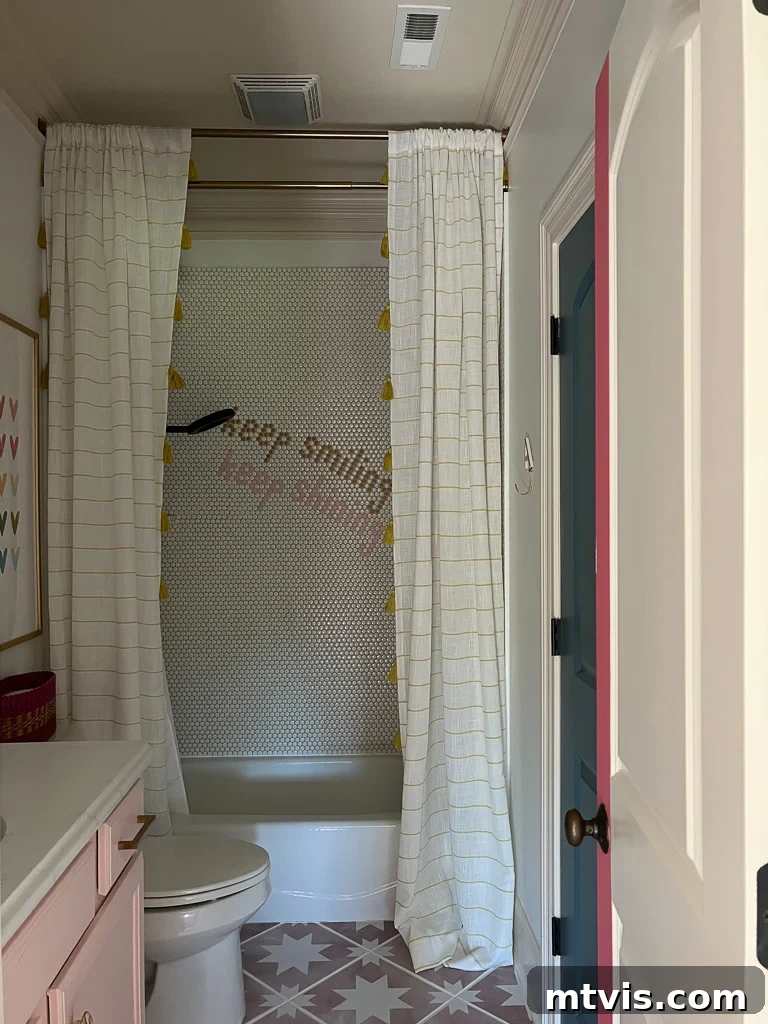
Similarly, both Avery's bathroom and Attley's bathroom suffered from a complete absence of direct natural light. The following images show just how dreary and uninviting they appeared when no artificial lights were switched on. "Bleh" perfectly captured the sentiment these spaces evoked before their transformation.
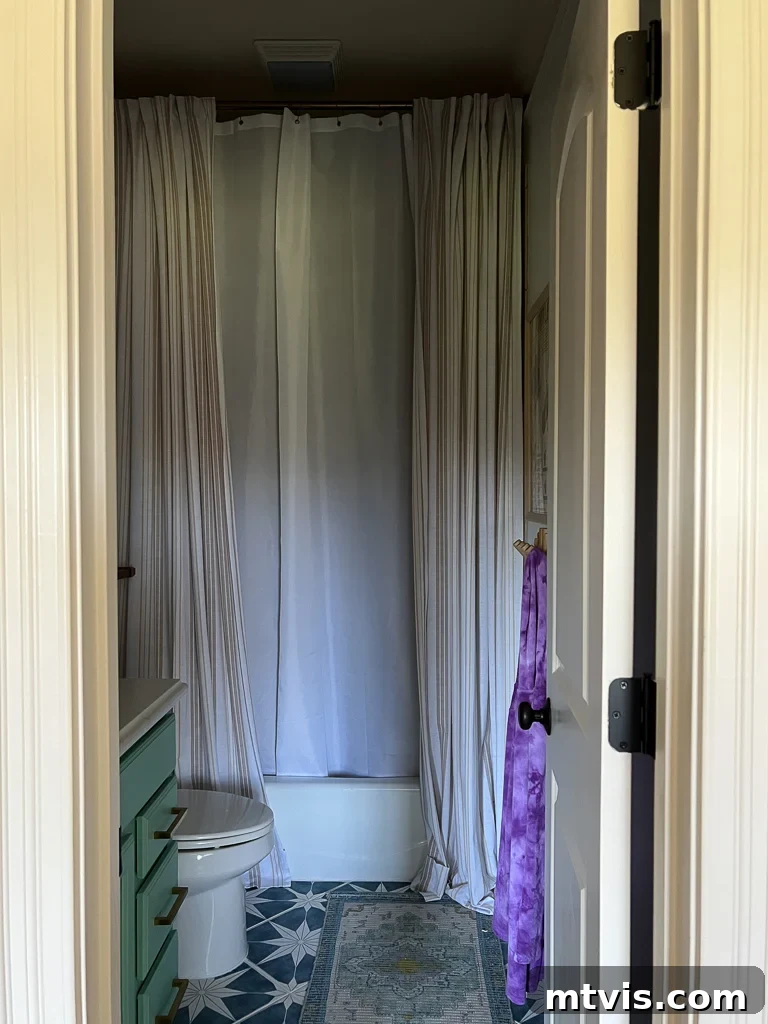
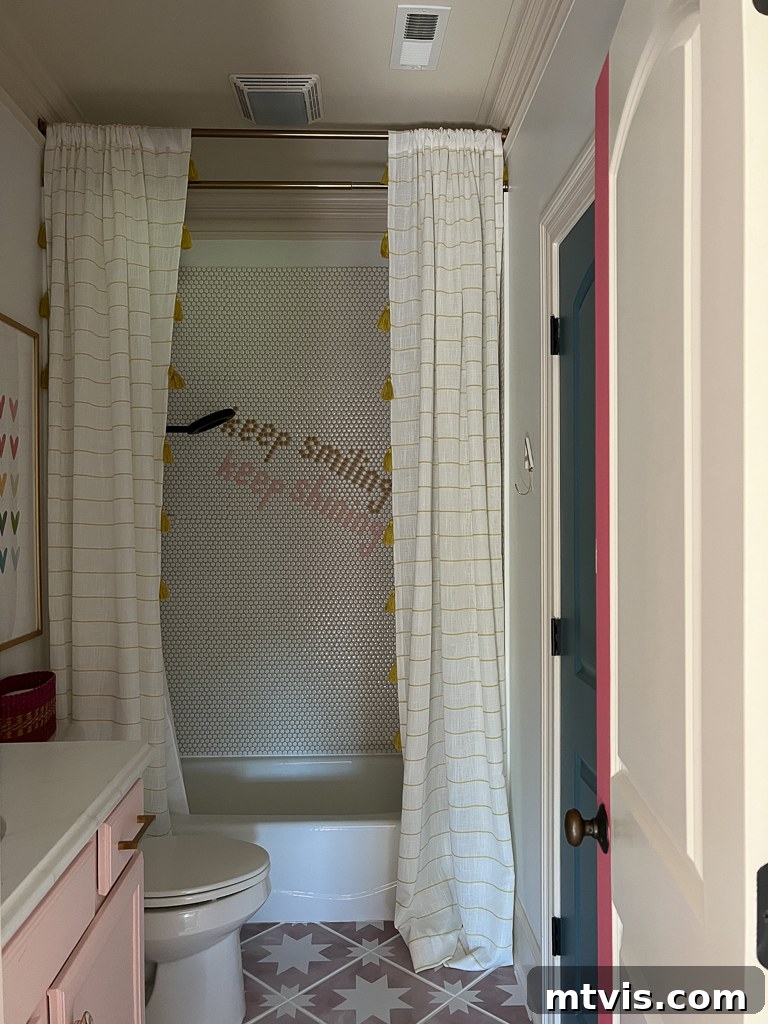
Hopefully, these descriptions and images clearly illustrate our compelling motivation for wanting to inject vital natural light into our upstairs hallway and bathrooms. The transformation was not just about aesthetics but about creating more functional, inviting, and uplifting spaces within our home.
The Power of Light: How Much Do Sun Tunnels Really Illuminate?
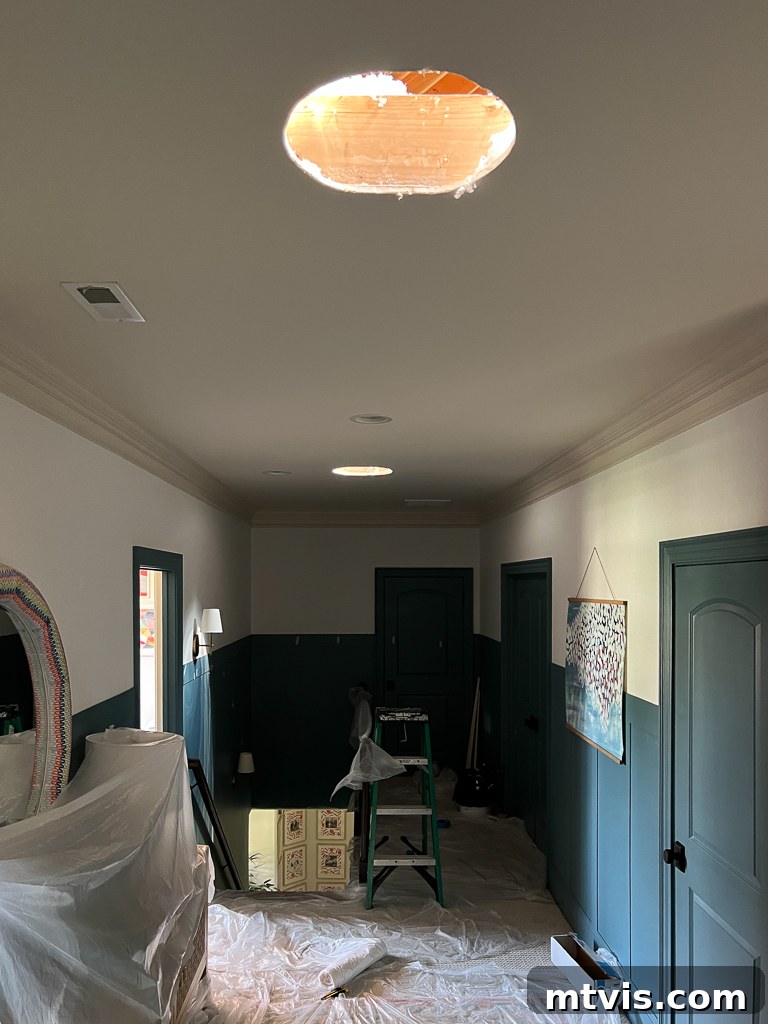
As I previously mentioned, the installation of all four of our Velux Sun Tunnels was completed efficiently over just one and a half days, a remarkably non-disruptive process for our household. The majority of the first day saw the skilled installers from Natural Home Lite working on the roof and within the attic space. The true magic began on the second day when they carefully cut through the ceiling and finalized the interior installations. The initial glimpse of light was captivating: this is what it looked like after they had cut through both the roof and ceiling, but before the highly reflective tunnel was even installed. Even at this preliminary stage, an astonishing amount of natural light poured into the space! This unedited photograph, taken straight from my phone, truly captures the immediate impact.
But friends, brace yourselves... because the level of brightness after the reflective tubes were attached was genuinely astounding. I was legitimately shocked by the sheer volume of light flooding into our hallway. SHOCKED. This photograph, also an unedited, direct capture from my phone, speaks volumes about the incredible transformation.
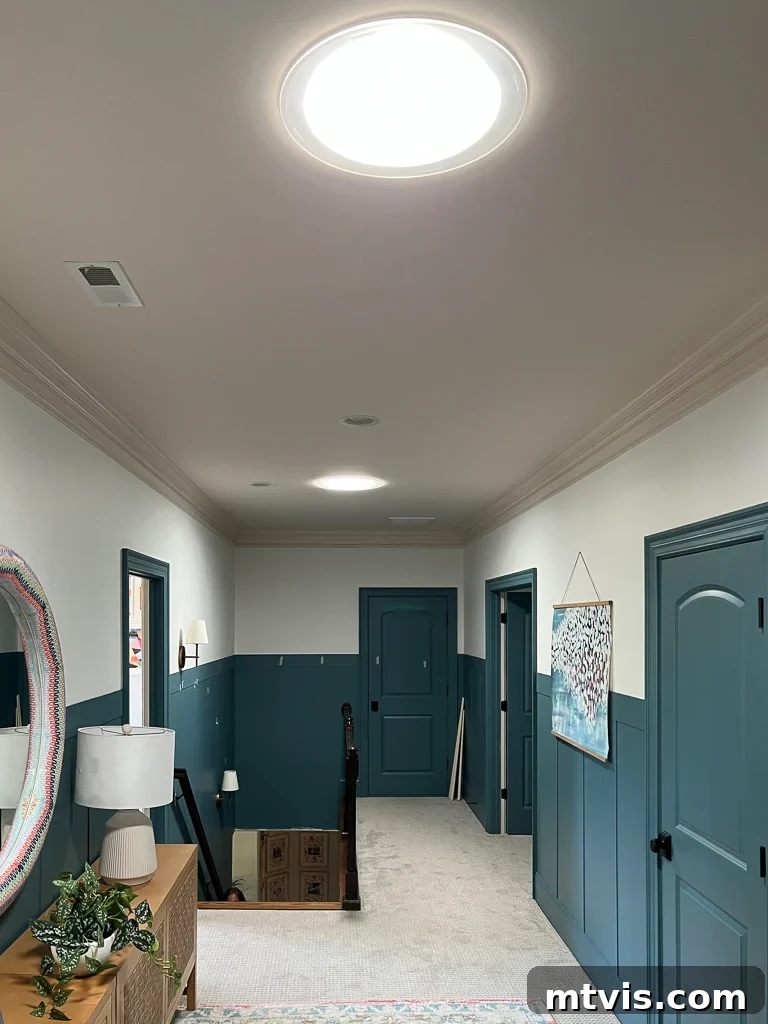
The efficiency of the reflective tubing is truly remarkable. It's not just about letting in light; it's about maximizing and channeling every ray of sunlight, distributing it evenly and effectively throughout the designated space. This makes sun tunnels an incredibly powerful tool for dramatically enhancing the ambient light in any room, drastically reducing the need for electric lighting during daylight hours and contributing to energy savings.
Seeing Is Believing: Dramatic Before and After Comparisons
Now for the moment you've been waiting for! I know you're eager to witness the incredible transformation of our upstairs hallway and bathrooms with our new Velux Sun Tunnels fully installed. The video below showcases these stunning changes, but I've also included an abundance of side-by-side photos to provide a detailed visual comparison.
To truly highlight the monumental change, I've provided side-by-side shots of the hallway taken with the exact same camera settings (shutter speed and aperture). This ensures a pure, unbiased comparison where the only variable is the presence of the sun tunnels. You'll notice that with these consistent settings, the "after" photos are significantly overexposed, demonstrating the colossal increase in natural light. The difference is absolutely breathtaking, isn't it?!
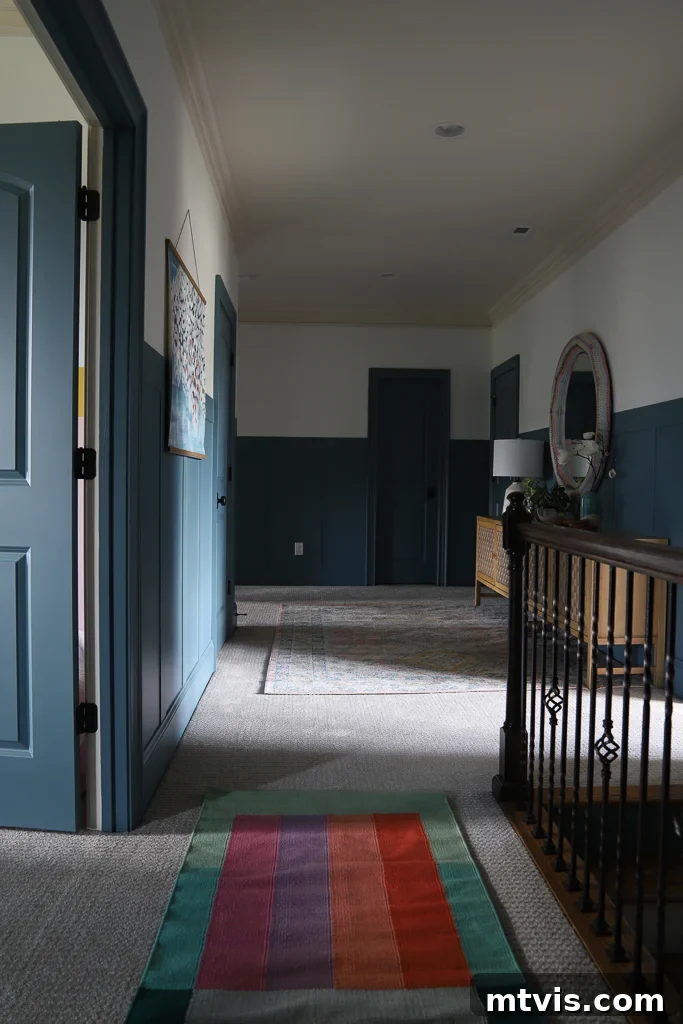
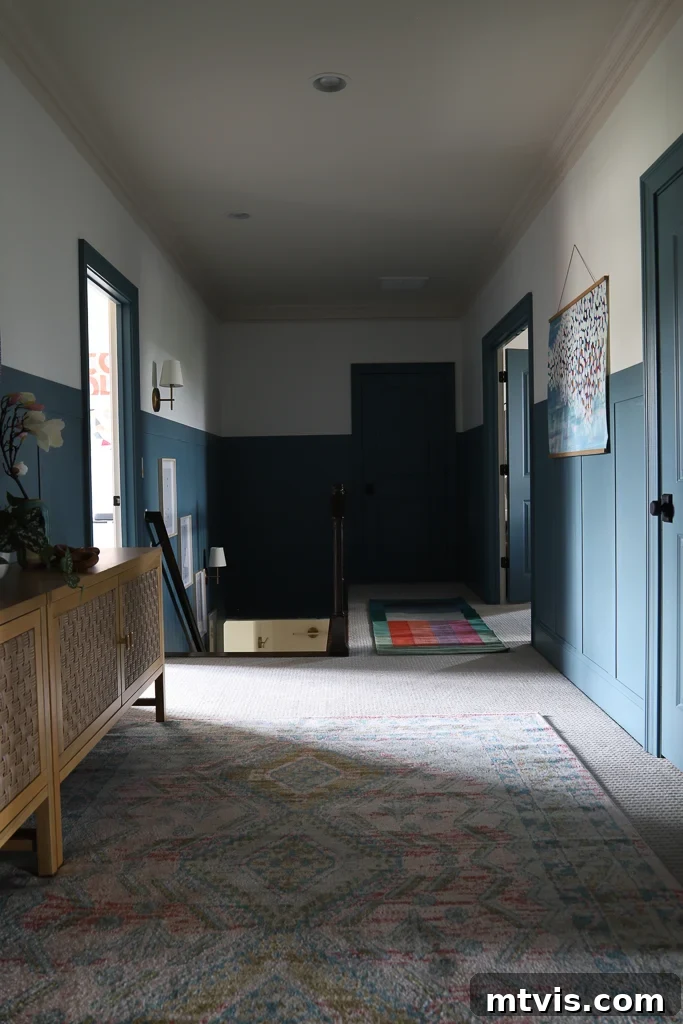
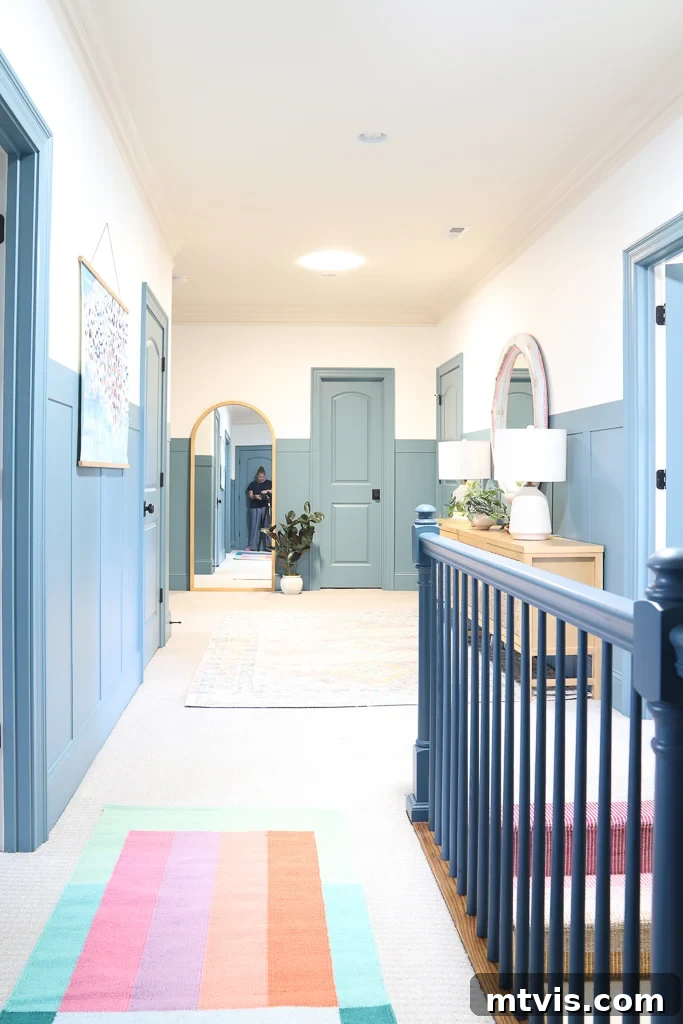
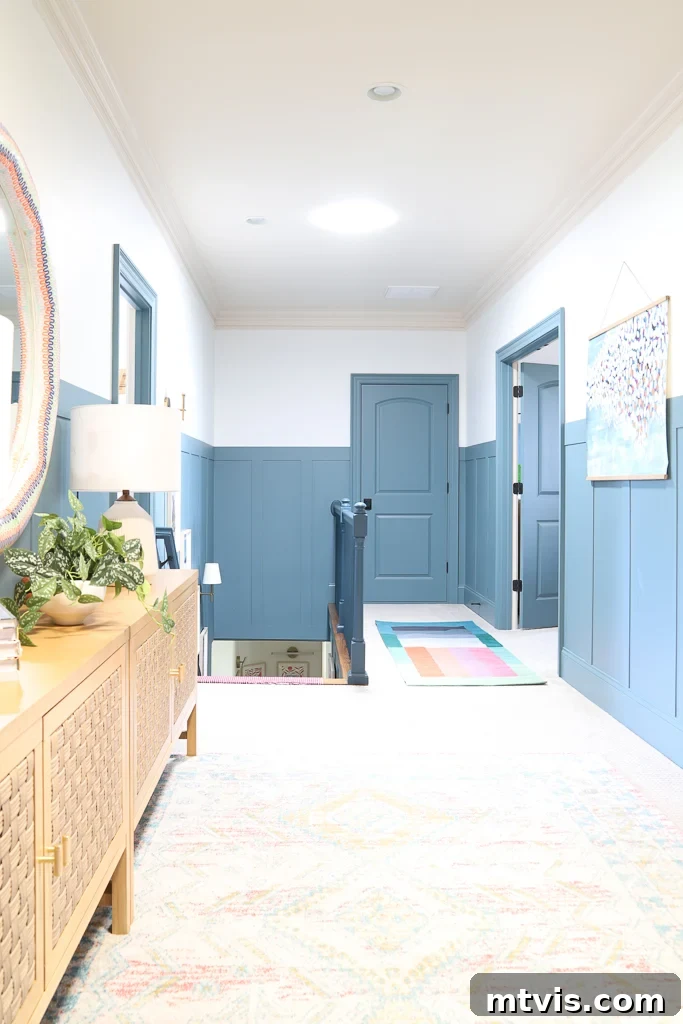
And here are additional photos of the hallway, with the exposure settings appropriately adjusted to beautifully capture and accommodate the immense amount of natural light that now generously floods our once-dark space!
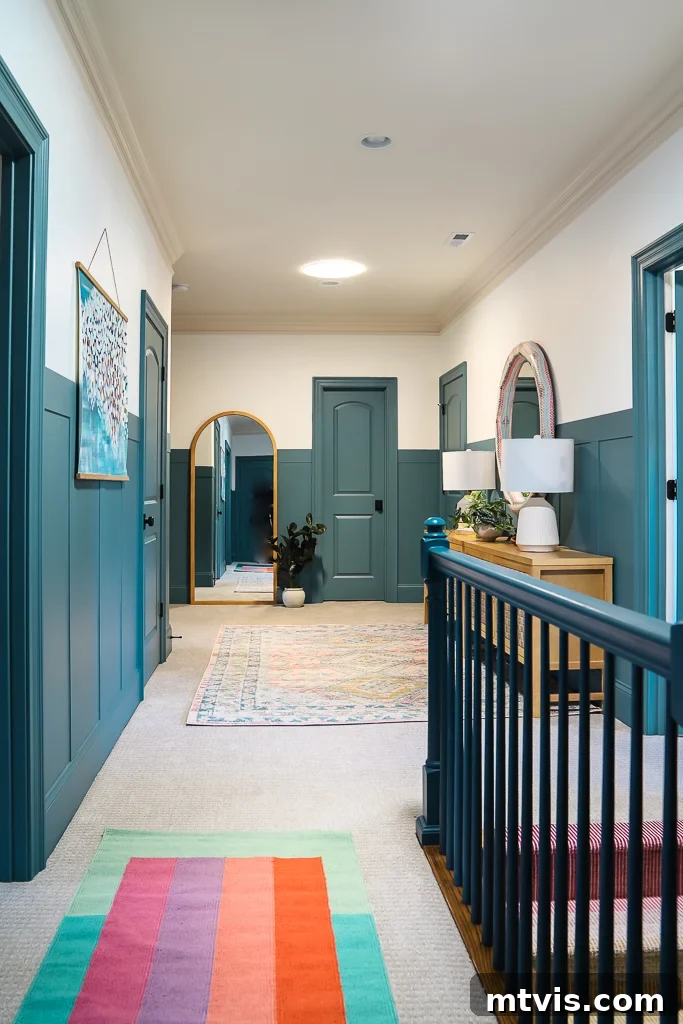
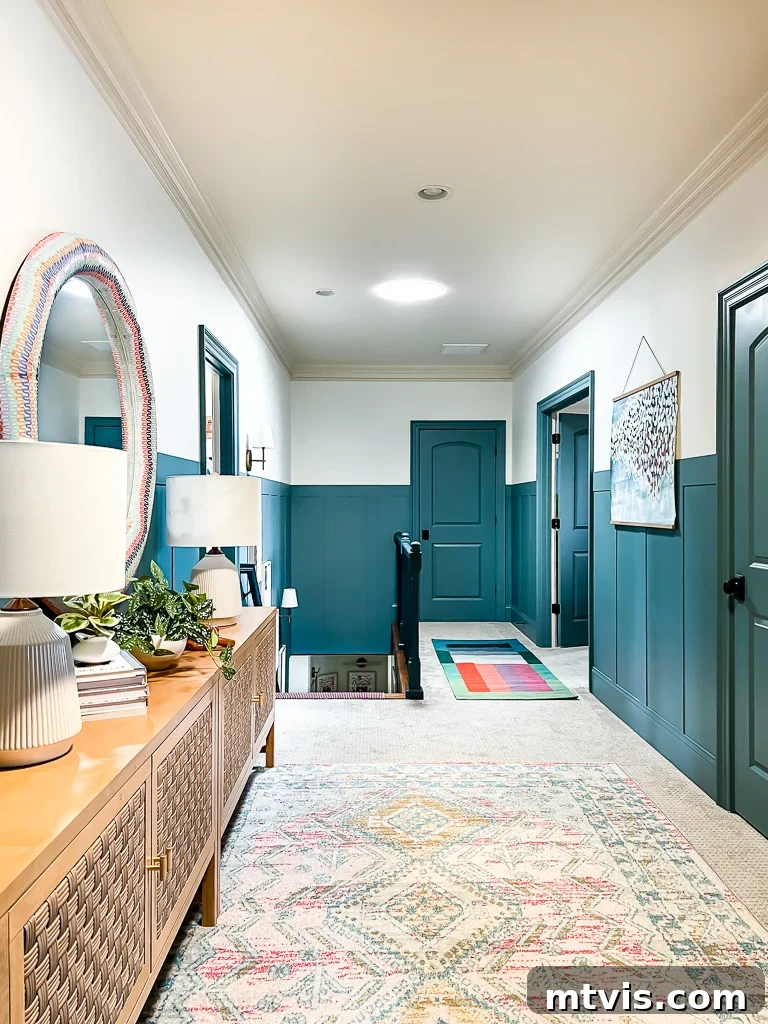
For the before-and-after photos of Avery's bathroom and Attley's bathroom, I used my phone, which naturally auto-adjusts its settings to optimize exposure. Therefore, these comparisons aren't as "controlled" as the hallway photos. Nevertheless, the dramatic increase in brightness in their bathrooms after the sun tunnels were installed is unequivocally clear and truly remarkable. We've now had these sun tunnels for nearly a month, and I still occasionally find myself thinking someone left the lights on when I walk past their bathroom doors – that's how effective they are! The reality is, we never even need to turn on the artificial lights in their bathrooms during the day anymore. The 10-inch sun tunnels installed in each of their spaces provide more than enough vibrant, natural light from dawn till dusk.
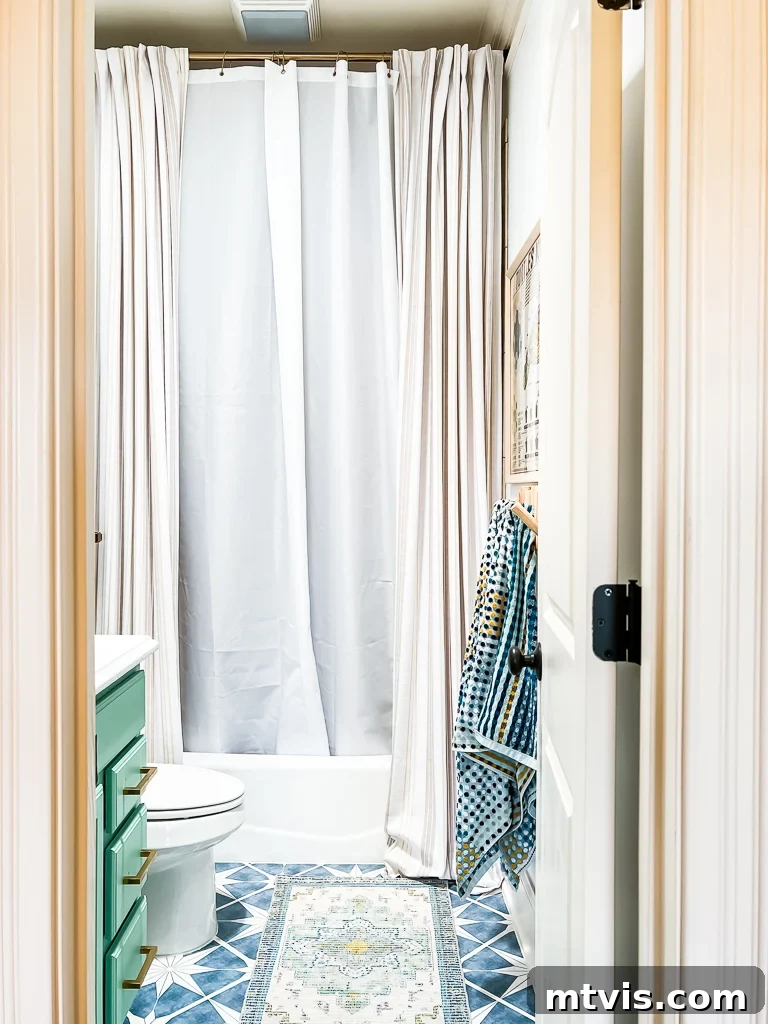
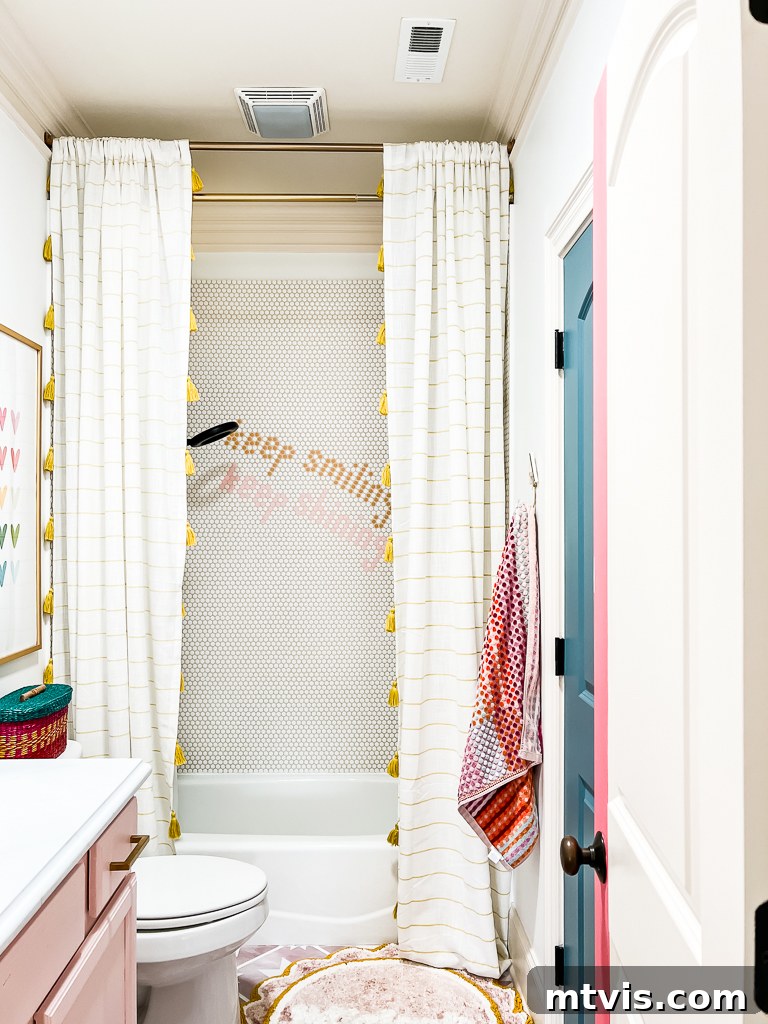
Unexpected Delights: Surprising Perks of Velux Sun Tunnels
Beyond the primary benefit of bringing abundant natural light into our home, we were genuinely and pleasantly surprised by a couple of additional features offered by our Velux Sun Tunnels. These thoughtful additions enhance both functionality and customization, adding even more value to an already impressive daylighting solution.
First and foremost, the option to integrate a solar night light into each sun tunnel is incredibly ingenious and practical. This innovative feature not only adds convenience but also makes the sun tunnel eligible for a "Solar Electric Property" Federal tax credit, offering a tangible financial incentive. The VELUX Solar Night Light works by harnessing available sunlight to charge a concealed battery throughout the day. Once darkness falls, this stored energy powers discreet LED bulbs, providing a gentle, soft glow. Since it fits entirely within your sun tunnel, it remains invisible during the day, maintaining a clean aesthetic. We've installed one in each of our sun tunnels, and they emit the perfect amount of ambient light at night, allowing us to navigate without the harsh glare of a bright overhead fixture.
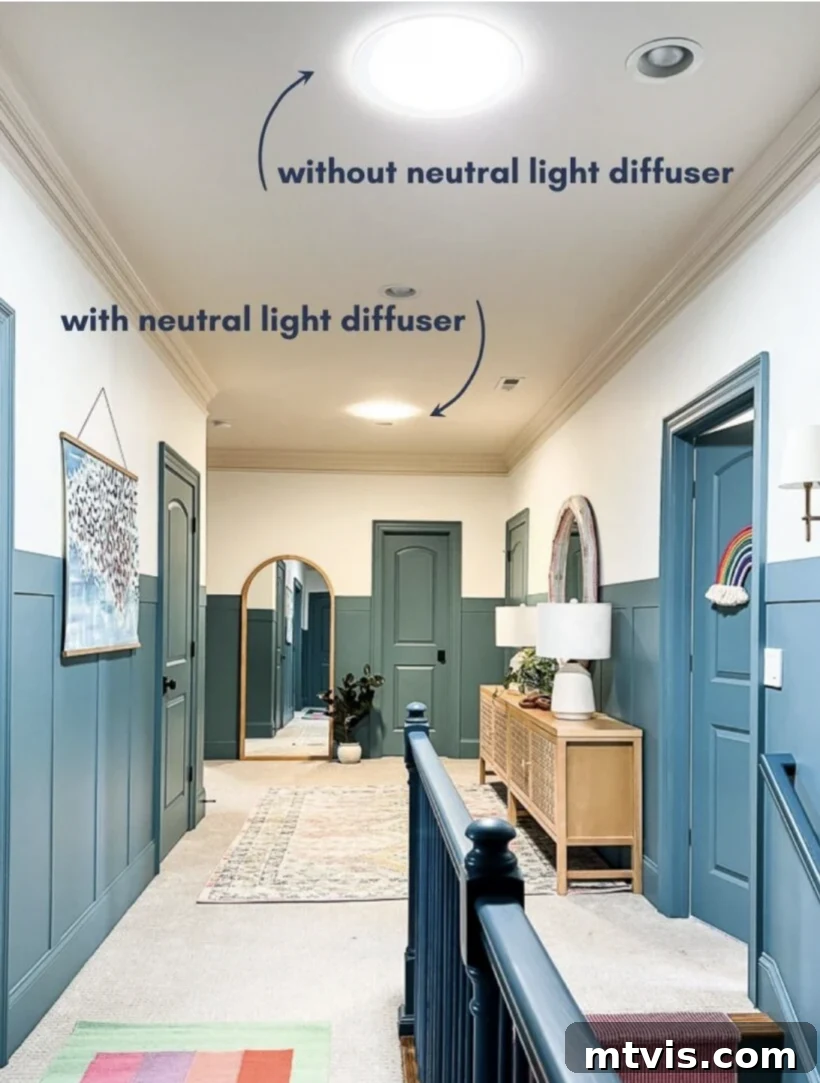
Secondly, the choice of diffusers for your sun tunnels offers a wonderful degree of control over both the visual appearance of the ceiling fixture and, more importantly, the temperature of the light entering your space. Unfiltered daylight captured by sun tunnels can sometimes appear quite cool, with a bluish tint. While some prefer this crisp light, I personally found it a touch too cool for our home's desired ambiance. To remedy this, we opted for a neutral light diffuser. This simple addition effectively warms up the light temperature slightly, creating a more inviting and balanced glow. You can observe a subtle yet noticeable difference in the photo below. I'm still weighing which aesthetic I ultimately prefer, especially since the natural light's angle and intensity change throughout the day. Regardless, having these customization options is a fantastic perk, allowing homeowners to tailor the sun tunnel's output to their exact personal preference and interior design scheme.
Is a Velux Sun Tunnel the Right Choice for Your Home?
If you find yourself contending with dark, unwelcoming interior spaces that are starved for natural light, then Velux Sun Tunnels should absolutely be at the top of your consideration list. They present an exceptionally budget-friendly alternative to traditional skylights while delivering an incredible volume of natural light that can truly transform a room. Their remarkable versatility means they can be installed in nearly any part of your home, effectively bypassing architectural obstructions that would preclude larger, more rigid skylights. Furthermore, the installation process for sun tunnels is significantly faster and less intrusive than that for skylights, often taking just a matter of hours or a day.
Our personal experience has been overwhelmingly positive; we could not be happier with our sun tunnels! They have fundamentally changed the way we perceive and interact with the second story of our home. What once felt dark, oppressive, and even depressing is now consistently bright, airy, and filled with a cheerful ambiance. The emotional and practical benefits are immeasurable.
For those who have the necessary attic space and budget, and desire the expansive views and architectural statement of traditional roof windows, Velux also offers outstanding skylight solutions. Be sure to check out this detailed post about the Velux skylights we had installed in our previous house. We loved them immensely and, to this day, still miss their beautiful presence.
Ultimately, a Velux Sun Tunnel is an investment in a brighter, more inviting, and energy-efficient home. It's a simple yet powerful solution for anyone looking to harness the power of natural daylight to enhance their living environment.
Other posts you may enjoy:
- DIY Board and Batten Accent Wall: The Easy Method
- How to Install a Stair Runner: A Step-by-Step Guide
- Stunning Board and Batten Wall Ideas to Inspire Your Next Project
- Interior Trim Color Ideas That Aren't White: Add Personality to Your Home
- 8 Interior Design Mistakes You Don’t Even Know You are Making (and How to Fix Them)
- How to Choose Paint Colors for Your Home: 6 Simple Tips to Follow
Curious about my personal approach to transforming rooms and spaces within our home? Explore Designer in a Binder® – your affordable and simple guide to decorating with confidence.
For exclusive content, behind-the-scenes glimpses, and early access to new projects, be sure to subscribe before you go!