Do you find joy in the process of crafting or diving into exciting DIY projects? Is working with your hands a source of relaxation and creative fulfillment? If so, then you’re about to discover a world of possibilities with decoupage, an art form that perfectly blends simplicity with stunning results. Decoupage is essentially the craft of embellishing objects using paper cut-outs, special adhesive, and protective varnish. This centuries-old technique remains incredibly popular today, and for good reason—it’s an ingenious way to breathe new life into old, forgotten items or to craft truly unique and heartfelt gifts for your loved ones. In this comprehensive guide, we’ll explore some of the most creative decoupage ideas, ranging from upcycling tired furniture pieces to designing small, exquisite treasures perfect for gifting. Get ready to unleash your inner artist and transform ordinary objects into extraordinary works of art!
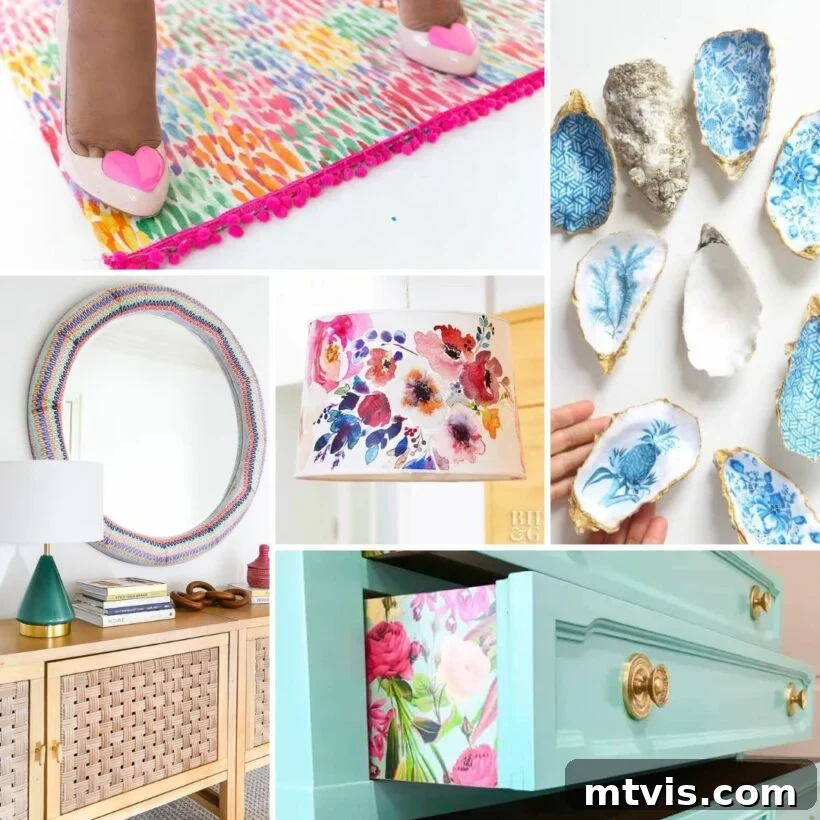
Table of Contents
- What is Decoupage?
- What is Mod Podge?
- What Can You Decoupage?
- Why Decoupage is a Fantastic Craft
- Essential Tools and Materials for Decoupage
- Tips for Successful Decoupage
- The Best DIY Decoupage & Mod Podge Projects
Whether you’re a seasoned crafter with years of experience or just starting your creative journey, you’ll find a decoupage project on this list that’s perfectly suited for you. But before we dive into the exciting projects, let’s establish a solid foundation by understanding the basics of decoupage and the essential materials you’ll need to get started!
What is Decoupage?
Decoupage, originating from the French word “découper” meaning “to cut out,” is a captivating art form that involves decorating surfaces with paper or fabric cut-outs. The process typically includes applying a decoupage medium (which acts as both a glue and a sealer) to adhere the cut-outs to an object. Once the pieces are meticulously arranged and glued, multiple layers of the same medium, or a clear varnish, are applied over them, creating a smooth, durable, and often seamless finish that looks as if the designs are painted directly onto the object. This technique allows for incredible customization, transforming everyday items into personalized masterpieces.
The beauty of decoupage lies in its simplicity and versatility. You can decoupage almost any solid surface, from furniture to picture frames, flower pots, boxes, and even glassware. With a rich history spanning centuries, decoupage remains a cherished craft today, offering endless possibilities for creative expression and unique home decor. It’s a fantastic way to add character and a personal touch to your surroundings without requiring advanced artistic skills.
What is Mod Podge?
When you hear “decoupage,” “Mod Podge” often comes to mind, and for good reason. Mod Podge is not just any glue; it’s the most widely recognized brand of decoupage medium, often mistakenly called “Modge Podge” (the correct pronunciation is MOD Podge!). This iconic crafting staple is a versatile, all-in-one water-based formula that serves as an adhesive, sealer, and finish.
Mod Podge dries clear, creating a strong, durable bond between paper or fabric and virtually any surface. Its convenience makes it the go-to choice for decoupage enthusiasts worldwide. Available in various finishes, including gloss for a shiny look, matte for a subtle, non-reflective appeal, and satin for a soft sheen, Mod Podge allows you to achieve the perfect aesthetic for every project. There are also specialized formulas like Outdoor Mod Podge for weather resistance, Fabric Mod Podge for textile projects, and Dishwasher Safe Mod Podge for items that need frequent washing. You can easily find Mod Podge at almost any craft store, art supply shop, or online retailer. Ask any experienced DIYer about their favorite versatile craft medium, and “Mod Podge” will undoubtedly be among their top recommendations!
What Can You Decoupage?
The exciting decoupage ideas showcased below will quickly demonstrate that the possibilities are truly vast when it comes to surfaces you can decorate. Almost any clean, dry, and non-porous surface can be decoupaged, including:
- Wood: Furniture, picture frames, boxes, trays, signs
- Ceramic: Vases, plates (for decorative use), tiles
- Glass: Jars, bottles, ornaments, windows
- Metal: Cans, tins, planters
- Terra Cotta: Flower pots, garden decor
- Plastic: Storage containers, phone cases
- Canvas: Wall art, decorative panels
- Fabric: Shoes, bags, clothing (with specific Mod Podge formulas)
Equally diverse are the materials you can use for your cut-outs. The choice of paper or fabric directly influences the final look and feel of your decoupage project. Popular materials include:
- Napkins: Thin, delicate, and often featuring beautiful patterns, napkins create a nearly seamless finish.
- Fabric: Scraps of cotton, lace, or other thin fabrics add texture and a unique textile feel.
- Newsprint & Magazine Clippings: Perfect for vintage, rustic, or collage-style projects.
- Scrapbook Paper & Designer Paper: Available in countless patterns, colors, and thicknesses for specific themes.
- Gift Wrap: A budget-friendly source of vibrant designs.
- Maps & Book Pages: Ideal for creating nostalgic or academic-themed decor.
- Photos: Personalize items with cherished memories (ensure photos are printed on thin paper or treated appropriately).
- Tissue Paper: Creates a translucent, layered effect.
The sheer variety means you can transform virtually anything to match your personal style and home decor. This adaptability is precisely what makes decoupage one of the most beloved and popular craft projects out there. It’s an art form that empowers you to take old, uninspired pieces and give them a completely new, stylish, and customized identity.
Why Decoupage is a Fantastic Craft
Decoupage offers more than just a creative outlet; it’s a craft brimming with practical benefits and immense satisfaction. Here’s why decoupage continues to captivate crafters of all skill levels:
- Cost-Effective Creativity: One of the biggest draws of decoupage is its affordability. Instead of buying new items, you can transform existing, often discarded, objects. A bottle of Mod Podge and some inexpensive paper or fabric scraps can yield truly remarkable results, saving you money while sparking your imagination.
- Eco-Friendly Upcycling: In an age where sustainability is key, decoupage shines as an eco-conscious craft. It encourages upcycling and repurposing, reducing waste by giving new purpose and beauty to items that might otherwise end up in a landfill. Think old coffee cans becoming chic planters or drab dressers turning into statement pieces.
- Limitless Personalization: Want to express your unique style? Decoupage is your canvas. From custom furniture to one-of-a-kind gifts, you can tailor every detail. Choose patterns, colors, and themes that truly resonate with you or the recipient, making each creation deeply personal and meaningful.
- Beginner-Friendly: Unlike many crafts that require extensive training or specialized tools, decoupage is remarkably easy to learn. The basic steps are simple to grasp, making it perfect for beginners. With a little practice, you can achieve professional-looking results quickly, building confidence as you go.
- Versatile Application: As we’ve seen, decoupage isn’t limited to a single material or object. Its versatility means you can apply this technique to almost any surface and use a vast array of papers and fabrics. This adaptability ensures that you’ll never run out of new and exciting projects to tackle.
- Adds Instant Charm and Character: Whether you’re adding intricate floral patterns to a vase or a bold geometric design to a tabletop, decoupage instantly infuses items with charm, character, and a handmade appeal that mass-produced goods often lack. It’s a wonderful way to add warmth and personality to any space.
Essential Tools and Materials for Decoupage
Getting started with decoupage requires only a few basic supplies, most of which you might already have around your home or can easily purchase from any craft store. Here’s a checklist of the essentials:
- Decoupage Medium (e.g., Mod Podge): As discussed, this all-in-one adhesive, sealer, and finish is paramount. Choose the finish (gloss, matte, satin) and specific formula (original, outdoor, fabric, dishwasher safe) that best suits your project.
- Applicator Brushes or Foam Brushes: You’ll need brushes to apply the decoupage medium. Foam brushes are great for smooth, even coats and are easy to clean. Synthetic bristle brushes also work well, just ensure they don’t shed bristles onto your work.
- Scissors or Craft Knife: For precisely cutting out your paper or fabric designs. A self-healing cutting mat is also recommended if using a craft knife.
- Brayer or Smoothing Tool: A brayer (a small roller) or a plastic squeegee helps smooth out your glued papers, removing air bubbles and wrinkles for a flawless finish. Even a credit card or your fingers can work in a pinch.
- Chosen Papers or Fabric: Select your decorative materials. This could be anything from colorful napkins, patterned scrapbook paper, magazine clippings, printed photos, or fabric scraps. Ensure your chosen material is thin enough to adhere smoothly.
- Object to Decoupage: Pick your base item! This could be a wooden box, a glass vase, an old piece of furniture, a terra cotta pot, or anything else you wish to transform.
- Water and Paper Towels: Essential for cleaning brushes and wiping up any excess adhesive.
- Protective Sealant (Optional but Recommended): For projects that will see heavy use, be handled frequently, or be exposed to moisture, an additional clear sealant (like a clear acrylic spray or varnish) can provide extra durability and protection.
With these simple tools and materials, you’re all set to embark on your decoupage adventure!
Tips for Successful Decoupage
While decoupage is a forgiving craft, a few simple tips can help ensure your projects turn out beautifully and last longer:
- Prepare Your Surface: Always start with a clean, dry, and smooth surface. For wood, lightly sand and wipe away dust. For glass or metal, clean with rubbing alcohol. If painting your base item, ensure the paint is fully cured before decoupaging.
- Test Your Paper/Fabric: Different materials react differently to decoupage medium. If using very thin paper (like napkins), consider testing a small piece first to see how it absorbs the adhesive and if it becomes overly delicate.
- Cut Precisely: Cut your paper or fabric designs accurately before applying them. For intricate designs, a craft knife can provide cleaner edges than scissors.
- Apply Thin, Even Coats of Mod Podge: Avoid applying too much adhesive at once, as this can lead to wrinkles and bubbles. A thin, even layer is best for adherence, followed by thin topcoats for sealing.
- Work in Small Sections: Especially on larger items or with delicate papers, apply the medium to a small area, place your cut-out, smooth it, and then move to the next section.
- Smooth Out Bubbles and Wrinkles: Immediately after placing your paper or fabric, gently smooth it from the center outwards using a brayer, your fingers, or a credit card. This pushes out air bubbles and flattens wrinkles. Pierce stubborn bubbles with a needle and smooth them down.
- Allow Ample Drying Time: Patience is key! Let each layer of Mod Podge dry completely before applying the next. Rushing this step can lead to stickiness, cloudy finishes, or trapped moisture. Refer to product instructions for recommended drying times.
- Multiple Topcoats for Durability: For items that will be handled frequently, like furniture or trays, apply 2-3 (or more) thin topcoats of Mod Podge, ensuring each layer is dry before adding the next. This builds a strong, protective seal.
- Seal for Water Resistance (If Needed): If your decoupaged item needs to be waterproof or highly durable (e.g., outdoor decor, coasters), apply a final clear, waterproof sealant like a polyurethane varnish or a specialized outdoor Mod Podge.
- Clean Your Brushes Immediately: Mod Podge is water-based, so clean your brushes with warm water and soap right after use to prevent them from hardening.
By following these tips, your decoupage projects will be enjoyable to create and beautiful to behold for years to come!
The Best DIY Decoupage & Mod Podge Projects
Now that you’re armed with knowledge about decoupage, Mod Podge, essential tools, and pro tips, it’s time for the exciting part: discovering incredible project ideas! This curated list features diverse DIY decoupage and Mod Podge projects that cater to all tastes and skill levels. Prepare to be inspired to transform your home and create unique, personalized items.
Napkin Decoupage Technique
Give an old, plain mirror an astonishing facelift using nothing more than vibrant paper napkins and a bottle of Mod Podge. This project takes it from mundane to a truly captivating statement piece, adding a pop of color and personality to any room. It’s a surprisingly simple way to achieve a high-impact decor transformation.
Washi Tape Desk
Witness an incredible upcycle transformation with this desk project! By artfully decoupaging washi tape onto the tabletop and applying a fresh coat of paint, an old, forgotten desk is reborn with a vibrant, modern striped design. This is a brilliant example of how simple materials can lead to truly awesome furniture makeovers.
IKEA Kid’s Chair Makeover
Tired of the standard bright colors of children’s furniture? This clever decoupage project shows you how to elevate a basic IKEA kid’s table and chairs. By combining paint, Mod Podge, and your favorite fabric, you can create a surprisingly sophisticated and stylish set that complements your home decor. A simple yet impactful update for any child’s space.
Coiled Magazine Basket
Transform old magazine pages into a charming and eco-friendly storage solution with this coiled basket project. Using Mod Podge, you can create a durable and decorative basket. Leave off the lid for an open trinket dish, or add it for a unique catch-all for small items. It’s a creative way to repurpose paper waste.
Design Detail on Drawers
Elevate a simple dresser with a touch of elegance by adding beautiful decorative paper to the often-overlooked sides of the drawers. This quick and easy decoupage tutorial provides clear instructions to achieve a sophisticated and custom look, transforming a functional piece into a stylish furniture statement with minimal effort.
Decoupage Furniture With Fabric
Reimagine a plain wooden chair into a vibrant, fun, and funky desk chair by decoupaging it with a beautiful fabric. This popular and incredibly easy DIY technique allows you to customize furniture with patterns and textures that paint alone cannot achieve, making it a standout piece in any room.
Custom Bracelets
Craft your own stunning and personalized accessories with these simple DIY decoupage bracelets. This project offers limitless customization options, allowing you to use any paper or fabric to create unique bangles that perfectly match your style or make thoughtful, handmade gifts. An easy and fun way to upgrade your jewelry collection!
DIY Custom Wall Decals
Create a captivating focal point on your walls by decoupaging your favorite fabric onto custom letters or shapes. This project, which can be made even easier with a cutting machine, adds unique texture and a personalized statement to any room. It’s a fantastic way to incorporate fabric patterns into wall decor beyond traditional framed art.
Tabletop Orange Tree
Brighten your home with this delightful DIY orange tree crafted from crepe paper and Mod Podge. This faux floral stem offers a perfect, maintenance-free pop of vibrant color, ideal for areas where real plants might not thrive. It’s a charming accent that brings a touch of nature and artistry indoors.
Durable DIY Rug
Combine fabric scraps and a simple drop cloth to create a high-impact, budget-friendly rug that truly stands out. Finishing this decoupaged floor covering with several coats of poly varnish makes it exceptionally durable and remarkably easy to clean, proving that beautiful home decor doesn’t have to be expensive.
Oyster Trinket Dish
These charming oyster shell trinket dishes are an effortless DIY, making them perfect for personalized gifts. Easily customizable with any tissue paper or napkin, this easy decoupage idea allows anyone to create a beautiful, coastal-inspired catch-all dish for jewelry or small treasures, adding a touch of elegance to any space.
Decoupage Dresser with Fabric
This incredible project demonstrates the transformative power of decoupaged fabric. By pairing a stylish fox-patterned fabric with coordinating paint, an old piece of furniture is given a high-end, custom look that appears almost hand-painted. It’s a gorgeous and unique way to personalize any dresser or cabinet.
DIY Photo Canvas with Texture
Transform any cherished photograph into a bespoke piece of wall art with this easy DIY photo canvas tutorial. Learn how to add authentic canvas texture to your favorite photos, giving them a professional, gallery-wrapped look without the high cost of custom printing. A perfect way to display personal memories.
Large Storybook Art
Create stunning, oversized storybook art for under $30 with this brilliant decoupage craft. This project offers a big visual impact on a small budget, transforming beloved book pages into whimsical and charming wall decor. The finished product is incredibly cute and perfect for a nursery, child’s room, or cozy reading nook.
Colorful Chair Backs
Infuse your kitchen or dining room with unexpected flair by decoupaging fabric onto the backs of your chairs. This brilliant and budget-friendly idea adds a playful pop of color and pattern, instantly elevating the style of your dining set and creating a custom, high-end look without the expense.
Garden Bench Makeover
Don’t toss that old garden bench! This inspiring project demonstrates that decoupage isn’t just for indoors. By applying decoupaged napkins, this bench receives a fresh, Marimekko-inspired makeover, proving you can create durable and stylish outdoor pieces. Remember to use outdoor-specific Mod Podge and sealants for weather resistance.
Watercolor Style Lampshade
Achieve a sophisticated, designer look on a budget with this clever decoupage lampshade idea—no watercolor painting skills required! By carefully applying beautiful patterned paper, you can create a lampshade that appears hand-painted with delicate watercolor flowers, adding elegance and soft illumination to your living space.
Colorful Typography Wall Art
Inject personality and vibrant color into any room with this decoupaged typography art. Using various patterned papers, you can craft a custom piece featuring your favorite quote or phrase. This project is a fantastic source of inspiration for creating unique wall decor that perfectly matches your individual style and family’s aesthetic.
Decoupage Behind Shelves
Add an unexpected touch of design to your furniture by decoupaging geometric print fabric to the back of a hutch or china cabinet. This detail, perfectly complementing a painted exterior, creates a sophisticated and curated look. This technique is also ideal for built-in shelves or bookshelves, instantly updating their appearance.
Glitter Candles
Perfect for adding sparkle to holiday decor or special occasions, this is an incredibly easy and dazzling DIY project. Simply use Mod Podge to adhere your favorite glitter to any candle, creating custom, glittering accents that beautifully catch the light. It’s a quick way to add festive charm.
Mod Podge Confetti Tray
These dazzling trays, created by decoupaging colorful confetti with Mod Podge, are absolute showstoppers perfect for entertaining or display. The tutorial provides specific instructions to achieve the best results, ensuring a smooth finish and helping you avoid common issues like bubbles, for a truly festive and custom serving piece.
Mason Jar Vases
Transform ordinary mason jars into beautiful, decorative vases with this simple decoupage project. Easily customizable with any fabric, paper, or napkin, these vases can be tailored for any season or holiday. Keep a few on hand to quickly add a fresh bouquet for an instant, thoughtful last-minute gift or charming home accent.
Craft Paper Coasters
This project is an excellent starting point for beginner decoupagers. Utilize craft paper, wallpaper scraps, or decorative napkins to dress up plain tiles, transforming them into vibrant, functional coasters. It’s a fantastic way to add a bright pop of color and protect your surfaces, while also being a thoughtful handmade gift.
Collage Graphic Art
You don’t need to be an experienced artist to create beautiful wall decor! This project shows you how to craft charming raindrop art using simple collage and decoupage techniques. Feel free to get more adventurous by choosing any shape and creating intricate designs to match your unique artistic vision.
We hope that seeing these incredible and diverse decoupage ideas has inspired you and convinced you of the wonderful potential of this craft. Decoupage is truly a fantastic way to express your creativity, personalize your living space, and breathe new life into items that might otherwise be overlooked. Whether you’re an experienced crafter or just picking up a brush for the first time, there’s absolutely no limit to what you can create with a little Mod Podge, some paper or fabric, and a good dose of imagination.
So, why wait? Go ahead and pick out one (or even a few!) of these 20+ creative decoupage ideas. You’ll be utterly amazed at the beautiful and unique things you can accomplish with your own two hands. Happy crafting!
More DIY Decor
SEE ALL DIY decor POSTS
-
How to Make a DIY Outdoor Chandelier
-
How to Display Art On Almost Any Smart TV
-
How to Make Faux Oversized Poster Hangers
-
Stunning Light-Up Paper Snowflake Lanterns
-
DIY Christmas Art Display That Makes a BIG Impact
-
How to Make DIY Curtains With Tassels
Wondering how I approach transforming rooms and spaces in our home? Check out Designer in a Binder®.
And if you want exclusive content and behind-the-scenes sneak peeks, be sure to subscribe before you head out!
Stay updated with our latest DIY ideas and exclusive content by joining our newsletter!