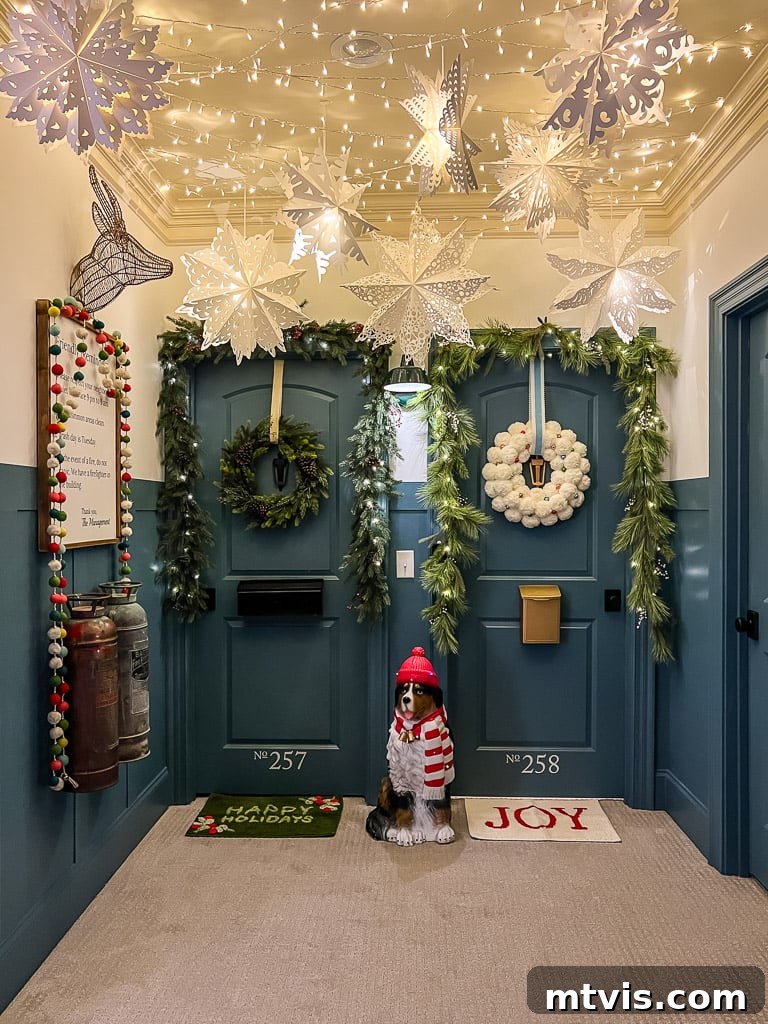
Transforming your home into a haven of warmth and wonder is a joy, especially as the holidays approach. Imagine stepping into a space softly illuminated by a gentle, enchanting glow – a truly magical experience that is surprisingly simple to achieve. This guide will walk you through creating stunning light-up paper snowflake lanterns, an effortlessly beautiful addition that promises to elevate your seasonal decor. With just a few basic supplies and less than an hour of your time, you can craft a breathtaking display that captivates both day and night. Prepare to infuse your home with a touch of magic that feels straight out of a winter wonderland.
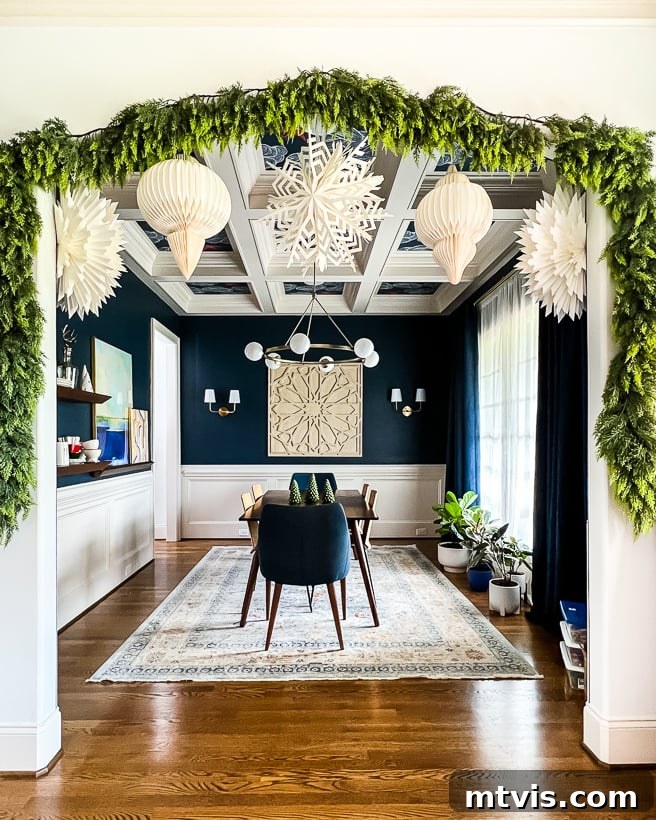
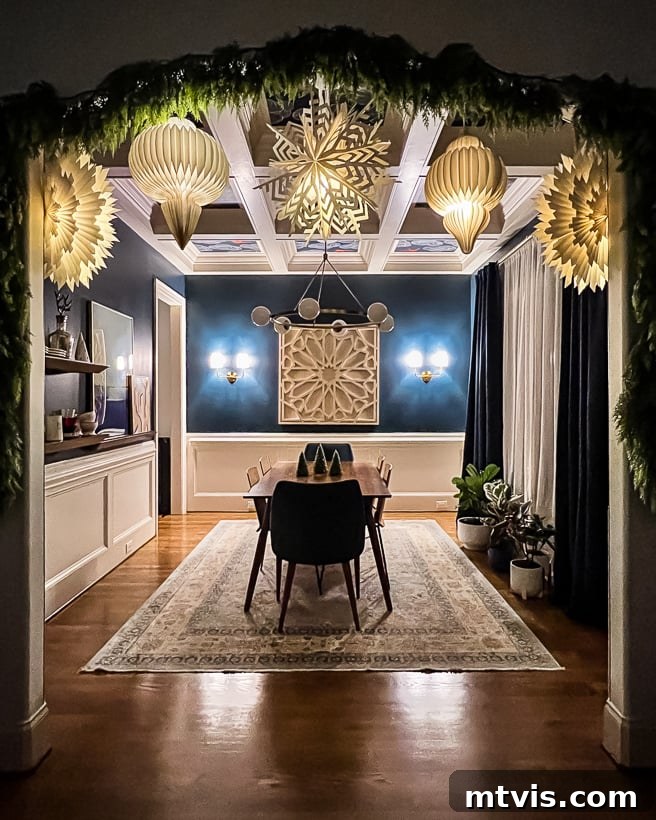
My journey into the delightful world of illuminated paper snowflakes and festive ornaments began in 2021. That year, I adorned the elegant cased opening to our dining room, blending realistic faux garlands with these captivating light-up lanterns. The transformation was instant and profound, creating a cozy and inviting atmosphere. When I shared the photos and videos on Instagram, the response was overwhelmingly positive! Everyone adored how beautiful they looked during the day, but it was their truly fabulous glow at night that sparked widespread excitement. This simple yet effective decorating idea resonated deeply, proving that impactful holiday decor doesn’t have to be complicated or expensive.
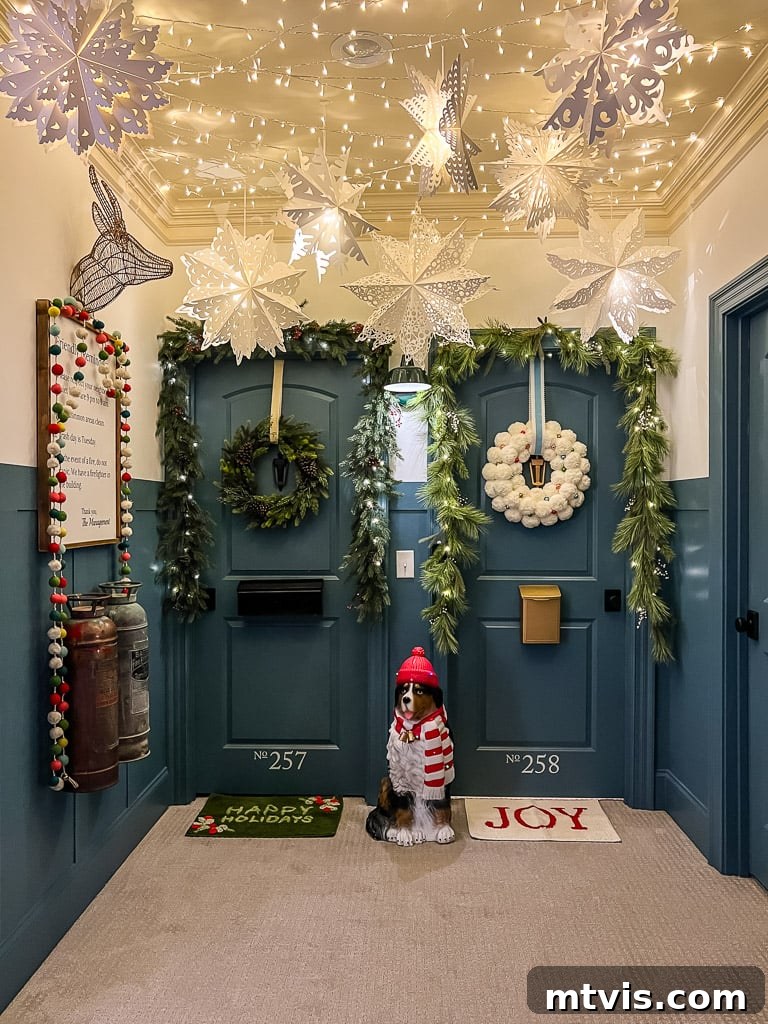
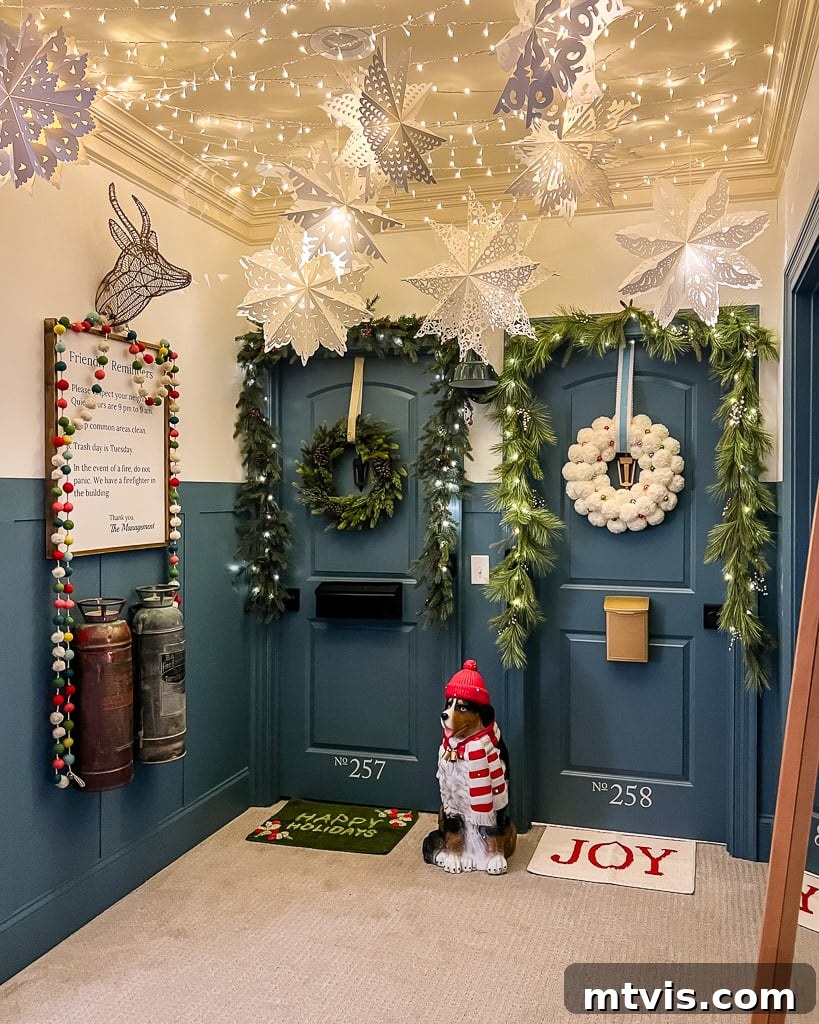
Inspired by that success, this year I sought to recreate a similar enchanting effect, this time for my daughters’ bedroom doors. These doors, which we transformed several years ago to resemble charming apartment entrances, are a beloved feature of our home, especially during Christmas. Each year, we enjoy adding unique festive touches to this area, and I immediately envisioned delicate light-up lanterns cascading from the ceiling, creating an even more magical entryway for them. The specific paper ornament and snowflake lanterns I used previously in our dining room were no longer available, prompting a delightful search for new options. Fortunately, I discovered a stunning set of paper snowflake lanterns that I love even more, boasting intricate designs and a truly captivating glow. This new discovery allowed for an even more personalized and whimsical display, perfectly suited for my daughters’ special space. The beauty of these lanterns lies not just in their aesthetic appeal but also in their ability to transform an ordinary space into something extraordinary, making every day feel a little more like a celebration.
This post contains affiliate links for your convenience. Click here for my full disclosure policy.
Essential Materials for Your Light-Up Snowflake Lanterns
Gathering the right materials is the first step to bringing your magical snowflake lanterns to life. I’ve carefully selected items that ensure both ease of assembly and a stunning final effect. Here’s what you’ll need:
- Hollow Paper Lanterns:
- The original paper lanterns I used in our dining room in 2021 were from World Market, but they are unfortunately no longer stocked.
- For my daughters’ hallway, I used this set of 10 light-up paper snowflake lanterns. I was absolutely thrilled with them – their detailed designs truly enhance the festive atmosphere. Make sure they are designed to be hollow inside once assembled, as this is where your light source will go.
- Remote-Controlled LED Lights:
- You’ll want these remote-controlled LED lights for maximum convenience.
- Important Note: While the set of 10 snowflake lanterns does come with LED lights, they require manual turning on and off. For a display where lanterns hang from the ceiling, this quickly becomes impractical. Investing in separate remote-controlled lights will save you a lot of hassle and enhance your enjoyment of the display.
- Clear Command Hooks: Choose these based on your desired hanging method.
- For hanging lanterns on your wall, opt for clear Command hooks.
- If you’re suspending them from the ceiling, Command ceiling hooks are the perfect solution, offering strong, damage-free adhesion.
- Optional: Extra Twinkle Lights: For an amplified magical effect and an even greater sense of enchantment, consider adding 99-foot long LED twinkle lights. We strung these randomly across our ceiling to create an extra layer of soft, shimmering light, enhancing the overall glow of the display.
Having these items on hand will ensure a smooth and enjoyable crafting experience, leading to a truly dazzling holiday display.
Assembling Your Enchanting Light-Up Paper Snowflake Lanterns
To ensure a perfectly seamless assembly process, I highly recommend watching the short 2-minute video below. It visually demonstrates each step, making the instructions incredibly clear. The video will begin playing after a brief advertisement. For those who prefer written guidance, I have also provided detailed instructions immediately following the video.
When my snowflake lanterns arrived, they surprisingly came without any assembly instructions. While I felt confident due to my past experience with similar lanterns, I quickly realized from numerous comments on my Instagram stories that others found the process less intuitive. Many expressed confusion about how to fully open the snowflakes or keep them securely closed. This highlighted that while seemingly simple, a little guidance goes a long way. Rest assured, the process is incredibly straightforward once you know the trick! Again, the video above offers a perfect visual walkthrough, but here are the written instructions to guide you:
Step 1: Gently Open the Snowflake
Begin by carefully taking one snowflake lantern. Gently pull the opposing ends of the snowflake towards each other. This action will start to expand the paper layers, revealing its intricate design. Take your time with each snowflake to avoid tearing the delicate paper.
Step 2: Insert the LED Light
Once the snowflake is about halfway open, you will notice a hollow cavity at its center. This is where your LED light will go. Carefully insert one of your remote-controlled LED lights into this central space. After placing the light, continue to gently open the snowflake until it is almost fully expanded. For some of the larger snowflakes, the central cavity might be quite generous, and your LED light could potentially fall out. Don’t worry if this happens; refer to the “Hot Tips” section below for an easy solution.
Step 3: Securely Open and Close with the Cord
This step is absolutely critical for the success and longevity of your light-up snowflake lanterns. The cord attached to each snowflake serves a dual purpose beyond merely hanging it; it is essential for both fully opening the snowflake and securing it in that open position. You will notice a small plastic cord stop on each cord. Once you have opened your snowflake as much as possible by hand, gently hold the snowflake in its desired open position. With your other hand, press down on the spring toggle of the cord stop and slide it as far down the cord as you can towards the base of the snowflake. This action will tighten the cord, drawing the paper segments together and locking the snowflake into its fully open, three-dimensional form. For larger snowflakes, or if you find it a bit tricky, an extra set of hands can be very helpful here. Release the spring toggle to lock it in place. Your snowflake should now appear perfectly open and feel completely secure. If your snowflake seems reluctant to stay open or doesn’t look fully unfurled, check out the “Hot Tips” below for troubleshooting advice.
Step 4: Understand the Role of Velcro (if applicable)
Some snowflake designs may incorporate small velcro tabs. It’s important to understand that these velcro pieces are not intended to hold the snowflakes closed. They are simply there to assist in ensuring that the two paper ends of the snowflake press together properly, creating a more seamless and polished appearance once the cord has done the main work of securing the lantern open. Do not rely on the velcro alone to keep your snowflakes expanded, as it is generally not strong enough for this purpose. Always use the cord and toggle mechanism described in Step 3 for stability.
Hot Tips for Perfect Snowflake Lanterns
Don’t let a minor hiccup derail your magical project! Here are some common issues you might encounter and my best advice for resolving them, ensuring your snowflakes look absolutely stunning:
If your snowflake doesn’t fully open or stay securely closed: The most frequent reason for this issue is that one or more segments of your paper snowflake haven’t fully expanded. It’s easy to overlook a section that’s still slightly folded. Before you attempt to tighten the cord, carefully inspect every single segment of the snowflake. Gently unfurl any part that isn’t completely open. I’ve found myself struggling with a couple of lanterns, only to realize that a small segment was stubbornly folded, preventing the whole structure from expanding correctly. Once all segments are properly unfurled and expanded, you will find that tightening the cord as described in Step 3 becomes much easier and more effective, allowing the snowflake to hold its beautiful, open shape without resistance.
If your LED light falls out of larger snowflakes: The central cavities of some of the larger snowflake lanterns might be too spacious to snugly hold a small LED light in place while you’re assembling them. A simple solution is to wait until after you have successfully hung your snowflakes in their final position. Once they are suspended, you can then easily reach inside and find a stable spot to balance the LED light. The gentle sway or fixed position will often provide enough support. If you’re still concerned about the lights shifting or falling, a tiny dab of museum putty can be a wonderful, non-damaging adhesive to secure the LED light within the cavity. However, in my experience, carefully balancing them usually does the trick without any extra materials.
Step 5: Hang and Adjust for Optimal Glow
With your snowflake lanterns assembled and illuminated, it’s time to display them! Use Command hooks to hang them wherever you desire – whether directly on your wall to create a dazzling backdrop or from the ceiling using Command ceiling hooks for a floating, ethereal effect. Once they are in place, take a moment to adjust the position of the LED lights inside each lantern. I found that gently nudging the lights so they point upwards allows the illumination to be distributed more evenly throughout the snowflake, enhancing its radiant glow and maximizing the magical ambiance. This small adjustment makes a big difference in the overall visual impact.
And there you have it! A project so incredibly easy, yet the result is profoundly magical. The soft, enchanting light emanating from these paper snowflakes will transform any room into a captivating winter wonderland, perfect for the holiday season. What are your thoughts on this enchanting DIY decor idea? I’d love to hear how you plan to incorporate these glowing snowflakes into your home!
Frequently Asked Questions About Light-Up Snowflake Lanterns
All the specific details and links for the paper lanterns, along with other necessary materials, are conveniently listed in the “Materials Needed” section earlier in this post. I’ve linked to the exact set I used and loved for the hallway display, so you can easily find them.
Storing these lanterns is remarkably simple, making them a reusable festive decoration year after year. At the end of the holiday season, we carefully take down each lantern, remove the LED lights, and then gently collapse the paper snowflakes back into their flat, original form. This compact storage method saves significant space. We then place them in a dedicated plastic storage bin, along with our other cherished Christmas decorations, ready to be brought out for next year’s festivities.
This is precisely why I recommend investing in remote-controlled LED lights! The LED lights I utilize come with a convenient remote control, allowing you to easily turn them on and off without having to physically reach each lantern. While I would have loved to find remote-controlled LED lights that also included a timer function for automatic operation (like staying on for 4 to 6 hours nightly), I didn’t have luck finding such a feature. However, using the remote each evening to switch them on and off is still incredibly straightforward and hassle-free.
I opted not to use the LED lights included with the snowflake lantern set primarily due to their operational limitations. These lights require manual activation, which would be highly impractical for lanterns hung from a ceiling, as was the case for my daughters’ hallway. Furthermore, the included lights were quite small, and I doubted they would emit sufficient illumination to create the desired magical glow. While they might be a suitable option for smaller, more accessible displays, for our specific setup, the separate, more powerful, and remote-controlled LED lights were a far superior choice.
Thank you for noticing! The board and batten accent wall in our upstairs hallway is indeed one of my favorite DIY projects. I have dedicated an entire post to it, sharing all the details, including an easy step-by-step DIY tutorial, the specific brand, and the exact color of paint we used. It’s a project that truly adds character and charm to any space!
Explore More Seasonal Posts
SEE ALL holiday POSTS
-
The Most Realistic Faux Garlands for 2025
-
Stunning Light-Up Paper Snowflake Lanterns
-
How to Decorate Bedroom Doors to Look Like Apartment Doors
-
DIY Santa Sacks Your Kids Will LOVE!
-
Magical Light-Up Paper Christmas Lanterns
-
Inspiring Front Porch Christmas Decorations & Tips
Curious about my unique approach to transforming rooms and spaces throughout our home? Dive into the world of organized and beautiful design with Designer in a Binder®. This comprehensive guide simplifies the decorating process, empowering you to create spaces you love with confidence and creativity.
For even more exclusive content, behind-the-scenes sneak peeks into my latest projects, and decorating insights, be sure to subscribe to my newsletter before you go! Join our community and never miss out on new ways to make your home shine.