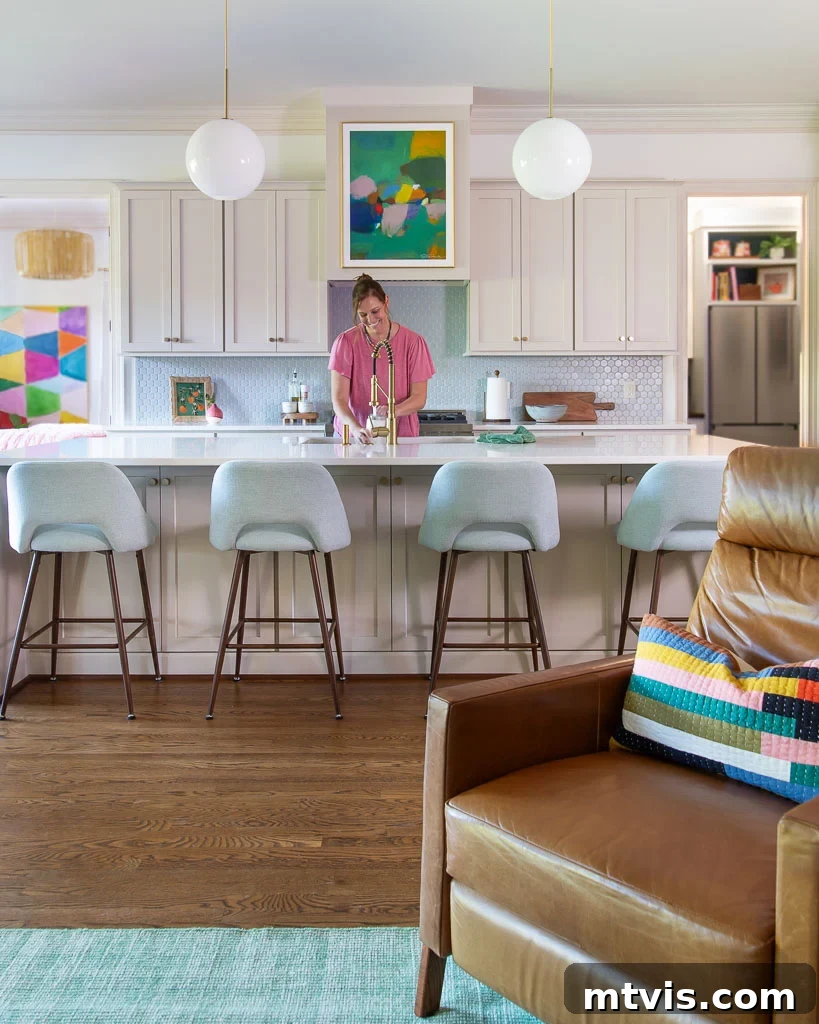
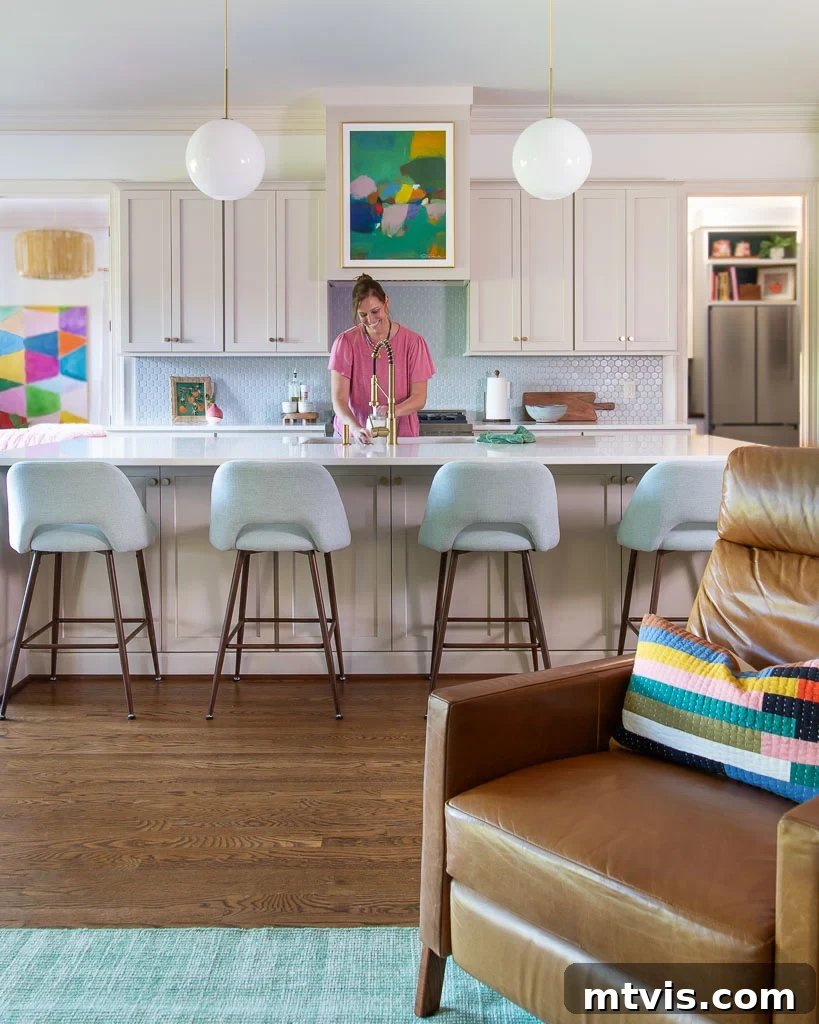
We are absolutely thrilled to finally unveil the complete transformation of our kitchen! This wasn’t just a cosmetic refresh; it was a full-scale renovation meticulously planned to dramatically enhance both functionality and style. Our primary goals were to significantly increase cabinet and countertop space, streamline the layout for better workflow, and infuse our love for color into a beautifully neutral foundation. The result is a vibrant, efficient, and deeply personal kitchen that we couldn’t be happier with. Whether you’re simply curious about our journey or actively seeking innovative ideas to add character and color to your own neutral kitchen, we invite you to explore every detail of our dream space, designed to be both highly practical and aesthetically inspiring.
In This Article: Your Guide to Our Kitchen Transformation
- A Look Back at Our Old Kitchen: From Cosmetic Fixes to Full Renovation
- Why We Decided on a Full Gut Renovation for Our Kitchen
- Strategic Layout Changes: Maximizing Space and Efficiency
- Reclaiming Underutilized Space & Creating a Seamless Working Triangle
- Exponentially Increased Counter Space: A Game-Changer for Workflow
- Increased & Improved Cabinet Storage: Smart Solutions for Every Item
- The Neutral but Colorful Design: A Balanced Approach to Kitchen Aesthetics
- Our New Kitchen Sources: Bringing Our Vision to Life
A Look Back at Our Old Kitchen: From Cosmetic Fixes to Full Renovation
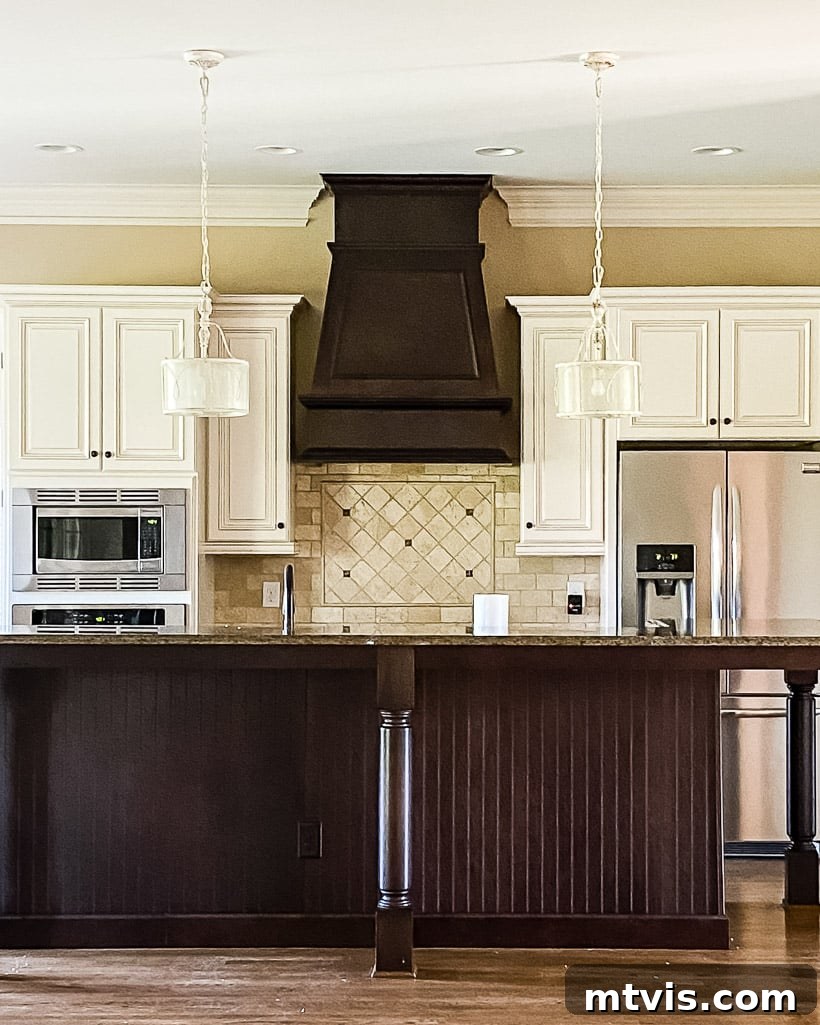
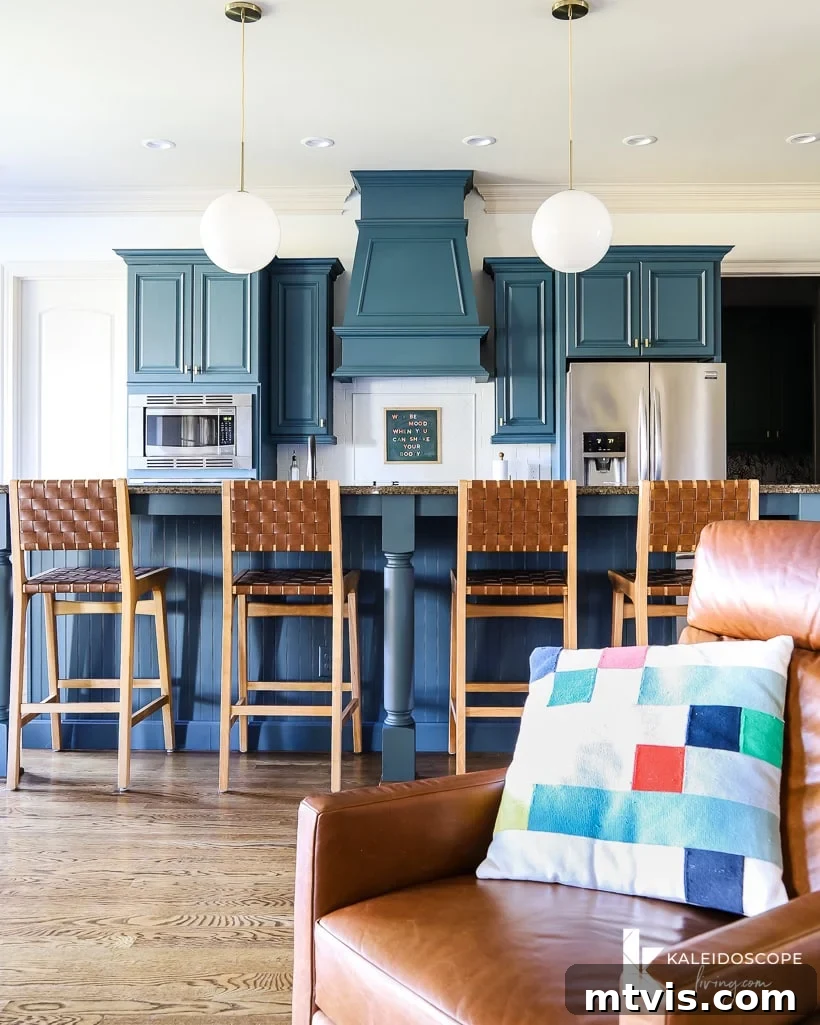
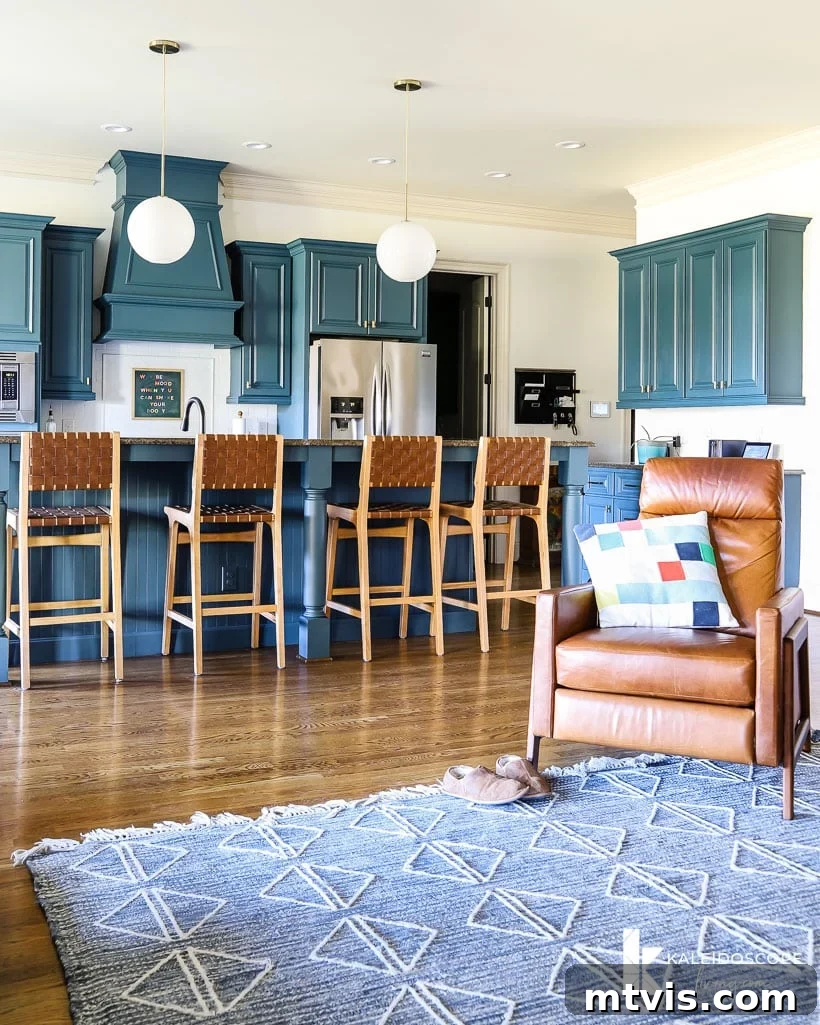
When we first purchased our home, built in 2012, its kitchen possessed what seemed like “decent bones” but lacked the personalized touch and functional efficiency we truly desired. Initially, we embarked on a series of budget-friendly cosmetic makeovers to better align the space with our aesthetic preferences. This included a rewarding, albeit ambitious, project where I managed to paint the kitchen cabinets in just two days without packing anything away—a task that yielded surprisingly professional results. Following that success, I transformed the tile backsplash using a specialized painting method, and even successfully painted the countertops to mimic the luxurious appearance of marble. We recently provided an update on how impressively our painted kitchen countertops held up after three and a half years, proving that even temporary, DIY solutions can offer remarkable durability and style.
These initial changes made a significant visual impact, transforming the kitchen from its outdated brown state into a much brighter and more colorful space. We were genuinely happy with these immediate results, and for a period, these budget-friendly DIY improvements perfectly served our needs. They demonstrated that a complete overhaul isn’t always the first or only answer. However, as time progressed and our family’s needs evolved, deeper functional issues began to surface, hinting that a more comprehensive and permanent solution would ultimately be necessary to create the truly efficient and beautiful kitchen we envisioned.
Why We Decided on a Full Gut Renovation for Our Kitchen
For many homeowners, the decision to embark on a full kitchen renovation is a significant one, often weighed and debated for months, if not years. In our case, after initially being content with our cosmetic upgrades, we ultimately recognized the deeper, underlying need for a comprehensive overhaul. I’ve previously shared all the detailed reasons that led us to fully renovate our kitchen in a dedicated post, which provides extensive insight into our decision-making process. The overarching theme was clear: this renovation was driven by much more than just a desire for a new look. It was about improving daily life and long-term functionality.
While the original cabinets and range hood possessed a more ornate and traditional style than our minimalist preferences, purely changing the visual appeal would never have justified such a substantial investment. With the budget-friendly cosmetic enhancements we completed a few years prior, our kitchen was already quite pretty and perfectly presentable. The true impetus for our decision to gut the kitchen and start fresh stemmed from a series of accumulating functional problems that significantly hindered our daily life, cooking experience, and overall enjoyment of the space.
Here’s a brief review of the critical functional issues that ultimately pushed us towards a complete renovation, highlighting how a full remodel became the most sensible long-term solution:
#1 Chronic Lack of Adequate Counter Space for Prepping and Serving Meals: This was, without a doubt, one of the most frustrating daily challenges. Our largest continuous stretch of uninterrupted counter space measured a mere 3 feet wide, which proved woefully inadequate for even basic meal preparation. Around the cooktop, we had only 18 inches of counter on each side – an impractical dimension that couldn’t even comfortably accommodate two dinner plates side-by-side. This severe limitation constantly hindered our ability to cook efficiently, entertain guests without feeling cramped, or even manage daily meals without a sense of disorganization. It was a major bottleneck in our kitchen’s workflow.
#2 Aging and Failing Appliances Past Their Prime: The kitchen’s original appliances were 12 years old and had unequivocally begun their rapid decline, impacting our household’s efficiency and budget. The hood vent fan, dishwasher, one of the ovens, and the ice maker in our refrigerator were all broken or intermittently failing. Even the microwave, while still technically operational, emitted concerning noises that strongly signaled its impending failure. Replacing individual appliances would have been a costly series of band-aid solutions. The cumulative expense, coupled with the desire for modern features and improved energy efficiency, made a full appliance upgrade within a newly designed layout a far more logical and economically sensible long-term choice.
#3 Insufficient Cabinet and Drawer Storage in the Primary Work Zone: Despite the overall footprint of the kitchen, the critical “work zone” suffered from a severe and frustrating lack of practical storage. We had only two small 18-inch upper cabinets dedicated to dishware and drinkware, making organization a constant struggle to fit everything or to keep frequently used items accessible. Drawer space for cutlery, utensils, and essential cooking tools was also minimal, forcing us to store frequently used items in less accessible pantry areas or other rooms, thereby disrupting workflow and efficiency during meal preparation.
#4 Deteriorating Cabinetry and the Urgent Need for New Countertops: The original cabinets were not only aesthetically outdated but were also physically deteriorating at an alarming rate. As our contractor commenced the demolition, many of the older cabinet components literally started falling apart, revealing their poor underlying condition and construction. We also contended with broken drawer slides and non-functional soft-close hinges, making the cabinetry frustrating and cumbersome to use on a daily basis. While our painted countertops had performed remarkably well for three and a half years, they were always intended as a temporary, cosmetic solution, and the time had finally come to invest in durable, high-quality replacements that would stand the test of time and heavy family use.
Strategic Layout Changes: Maximizing Space and Efficiency in Our New Kitchen
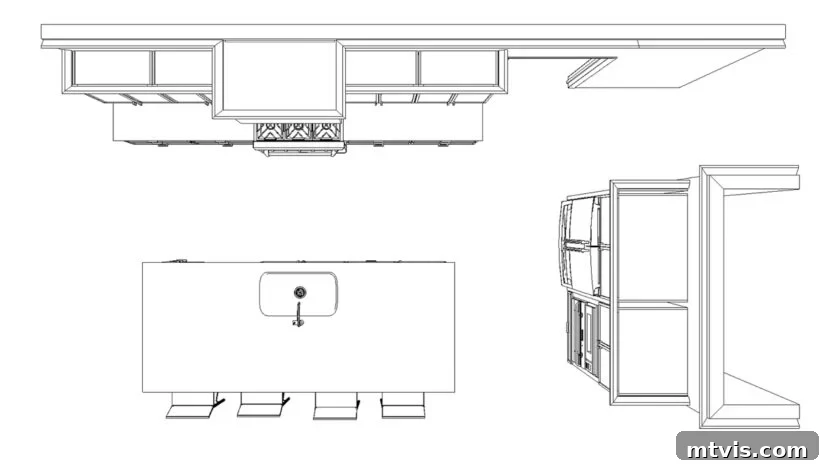
Once the definitive decision was made for a full kitchen renovation, our immediate focus shifted to the incredibly crucial task of reimagining the layout. This wasn’t merely about moving things around; it was the cornerstone of our entire plan, aiming to significantly boost both countertop space and cabinet storage, particularly within the kitchen’s primary work zones. To meticulously visualize and refine our ideas, I utilized my trusted Designer in a Binder, a tool that proved invaluable for sketching various layout options, identifying potential challenges, and ultimately solidifying our vision for the new, more efficient space. This thorough planning at the outset was absolutely crucial to avoid costly mistakes, minimize unforeseen issues during construction, and ensure the final design met every single one of our stringent functional and aesthetic requirements.
Reclaiming Underutilized Space & Creating a Seamless Working Triangle
A pivotal realization in our meticulous planning process was that strategically relocating the bulky oven/microwave stack and the refrigerator would be instrumental in unlocking a wealth of additional, much-needed counter space and dramatically improving the kitchen’s overall flow. We made the strategic decision to move these essential appliances to a wall that was previously occupied by an under-utilized bank of cabinetry. This old cabinetry, while present, was not situated within the kitchen’s active work zone, making it highly impractical for daily prep tasks or for storing frequently accessed items. Its former existence, as explained in a prior video, was a significant missed opportunity for efficiency, creating a dead zone in what should have been a vibrant hub.
This thoughtful and strategic relocation of major appliances transformed a once-ineffective area into an integral and highly functional part of our kitchen’s main working zone. The most significant benefit of this layout change was the successful establishment of a proper “working triangle.” For those unfamiliar, the working triangle is a fundamental kitchen design principle that efficiently connects the three primary work areas: the sink, the refrigerator, and the cooking area. By optimizing the placement of these elements, we minimized steps and maximized efficiency. Now, moving seamlessly between these key points is intuitive, effortless, and contributes significantly to a more enjoyable and productive cooking experience, whether preparing a quick snack or a multi-course meal.
Exponentially Increased Counter Space: A Game-Changer for Workflow and Entertaining
One of the most profoundly transformative aspects of our kitchen renovation is the dramatic and truly exponential increase in usable counter space. Previously, we constantly struggled with a mere 18 inches of countertop on each side of the cooktop, and only 36 inches adjacent to the sink on the main island level. These critically limited areas made every aspect of kitchen activity, from basic meal prep and baking to even simply setting out dishes for a family dinner, a constant challenge. We often felt cramped, disorganized, and found ourselves inadvertently bumping into one another during busy cooking times.
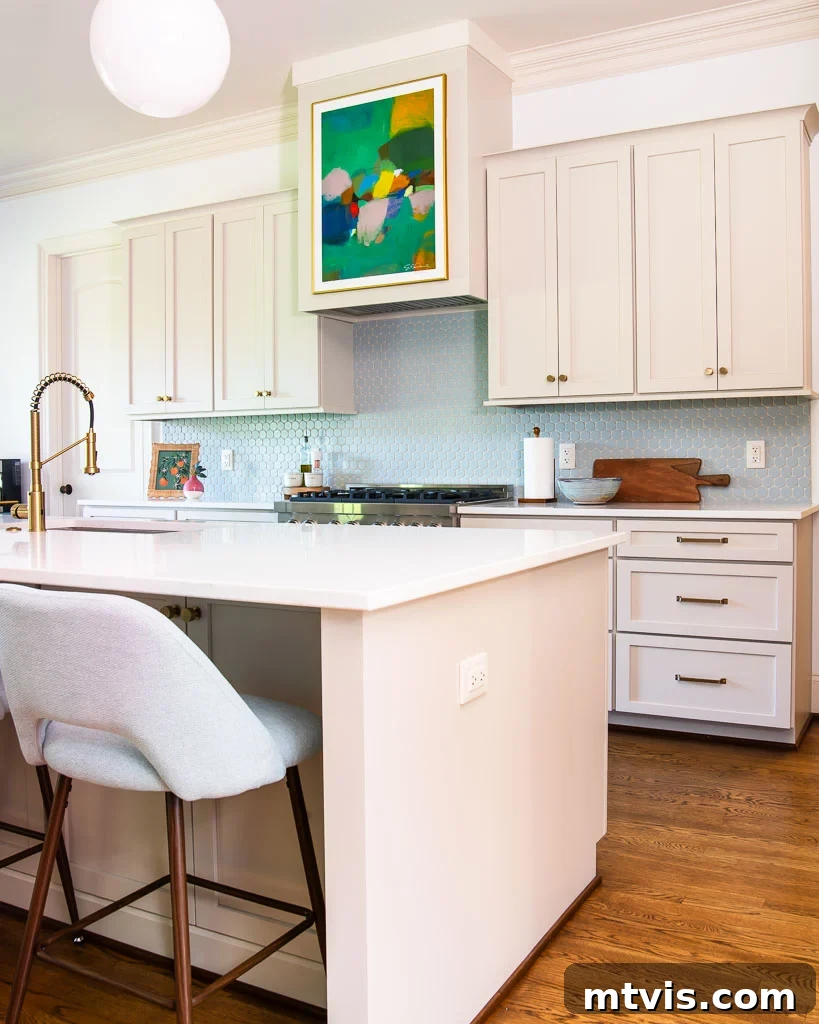
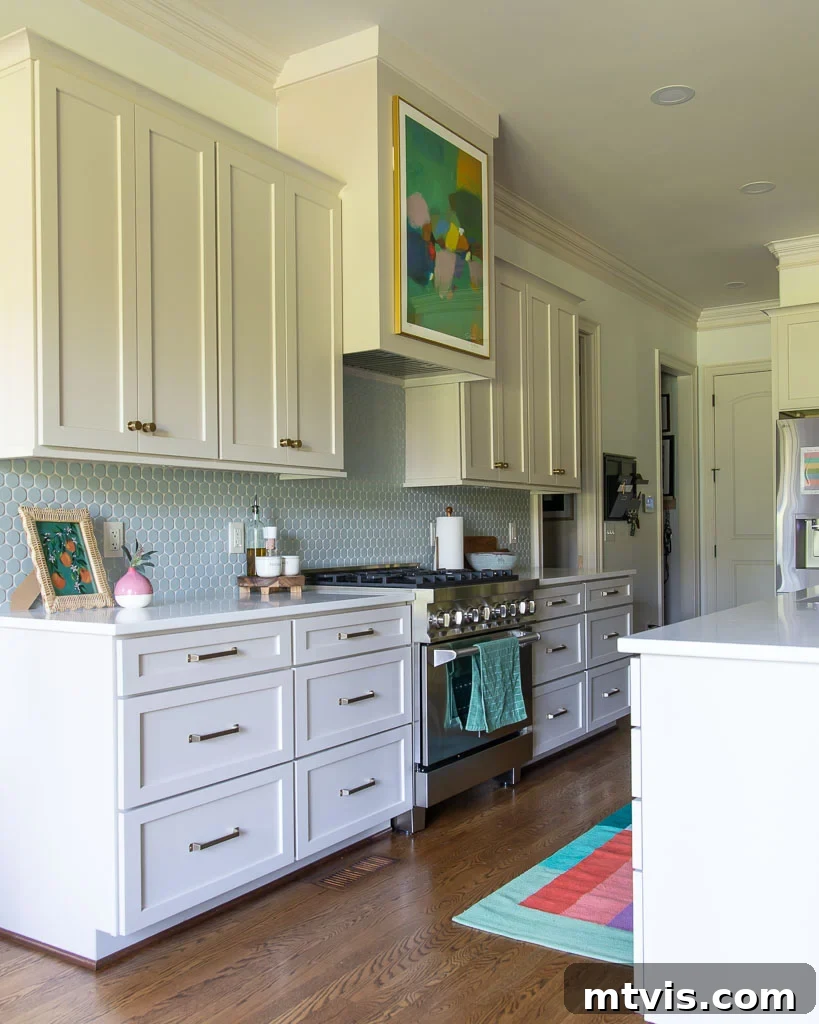
Our new kitchen layout has unequivocally redefined efficiency and comfort. We now proudly boast a generous 54 inches of uninterrupted counter space on each side of the range, providing an abundance of room that comfortably accommodates multiple cooks, extensive meal preparation sessions, or large serving platters when entertaining. Similarly, the area around the sink has been expanded to a luxurious 42 inches on each side, offering unparalleled elbow room for dishwashing and food prep. Furthermore, by transforming the entire island into a single, unified level (a decision that eliminated the previous multi-height bar section), we gained an incredible 120 inches of continuous island counter space that simply wasn’t usable before for anything beyond casual seating. This massive expanse now serves as a dynamic, multifunctional hub for everything from elaborate baking projects to family homework sessions, large buffet-style gatherings, and everyday tasks.
It is genuinely difficult to overstate how much this strategic increase in counter space has revolutionized the flow and overall capacity of our kitchen. As a household that cooks approximately 95% of our meals at home, this improvement is nothing short of life-changing, enhancing both our efficiency and enjoyment. Several people can now comfortably and simultaneously engage in cooking, prepping, or cleaning without any feeling of restriction or awkwardness. This newfound freedom and flexibility have truly made our kitchen the functional and enjoyable heart of our home, perfectly accommodating our family’s dynamic needs and ambitious culinary adventures.
This post contains affiliate links for your convenience. Click here for my full disclosure policy.
Increased & Improved Cabinet Storage: Smart Solutions for Every Kitchen Essential
Beyond the enhanced counter space, we also achieved a truly drastic increase in usable storage capacity within the working core of our kitchen. The old layout offered only two small 18-inch upper cabinets, which were woefully inadequate for housing our dishware and glass collections, making organization a constant uphill battle. Our new design proudly features FOUR spacious 27-inch upper cabinets, providing an abundance of accessible storage that has, quite literally, transformed our daily kitchen routines. This substantial upgrade means we no longer struggle to find space for essentials or resort to storing them far from their point of use, making meal times significantly smoother. You’ll also notice our deliberate choice of simple shaker style cabinetry; this clean, timeless, and more contemporary aesthetic perfectly aligns with our personal style, offering a refreshing departure from the more ornate and dated look of the previous units.
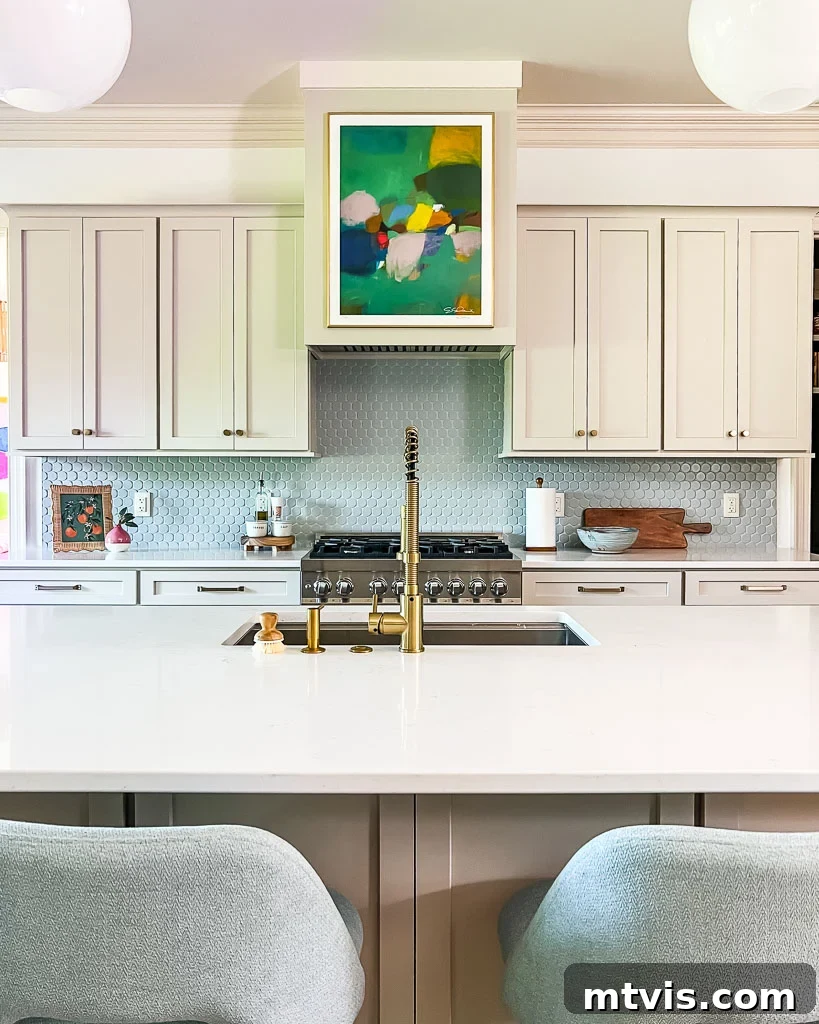
For the base perimeter cabinets, we made the conscious and highly practical decision to install drawers across all four units. This design choice is one we strongly prefer for its superior organization and immediate accessibility, allowing us to neatly store everything from bulky pots and pans to various sizes of Tupperware containers without any fuss. Gone are the days of frustratingly rummaging through deep, dark cabinets; now, every item is effortlessly visible and retrievable with a simple pull. Furthermore, we now enjoy significantly more top drawer space, perfectly suited for our expanded collection of frequently used utensils and cutlery, ensuring they are always at hand. A particular highlight is being able to move our entire spice collection from its former home in the pantry into a dedicated kitchen drawer, placing them exactly where they’re needed most during cooking. This small but impactful change epitomizes the thoughtful functionality and user-centric design of our new kitchen.
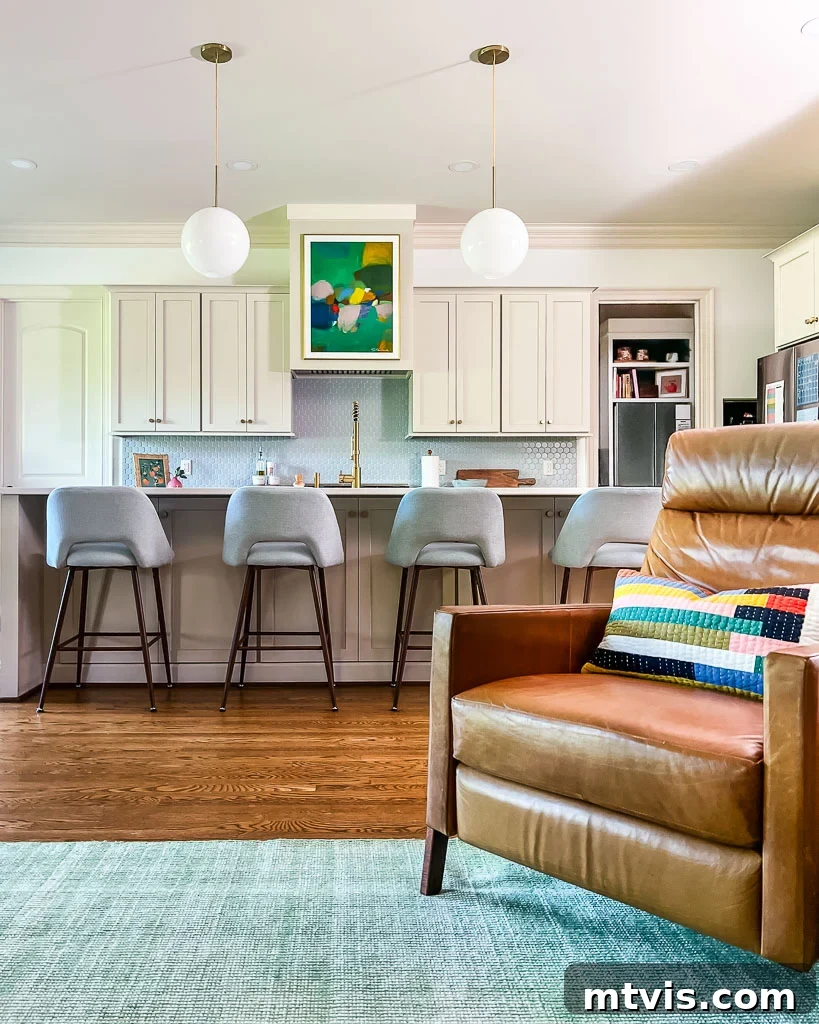
The leveling of our island also yielded substantial and unexpected gains in cabinetry. The working side of our island now includes one additional cabinet, providing essential storage right where it’s needed most, and two of the existing island cabinets are considerably larger than their predecessors, maximizing vertical space. Perhaps even more exciting is the completely new storage added along the entire non-working side of our island. This previously unused area now smartly houses a series of cabinets, most of which are currently empty, offering incredible future flexibility for our evolving storage needs. They’ve already proven perfectly suited for stashing various dog essentials, lesser-used entertaining dishes, and our small collection of decorative vases, keeping them neatly out of sight but readily accessible when needed.
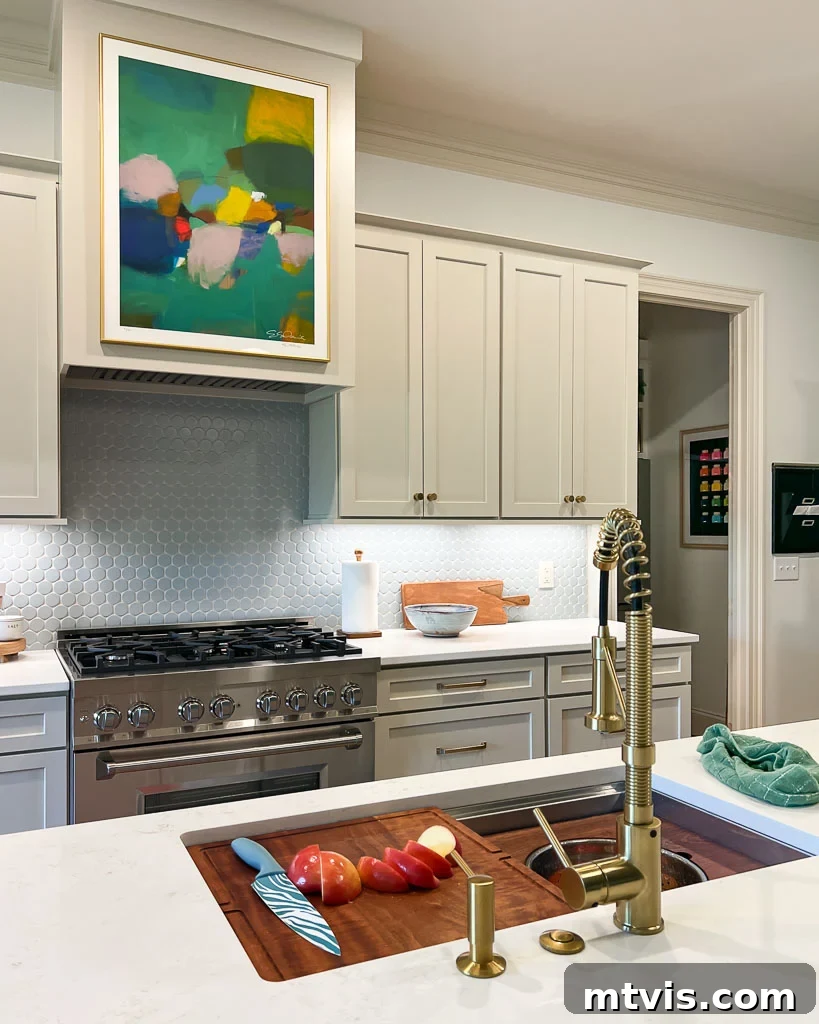
While no one specifically asked, I simply must express my profound appreciation for our incredibly affordable workstation sink. In our previous home, we installed the significantly more expensive Kohler Prolific workstation sink during our kitchen remodel and absolutely loved its features. This time, I made it my mission to find a more budget-friendly alternative that didn’t compromise on quality or versatility – and I unequivocally succeeded! I honestly believe I like this new sink even more, and I find its aesthetic much prettier and more modern. We chose the 33-inch version, though it’s conveniently available in various sizes to suit different kitchen dimensions. What truly sets it apart is that it comes packed with an impressive array of integrated accessories, transforming the sink from a simple basin into a multi-functional prep and cleanup station. This includes a sturdy cutting board, a versatile colander, a mixing bowl, a practical 3-bowl serving board, a convenient drying rack, and much more. These accessories fit perfectly within the sink ledges, making it an indispensable asset for any busy kitchen and truly elevating the entire cooking experience.
The Neutral but Colorful Design: A Balanced Approach to Kitchen Aesthetics
Developing the aesthetic for our kitchen was a deeply thoughtful and iterative process, ultimately culminating in what we fondly call a “neutral but colorful” design philosophy. I’ve dedicated an entire blog post to our detailed design plan, where I thoroughly elaborate on my precise design process and the detailed rationale behind every single choice made in creating this beautifully balanced kitchen. While a short video also provides a concise explanation of our vision, the core principle remains consistent and powerful: establishing a versatile, timeless neutral base allows for creative, flexible, and easily updateable layering of vibrant color and personality.
Our intentional decision to choose neutral “bones” for the kitchen was purely strategic. We adore how vibrant colors truly pop, command attention, and feel fresh when set against a calm, serene neutral backdrop. Beyond pure aesthetics, this approach offers immense practical and long-term benefits. Investing in classic neutral tones for expensive, long-lasting elements like cabinetry, countertops, and core furniture provides invaluable flexibility for future updates. Should our personal preferences evolve, or should design trends shift over the years, we can effortlessly and affordably update the entire color palette of the space simply by changing out accents, textiles, and art. This ingenious strategy ensures our kitchen remains timeless, adaptable, and perpetually stylish for decades to come, without the need for another major, costly overhaul.
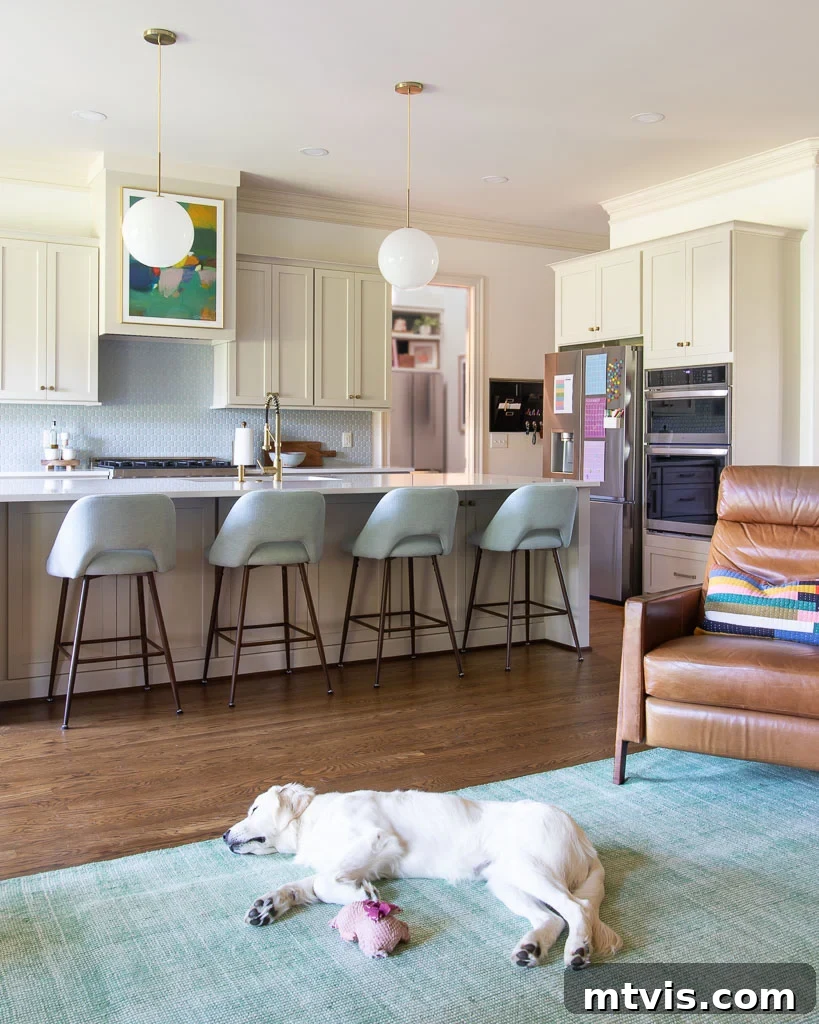
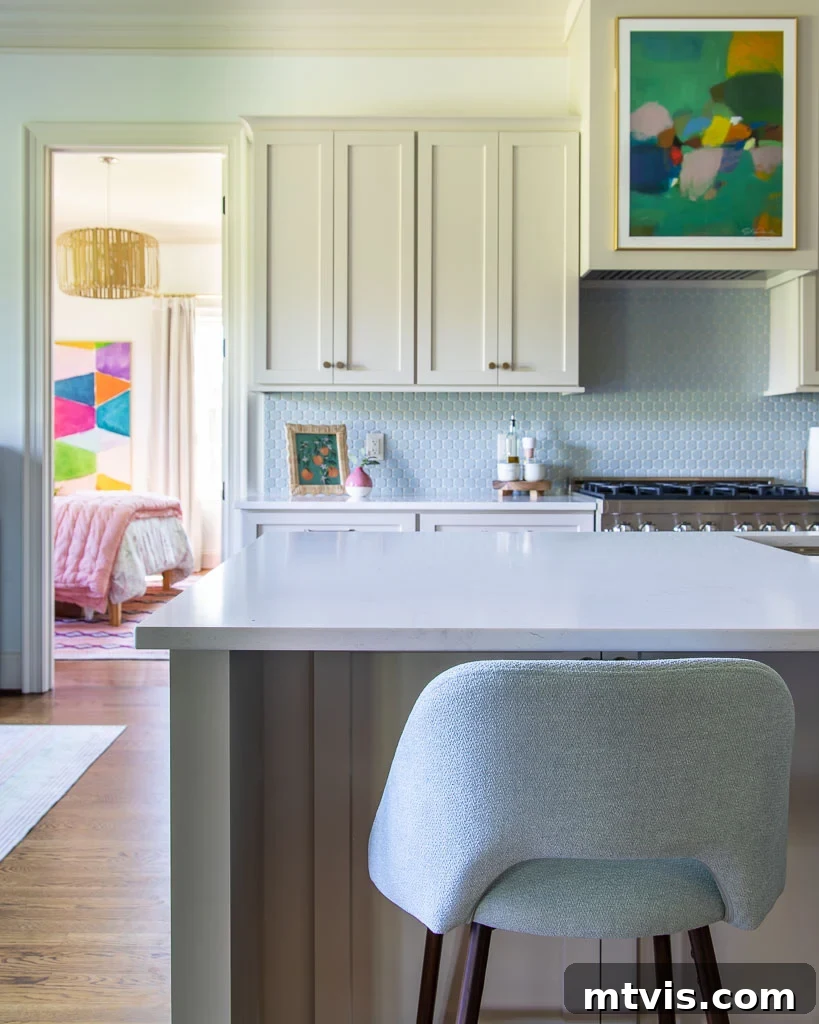
For our simple yet elegant shaker cabinetry, we meticulously selected Accessible Beige by Sherwin Williams. This shade is a perennial favorite of mine, widely recognized for its warm, inviting undertones and incredible versatility, making it one of the most ideal neutral paint colors for kitchen cabinets. For the backsplash, we opted for this exquisite light-blue oversized penny tile. While it introduces a delightful hint of soothing color, its soft hue maintains a sense of sophisticated neutrality, offering subtle texture and visual interest without ever overpowering the space. This careful combination of cabinetry and backsplash forms the perfect, understated foundation upon which our vibrant layered design truly shines.
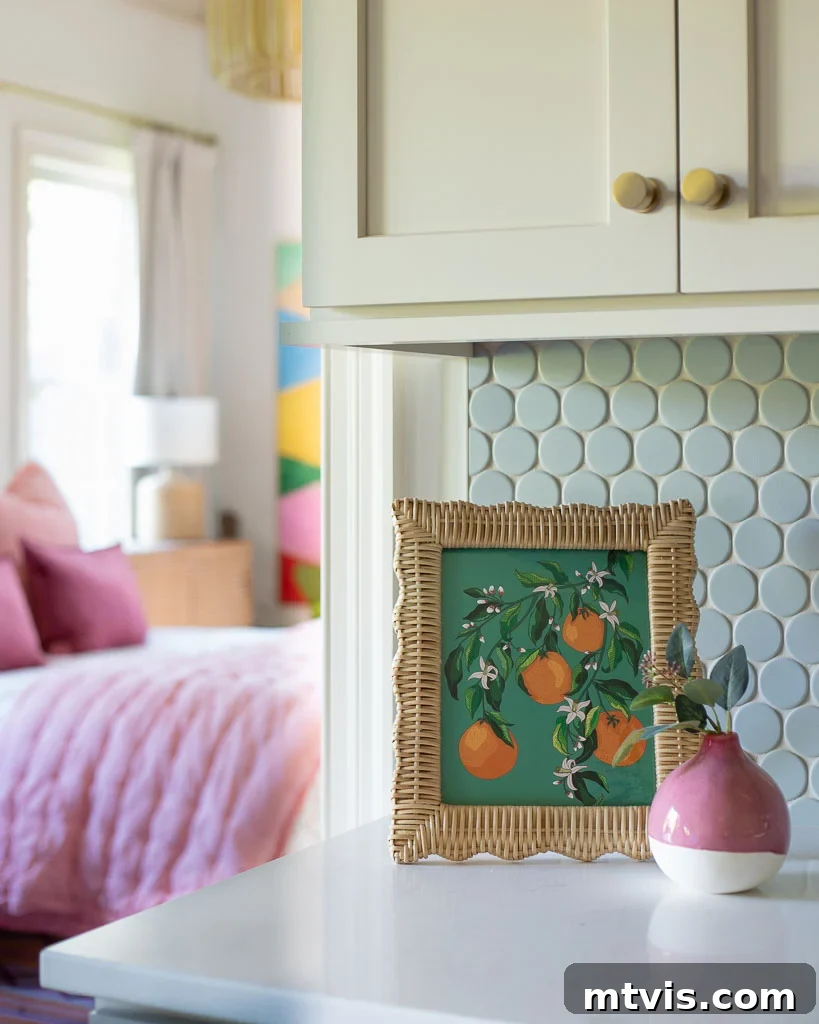
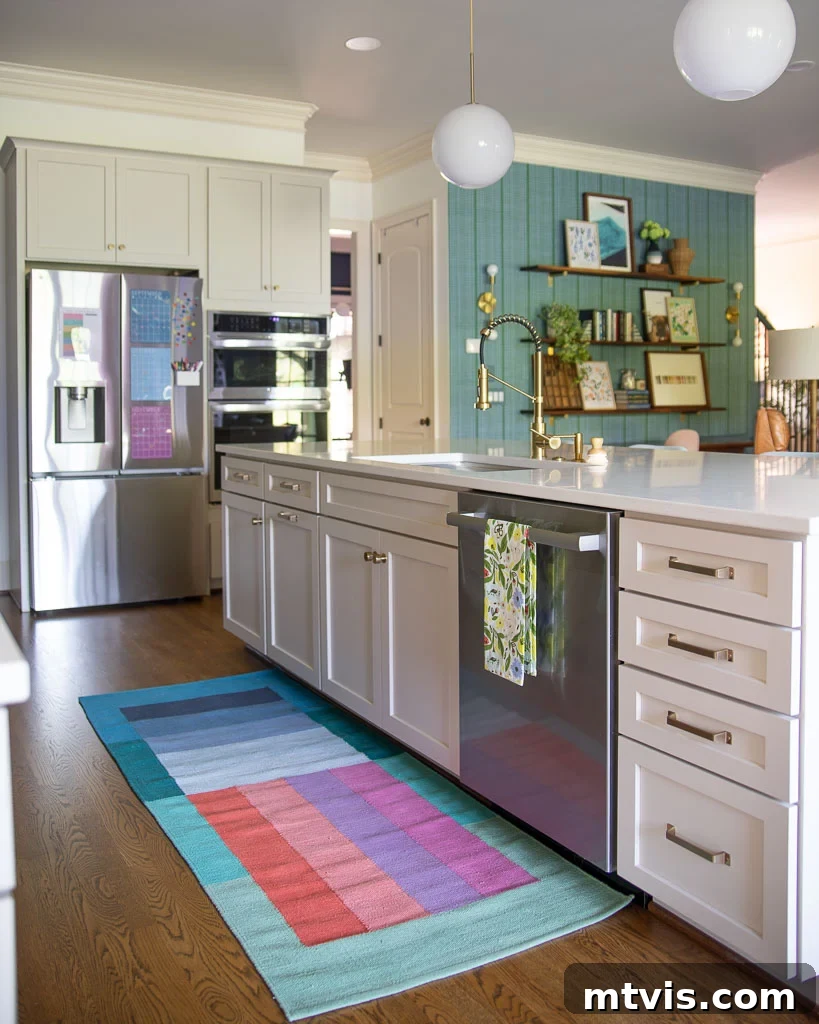
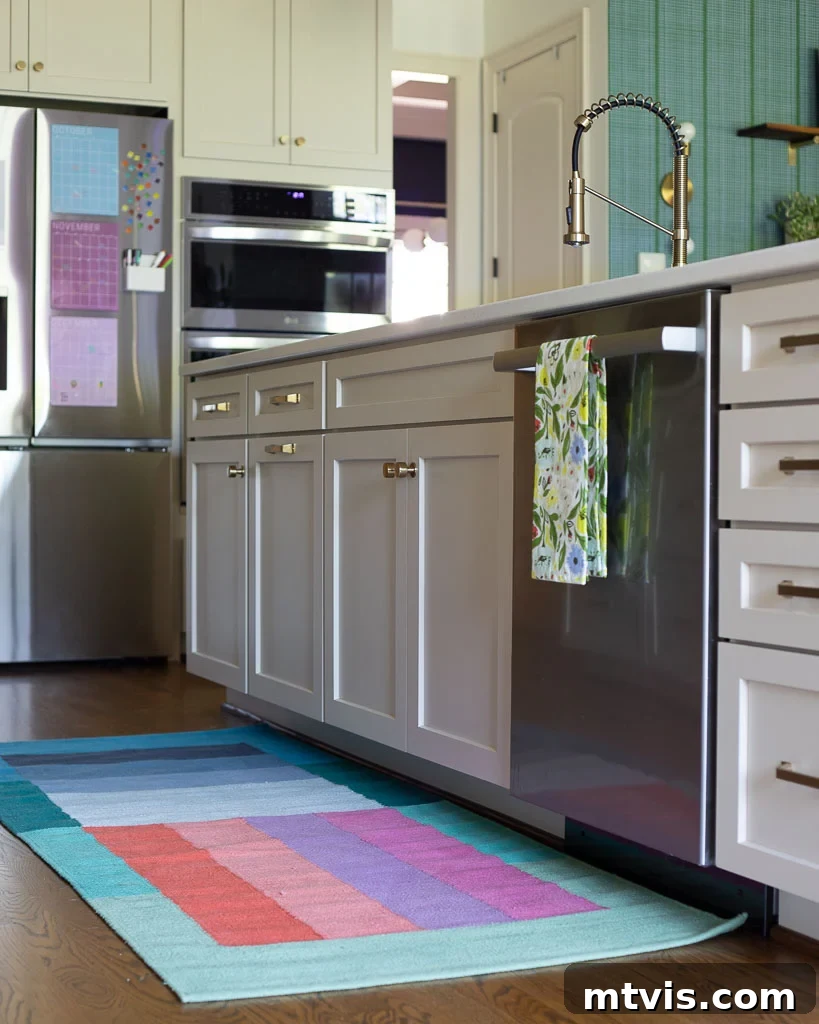
The true magic of our design comes alive through the careful and artful layering of color, meticulously transforming the neutral canvas into a warm, inviting, and deeply personal space. We proudly reintroduced a cherished colorful kitchen runner that has been a beloved part of our home for many years; its familiar patterns and vibrant hues instantly ground the space and add a cozy touch. Small, thoughtful decorative elements, such as a delicate bud vase filled with fresh seasonal flowers, a charming framed orange blossom print that evokes warmth, and a vibrant, patterned tea towel, are strategically placed to weave subtle yet impactful doses of color throughout the kitchen. These carefully chosen elements work in concert to create engaging visual interest and a sense of playful sophistication, preventing the neutral base from ever feeling sterile.
However, the indisputable “crown jewel” and primary color hero in our newly designed kitchen is the stunning, expressive abstract art print created by my absolute favorite artist, Eleanor Scott Davis. I had been patiently (or perhaps not so patiently!) waiting for the perfect opportunity to acquire a piece of her captivating work, and I finally succeeded when she launched her most recent collection. To ensure I secured one of these highly sought-after prints, which tend to sell out instantly, I even set an alarm and completed my purchase within a mere minute of the official launch. As it turns out, my swift action paid off handsomely, as my signed and numbered print proudly bears the distinction of being #1 of 50. This exceptional piece of art doesn’t just add a burst of color; it infuses the space with personality, artistic depth, and a vibrant, energetic statement that truly completes and elevates our kitchen’s unique aesthetic.
Our New Kitchen Sources: Bringing Our Vision to Life with Carefully Selected Elements
Curating the perfect elements for our dream kitchen involved a thoughtful blend of exciting new acquisitions and integrating beloved existing pieces. While some items, like our cherished colorful block runner, have been with us for many years and are unfortunately no longer available, we’ve made every effort to link to as many sources as possible for the new additions and key elements that define our refreshed space. Below, you’ll find a comprehensive list of products and materials, all inspired by the meticulously crafted mood board I created during the intensive planning phase of our renovation. It’s worth noting that our kitchen seamlessly flows into our family room and eat-in kitchen area, creating an open-concept living space. Therefore, the mood board and subsequent source lists include items that contribute to the cohesive and harmonious design of these adjoining spaces as well. For those interested in replicating our effective design process, I have an entire blog post detailing how to create a professional-looking mood board for free, even without any prior formal design skills.
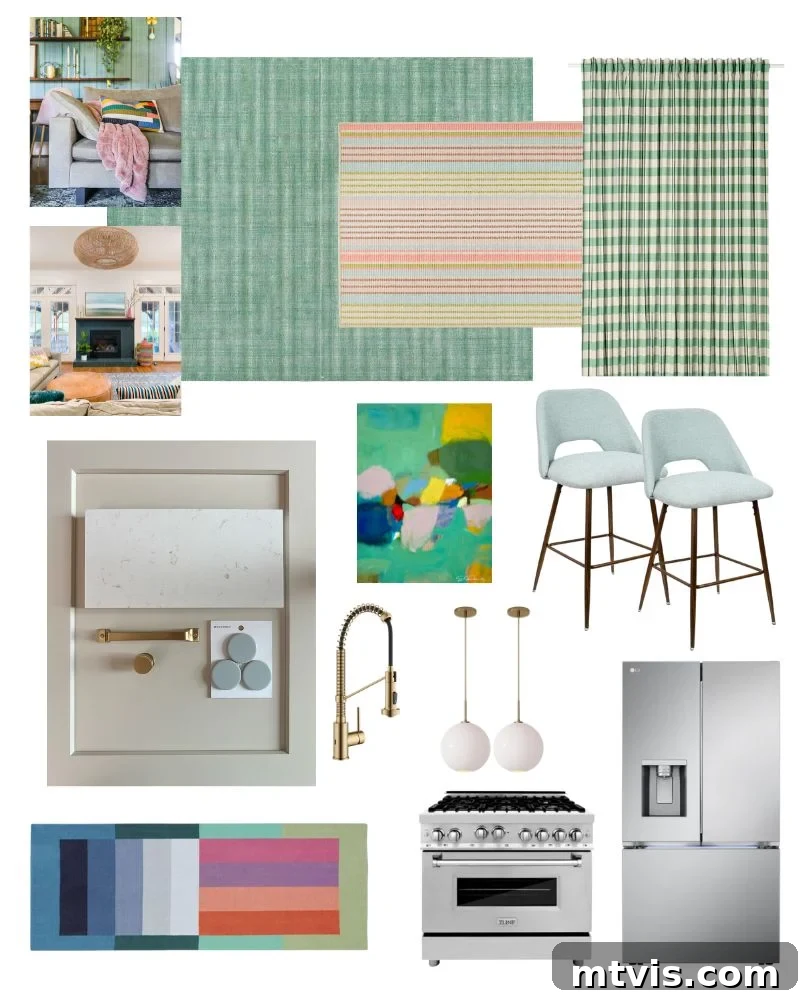
PAINT COLORS
- Cabinetry color is Accessible Beige by Sherwin Williams (a versatile and warm neutral that adapts beautifully to different lighting)
- Wall color is Pure White by Sherwin Williams (a crisp, clean backdrop that enhances the luminosity of the space)
- Trim color is Divine White by Sherwin Williams (a soft, inviting white for elegant transitions and architectural details)
RUGS & CURTAINS
- Green check curtains (these add a delightful touch of classic charm and visual interest; they are also available on Amazon here for easy access)
- Green area rug in our family room (this vibrant rug beautifully ties the open-concept living space together, adding warmth and defining the zone)
- Ticking stripe area rug (a subtle pattern that introduces texture and comfort, enhancing the inviting feel of the area)
- Colorblock runner in front of kitchen sink (a beloved, older piece from West Elm that adds a personal touch, but is no longer available in stores)
FIXTURES & HARDWARE
- Workstation sink (our highly recommended functional centerpiece that streamlines kitchen tasks, combining beauty with practicality)
- Faucet, cabinet knobs/handles and more (these elements were carefully selected for both their timeless style and their enduring durability, ensuring long-lasting appeal and functionality)
- Pendant lights (providing essential task lighting over the island while adding a sophisticated touch and aesthetic appeal to the overall design)
FURNITURE & ACCESSORIES
- Counter stools (comfortable and stylish seating options for the island, perfectly blending form and function)
- Floral tea towel & pink bud vase (cherished older items that add a touch of personal flair and charming detail, though no longer available for purchase)
- Abstract art print by Eleanor Scott Davis (the vibrant, captivating focal point that injects dynamic color and artistic energy into the space)
- Scalloped wicker frame on countertop (this elegant frame adds delightful texture and a hint of organic warmth to the kitchen surfaces)
- Orange blossom art (a subtle, refreshing floral accent that brings a whisper of nature’s beauty indoors)
TILE, COUNTERS & APPLIANCES
- Light blue oversized penny tile on backsplash (this choice provides a subtle pop of refreshing color and intriguing texture, serving as a beautiful backdrop)
- Countertop: Quartz Aspen Gold (a remarkably durable, elegantly understated, and exceptionally low-maintenance choice that ensures lasting beauty and practicality)
- Counter-depth refrigerator (this appliance integrates seamlessly into the new kitchen layout, offering a streamlined look without sacrificing storage capacity)
- 36-inch Dual Fuel Range (a high-performance culinary workhorse that combines the best of gas and electric cooking, perfect for enthusiastic home chefs)
And there you have it – the complete revelation of our transformed kitchen! We extend our heartfelt thanks to everyone who followed along and offered encouragement as I shared daily updates on Instagram. Your engagement truly made this entire renovation journey more enjoyable and collaborative. Looking ahead, we’re incredibly excited to delve deeper into how we meticulously organized our new kitchen cabinets and drawers. This was a process that involved extensive research, thoughtful planning, and a significant amount of consideration, as we were absolutely determined to maximize every inch of the abundant cabinet and drawer space we had long craved. Expect a detailed post soon on our smart storage solutions and organizational tips!
Do you have any questions at all about our renovation process, specific design choices, material selections, or any of the sources mentioned? Please feel free to ask away in the comments section below, or send me a direct message on Instagram. We love hearing from you and are always happy to share our insights and experiences!
More Kitchen IDEAS
SEE ALL kitchen POSTS
-
Budget-Friendly DIY Backsplash Ideas for Kitchens
-
How Durable are DIY Painted Kitchen Cabinets?
-
How To Refinish Butcher Block Countertops & Maintain Them
-
Designer Tips for Choosing Perfect Kitchen Rug Runners
-
How to Paint Kitchen Cabinets (From a DIYer Who Has Done it 3 Times)
-
Our Kitchen Renovation Reveal- It’s Neutral AND Colorful
Curious about my personal approach to transforming rooms and spaces throughout our home? You might find immense value in exploring Designer in a Binder®, my comprehensive guide to affordable and simple home decoration, designed to empower you in your own design journey.
For exclusive content, behind-the-scenes sneak peeks into our latest projects, and insider design tips delivered straight to your inbox, be sure to subscribe to our newsletter before you head out! Don’t miss out on future inspiration and expert advice for creating your dream home.