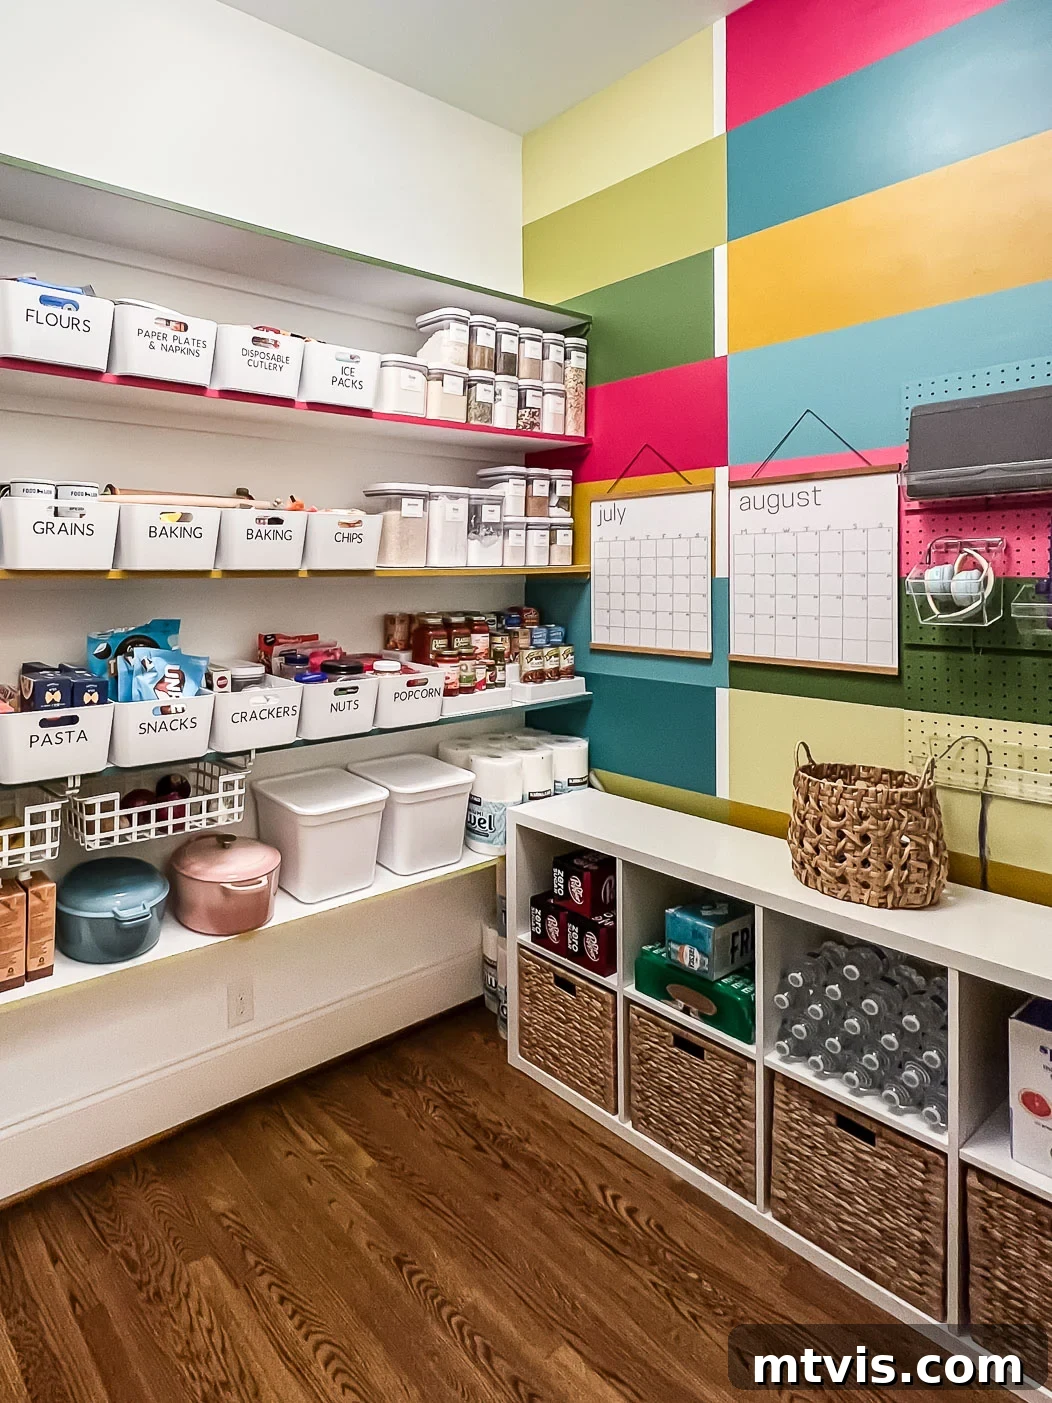
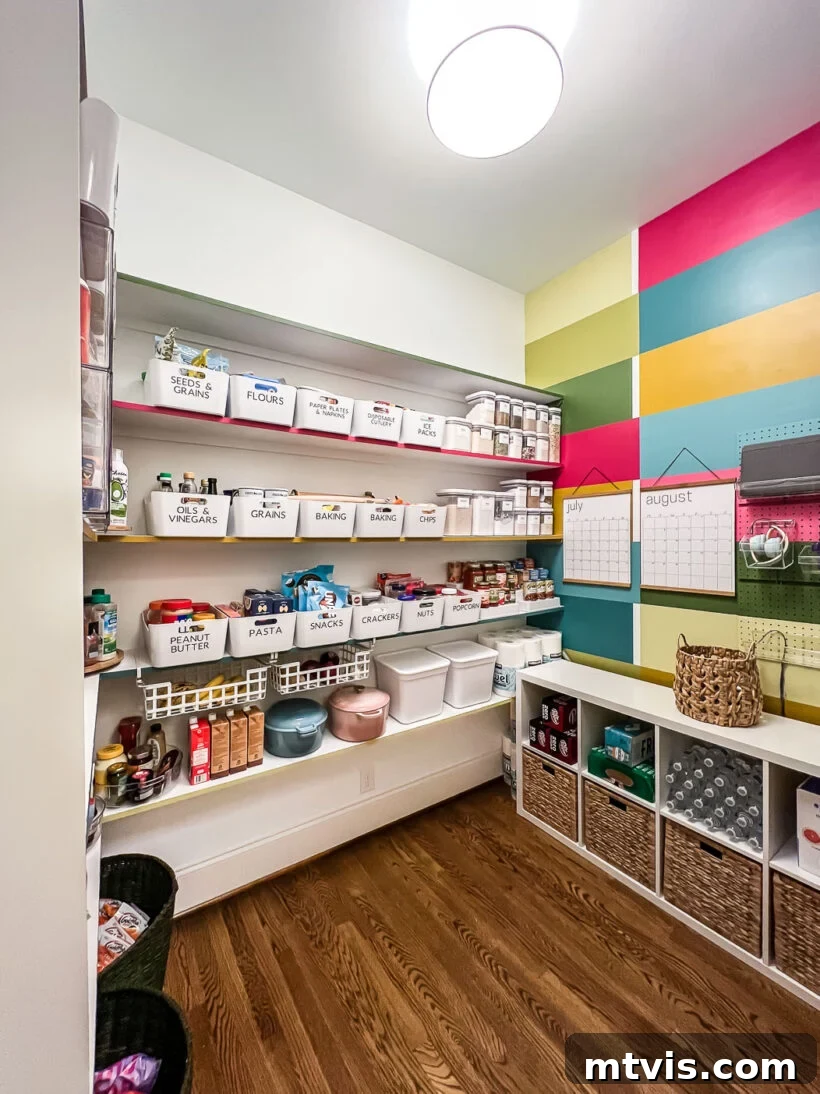
Welcome to our latest home transformation project! We are incredibly fortunate to have a spacious walk-in pantry, but for a long time, it was an overwhelming, disorganized mess that simply didn’t serve our family’s needs efficiently. More than just a functional failure, its drab and lifeless appearance stood in stark contrast to the vibrant, colorful aesthetic of the rest of our home. Over just a couple of weeks, and with a surprisingly small budget of less than $600, we undertook a complete pantry makeover. The result? A massive boost in functionality and a stunning new look, all achieved without any messy demolition. Get ready to discover how we turned a neglected space into an organized, joyful haven!
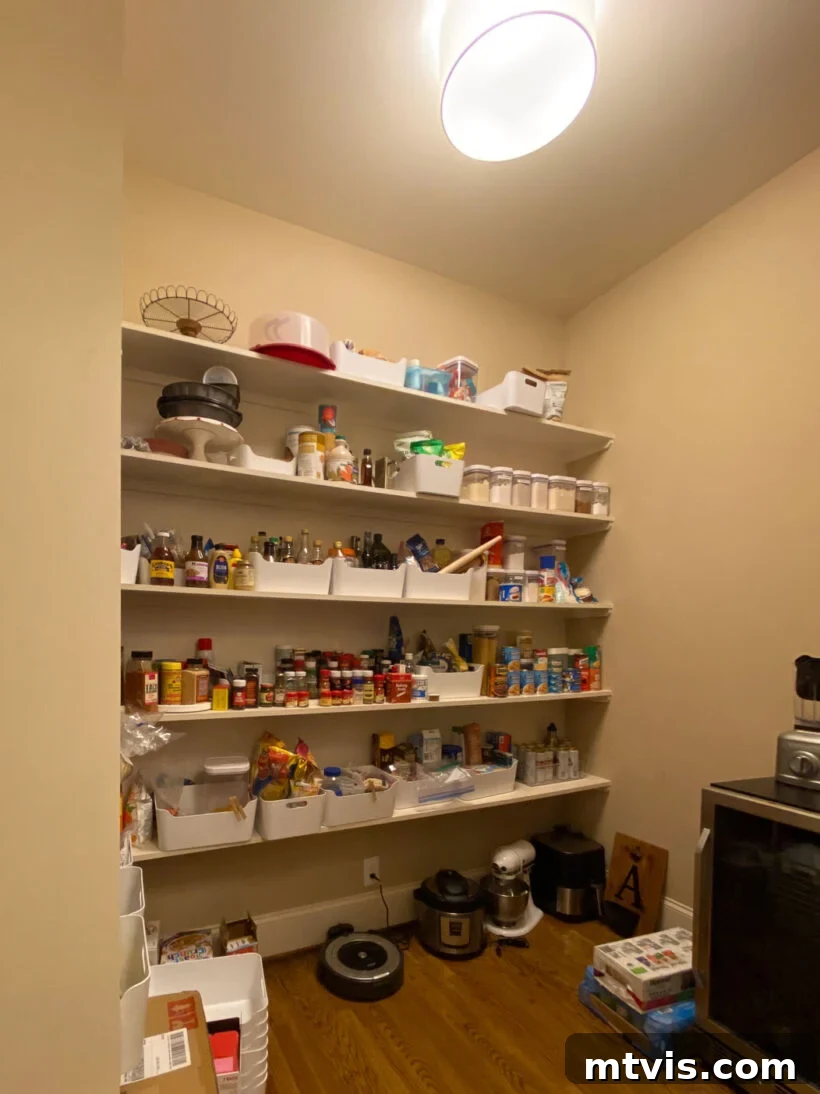
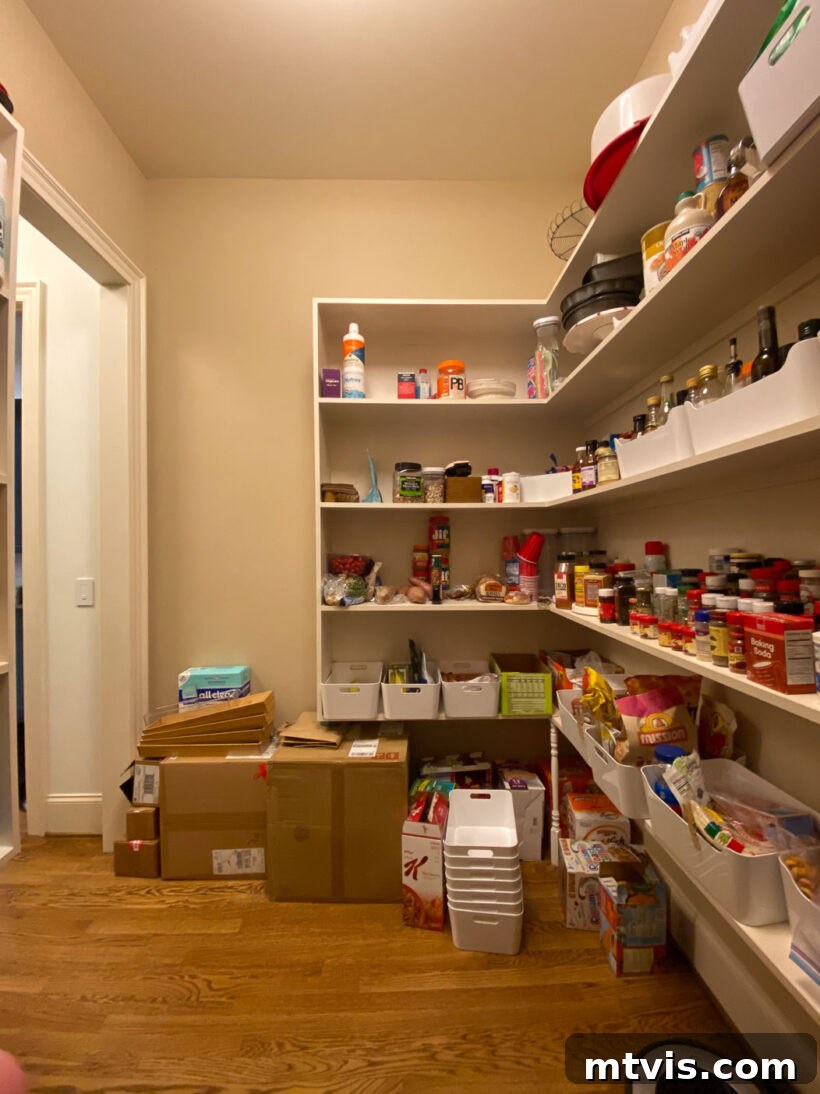
The Issues in Our Pantry: A Call for Transformation
While we appreciated the sheer size of our walk-in pantry, its original state was far from ideal. The dull beige walls and uninspiring brown shelves did nothing to spark joy or complement our home’s lively decor. We knew the aesthetic changes would be straightforward, but the core problem was its dysfunctional nature. It was a constant battle against disorganization, with boxes and overflow items perpetually cluttering the floor. The existing pantry shelving simply didn’t accommodate our family’s items in a logical or efficient manner, leading to wasted space and endless frustration.
Effective pantry shelving is the backbone of any functional pantry, and its design plays a crucial role in how well a pantry performs. I often emphasize the importance of thoughtful pantry shelving ideas because it truly makes all the difference. Our house, built in 2012, came with sturdy, original solid wood shelves. They were impressively durable, showing no signs of bending or warping, which was a huge plus. At 13 inches deep, they were also nearly perfect in terms of depth. Shelving deeper than this often leads to smaller items being lost at the back, making them inaccessible and forgotten.
However, these robust shelves had one significant flaw: they were all spaced evenly, 24 inches apart. This uniform spacing, while simple, created an abundance of wasted vertical space, as illustrated in the “before” photos. Tall gaps above smaller items meant we weren’t maximizing the full potential of each shelf. Ideally, pantry shelves should be adjustable or installed at varying heights to smartly accommodate different types of items, from tall cereal boxes to short canned goods. Since our existing shelving was in excellent condition and built to last, we decided to optimize it rather than replace it entirely. This decision not only reduced waste but also significantly helped us stay within our budget, proving that a major impact doesn’t always require a major overhaul.
This post contains affiliate links for your convenience. Click here for my full disclosure policy.
Pantry Makeover Details: Smart Solutions for a Functional Space
Our goal was to transform our pantry into a highly functional, aesthetically pleasing space without breaking the bank. Here’s a detailed look at how we creatively updated our existing pantry, making it vastly more efficient for our family while adhering to a tight budget.
Made it a Bright & Happy Space
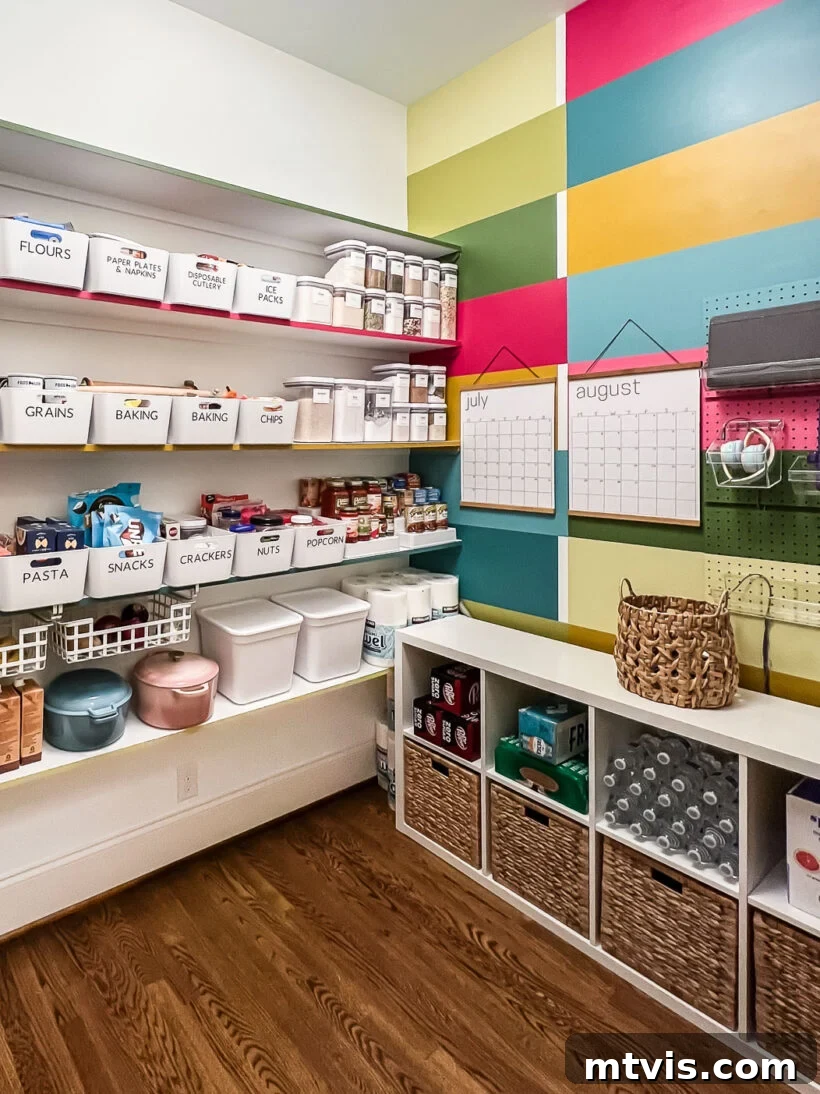
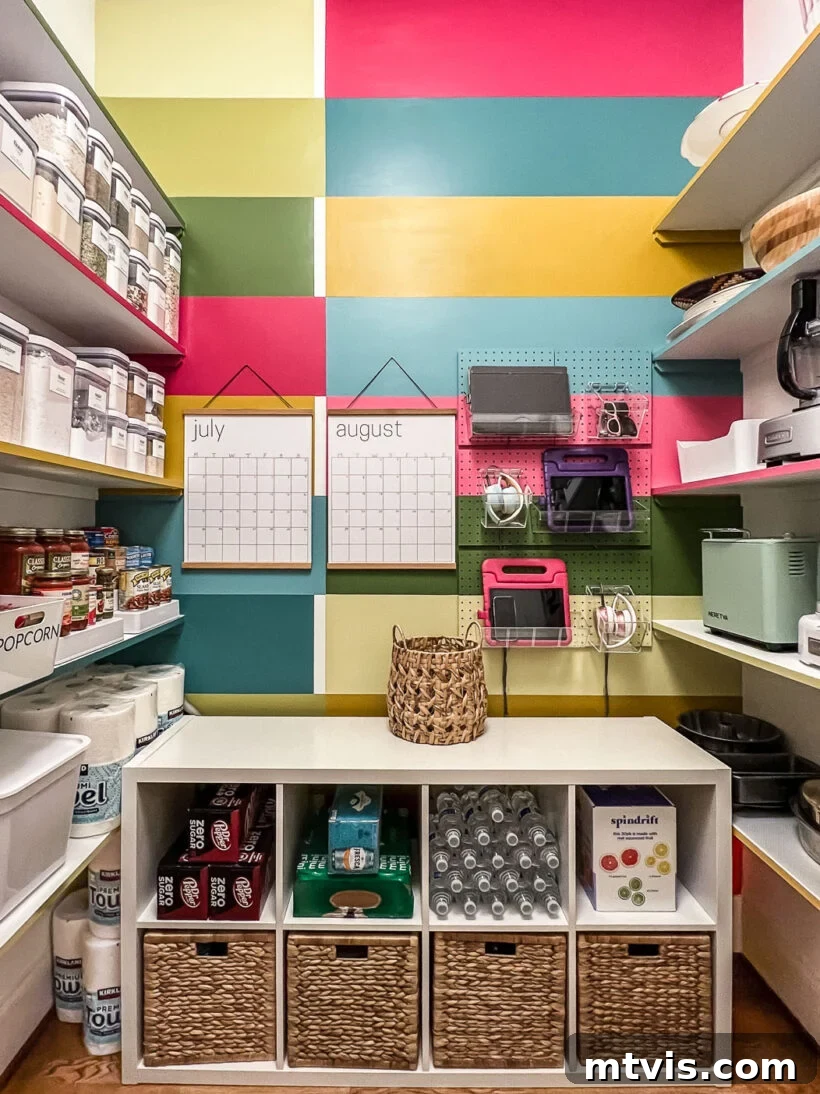
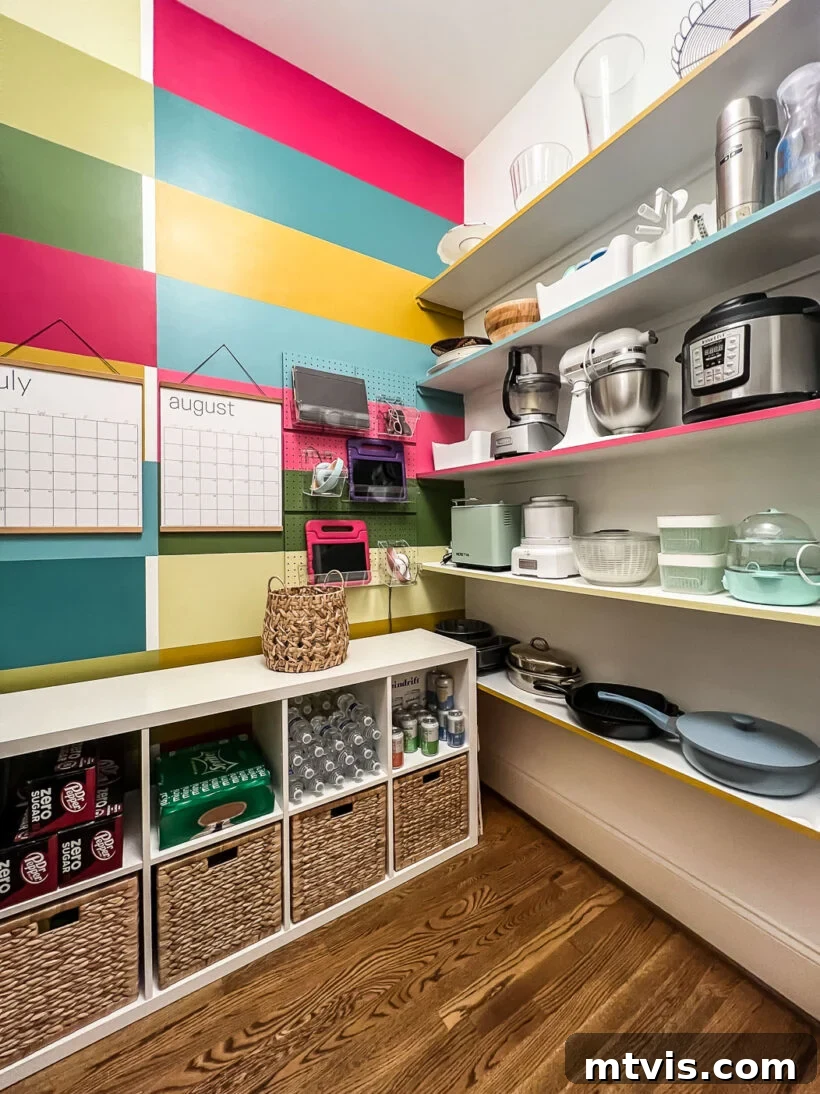
Given that our pantry lacks natural light from windows, making it feel bright and inviting was a top priority. The first step in our design journey was to banish the dreary brown walls and beige shelves. We painted almost every surface – walls, shelves, and ceiling – with Pure White by Sherwin Williams. This simple change alone made an absolutely monumental difference, instantly transforming the space into a luminous canvas. To inject personality and align with our home’s colorful aesthetic, I then painted a vibrant wall mural on the back wall. For a playful touch, I also painted just the edges of the pantry shelves in coordinating hues, adding subtle bursts of color throughout. The mural incorporates a mix of hand-mixed paints, but I’ve listed the main Sherwin Williams colors used to create this cheerful design:
- Garden Spot (dark green)
- Auric (mustard yellow)
- Edgy Gold (medium green)
- Pale Moss (light green)
- Gala Pink (dark pink)
- Lagoon (darkest blue)
Used Smart Pantry Storage to Maximize Vertical Space
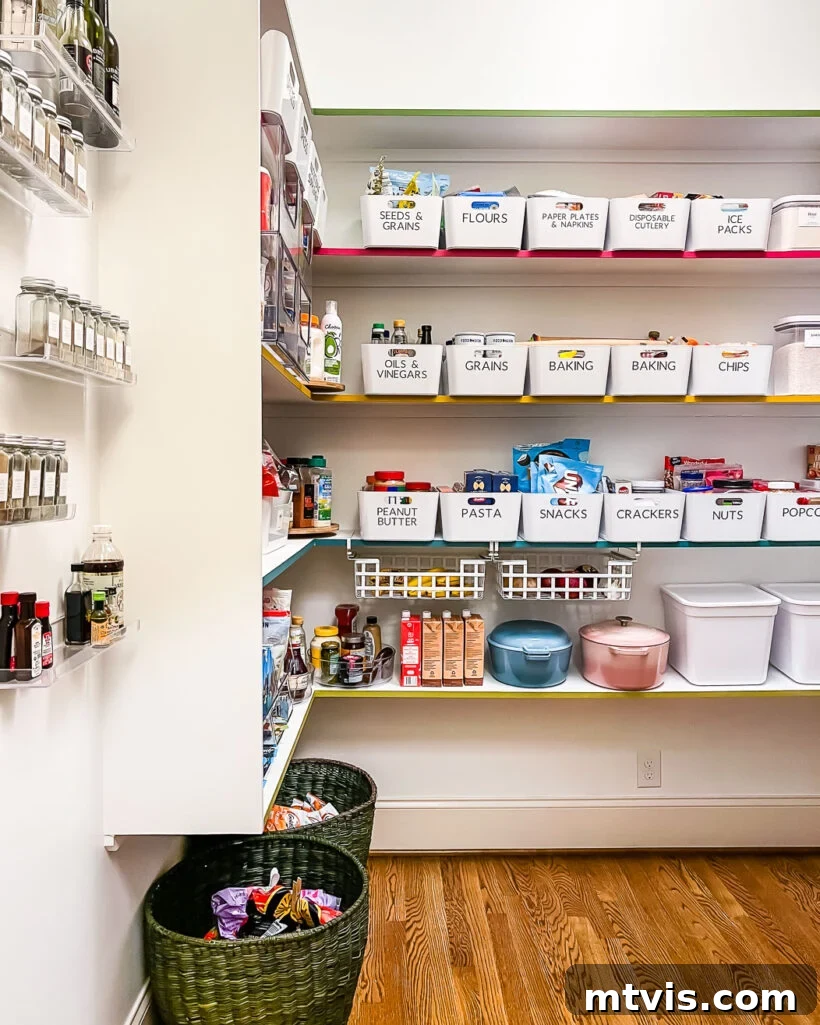
Instead of the costly and time-consuming task of replacing all the existing shelving, we strategically introduced a variety of affordable pantry storage solutions. These ingenious additions allowed us to cleverly reclaim much of the previously wasted vertical space, making every inch work harder for us. While you can find most of our pantry organizing pieces HERE, I’ve also highlighted specific items below for easy reference and inspiration:
- These under-shelf drawers proved to be a perfect find for storing produce. Their design promotes excellent air circulation, which is essential for keeping fruits and vegetables fresh longer. By utilizing the space beneath existing shelves, they added valuable storage without requiring any structural changes.
- The large clear stackable bins on the yellow shelf were a game-changer. Their stackable nature allowed us to take full advantage of the height between shelves, essentially creating multiple mini-shelves within one tall section. Being clear, they offer a quick visual inventory, so we know exactly what we have at a glance, eliminating the need to rummage through opaque containers.
- Similarly, the smaller clear stackable bins on the bottom shelf were ideal for consolidating small, individually packaged items. These are perfect for snacks, condiment packets, or single-serving foods that often create clutter. Their stackability again optimized vertical space, bringing order to what was once a chaotic area.
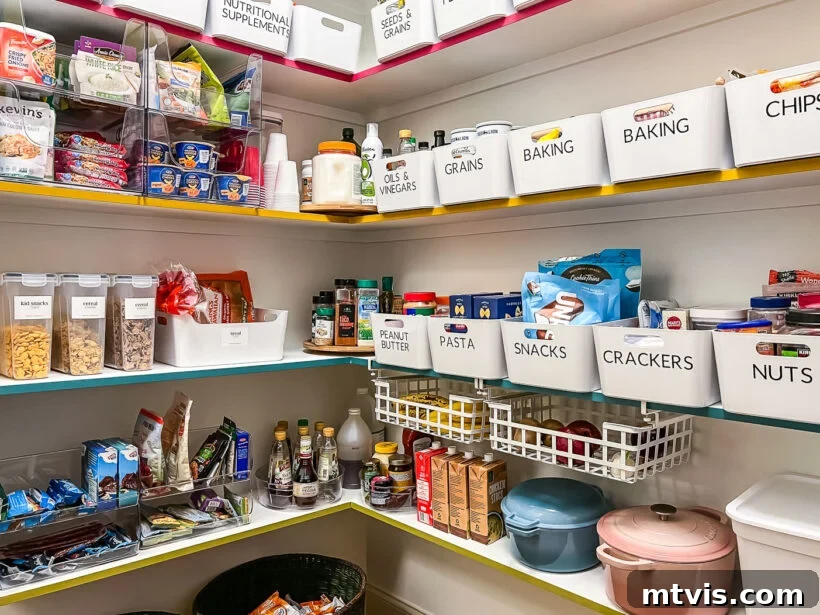
- For our collection of canned and jarred goods, we incorporated these adjustable shelf risers. These risers create tiered levels on a single shelf, making it possible to see and access items at the back without having to move everything in front. This simple addition brought a significant improvement to both visibility and accessibility, preventing items from being forgotten.
- For many years, we’ve relied on these airtight OXO Pop containers to decant our dry goods. Their modular design is fantastic, allowing them to stack effortlessly in countless configurations. By stacking them, we were able to utilize the full height of our pantry shelves, creating a neat and uniform appearance, all while ensuring that the contents of each container remained visible and easily identifiable. This systematic approach to dry goods storage keeps everything fresh and organized.
- To further enhance organization, I added these super inexpensive pantry labels. The comprehensive set includes 135 essential ingredients, 75 baking ingredients, 135 herbs & spices labels, plus 45 blank labels for customization, ensuring every item has its place.
- For any items requiring cooking instructions, I simply cut out the relevant portion of the original packaging and tuck it inside the container. Alternatively, these instructions could be taped to the underside of the lid or the back of the container for easy reference.
- The pantry label set also thoughtfully includes 258 “best before date” labels, which can be applied to any container, addressing any concerns about tracking expiration dates for decanted goods.
Maximized the Pantry Corner With Lazy Susans
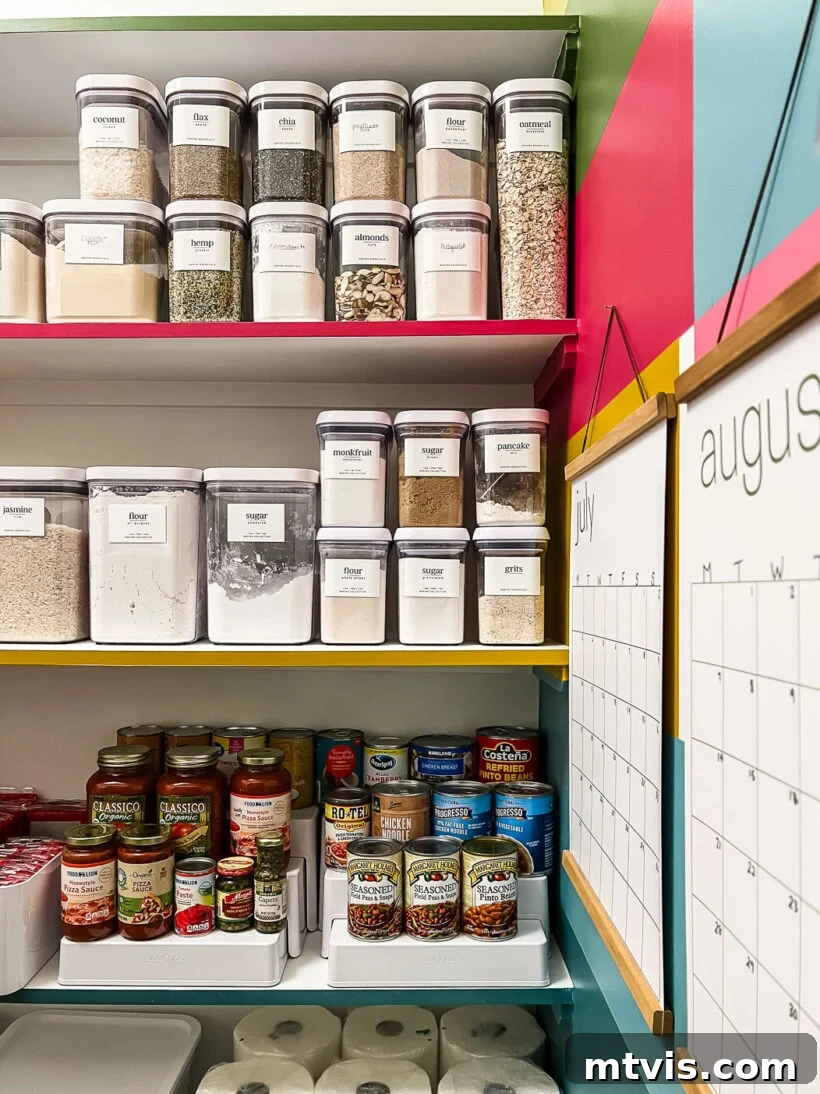
Corners in any storage space, especially pantries, often become black holes where items get buried, forgotten, and ultimately wasted. To combat this common challenge, we strategically incorporated lazy susans into our pantry corners. These rotating organizers are a brilliant solution, making every inch of corner space accessible and highly functional. No more digging to find that elusive spice jar or condiment bottle; a simple spin brings everything into view.
Grouped Like Items Together in Labeled Bins
Our trusty white bins have been a staple in organizing various areas of our home for years, and they continue to be an essential part of our pantry makeover. Their clean aesthetic and practical design make them perfect for containing clutter. To ensure seamless organization, I created clear labels for each bin using my Cricut machine. This simple step ensures that everyone in the family knows exactly where items belong, promoting a consistent system. Labeled bins are incredibly effective because they keep similar items together, streamline grocery put-away, and make it immediately obvious when supplies are running low, simplifying meal planning and shopping lists.
Added Floor Baskets for Extra Bulk Items
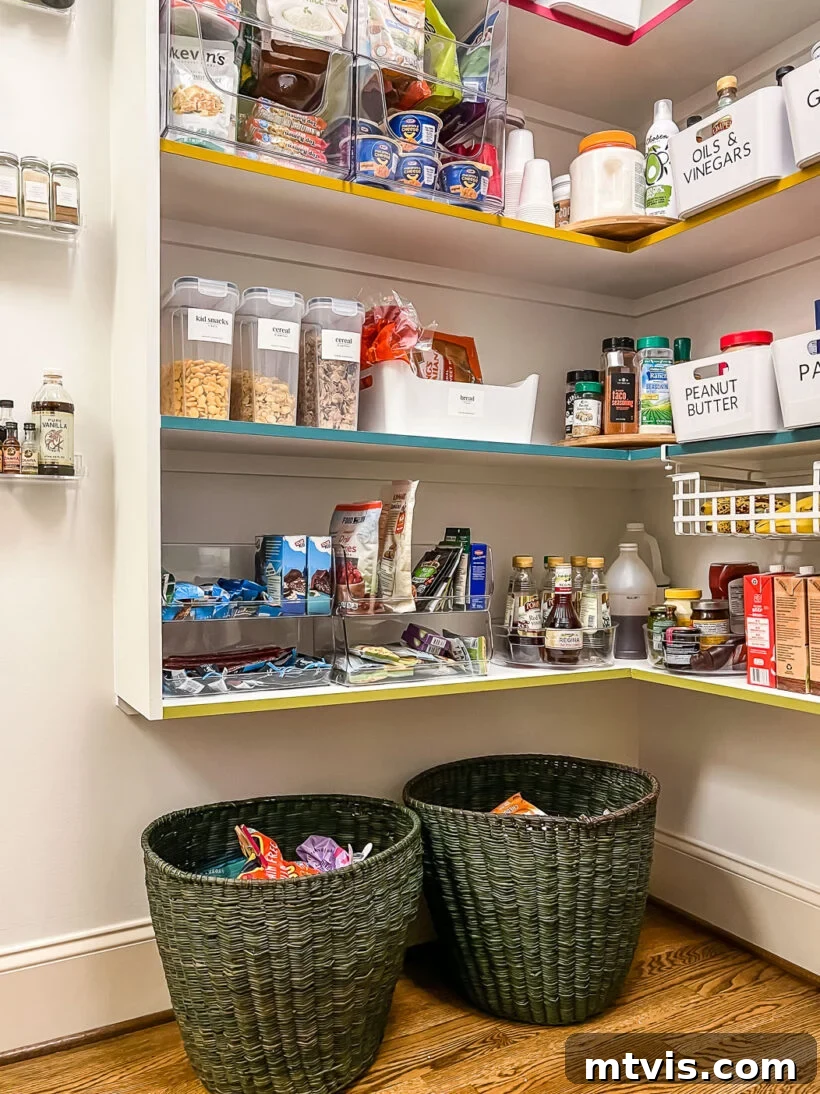
A key objective of this pantry makeover was to clear the floor of all clutter, with one strategic exception. I envisioned using large, attractive floor baskets as the ideal solution for storing bulk items that we purchase frequently from stores like Costco, such as extra boxes of goldfish crackers or large bags of cereal. This approach proved incredibly successful, transforming previously unused floor space into efficient, tidy backup storage. Having these backstock items neatly contained in baskets keeps them accessible when needed but out of the way, preventing the shelves from becoming overloaded with items not in immediate use. It’s a practical and visually appealing way to manage bulk purchases.
Hung Wall-Mounted Spice Shelves
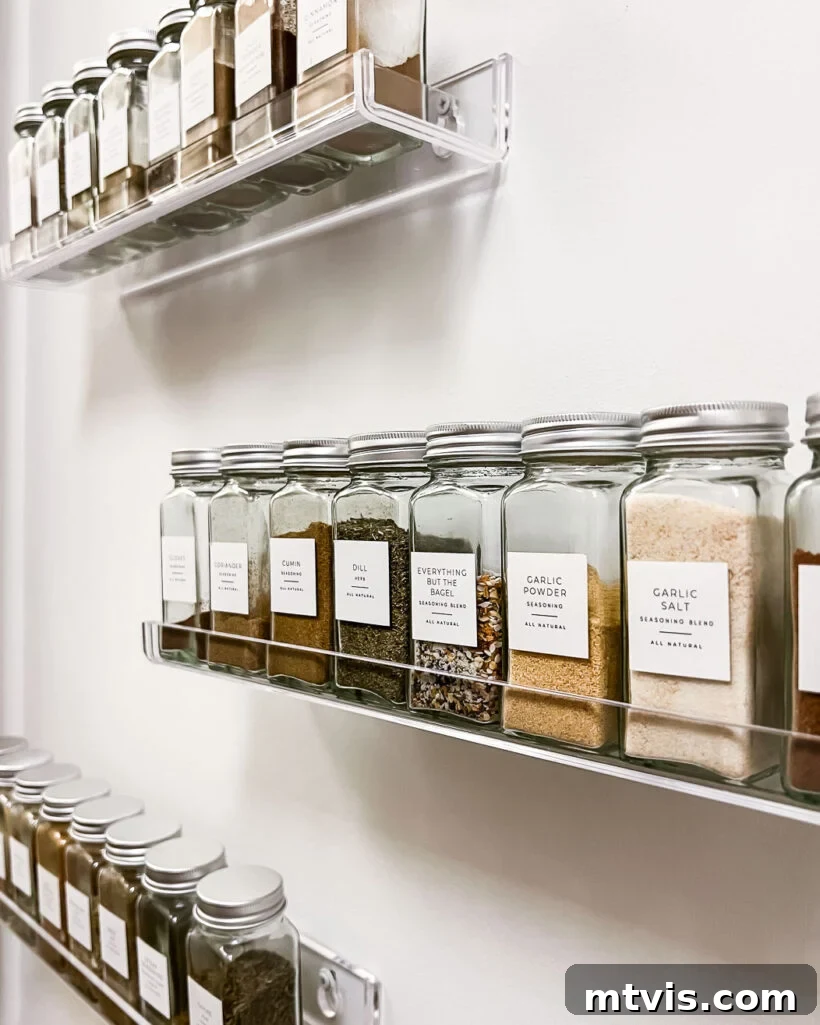
Our kitchen, despite its size, has limited cabinet and drawer space, making spice storage a persistent challenge. Spices and extracts, while small, can quickly consume valuable pantry shelf real estate. To address this, we installed these clear acrylic shelves on a small, otherwise unused wall section within the pantry. For a uniform and visually appealing display, I transferred all our spices into matching spice jars, complete with custom labels (which are different from those typically included with jar sets, a personal preference for a specific aesthetic). Any overflow or backup spices are neatly stored in a bin on the top shelf, and we simply refill the jars as needed. This simple wall-mounted solution is incredibly effective, keeping our spices organized, easily accessible, and off our main pantry shelves. If you’re facing similar spice storage dilemmas and lack wall space, explore these awesome spice storage ideas for more inspiration.
Added a Bookshelf for More Storage
With the recent addition of a secondary refrigerator to our DIY butler’s pantry, the small beverage fridge that once occupied the back wall of our walk-in pantry was no longer needed. This created an exciting opportunity. We retrieved an old IKEA Kallax bookshelf and its accompanying baskets from our attic, hoping it might fit. To our delight, it slid perfectly into the space on the pantry’s back wall! This bookshelf has become ideal for additional drink storage, keeping bottled water, juices, and other beverages neatly organized. The baskets on the bottom shelf are perfect for stashing extra Ziploc bags, trash bags, and other household essentials. Introducing this bookshelf not only added substantial storage but also freed up valuable space on our main pantry shelves, further improving overall organization.
Hung a Family Charging Station
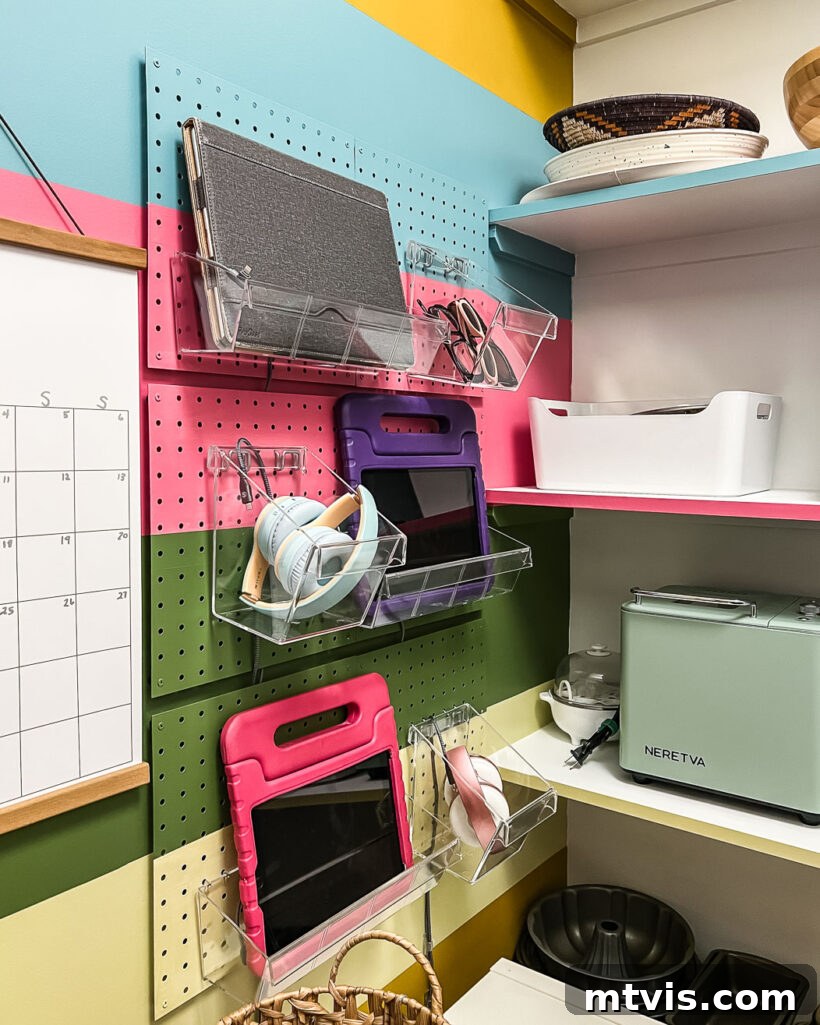
Beyond food and cookware, we wanted to leverage the pantry’s ample space for additional household functionality. The new bookshelf also conveniently provides a discreet spot to conceal cords for our innovative DIY family charging station. For too long, charging cords, phones, and iPads created visual clutter across our countertops and tables, a frustrating daily sight. This dedicated charging station, installed on an otherwise blank wall within the pantry, has been an absolute game-changer. It offers a centralized, tidy home for all our electronic devices. The best part? Everyone in the family now happily puts their devices away here each night, whether they need charging or not. We are thrilled to have eliminated the visual chaos of tangled cords and scattered gadgets, bringing a new level of order and peace to our home.
A video overview detailing the assembly of this charging station was previously available here.
Grouped Cookware and Small Appliances Together
Finally, a crucial aspect of our pantry makeover involved consolidating all our “kitchen overflow” items. These are the serving ware, specialized cookware, and small appliances that simply don’t fit into our kitchen’s main cabinetry. Prior to the makeover, this section of the pantry was a chaotic mix of food items and various kitchen gadgets. By successfully organizing all our food items onto the other side of the pantry, we dedicated this entire section to these essential, yet bulky, non-food kitchen necessities. Our kitchen, despite appearing large, has a surprisingly limited amount of cabinet storage. This dedicated pantry zone now serves as a highly efficient extension of our kitchen, keeping all these items organized and easily accessible without cluttering our main cooking areas. If you’re curious about maximizing every inch, I’ve shared a comprehensive guide on how we organize our kitchen cabinets to make the most of what we have.
Pantry Makeover Budget Breakdown: How We Saved Big
One of the most satisfying aspects of this transformation is that we achieved a complete pantry overhaul for less than $600. Our commitment to working with the existing sturdy shelving and leveraging smart, affordable organization solutions made this budget-friendly makeover possible. Here’s a transparent breakdown of our expenses, illustrating how accessible a significant home improvement project can be with careful planning:
- Paint: Approximately $200. This included all the Sherwin Williams Pure White for the walls, shelves, and ceiling, as well as the various colorful paints for the accent mural. Opting to paint ourselves saved significant labor costs.
- New Baskets, Bins, Labels & Under-Drawer Shelves: $237. This category covers all the strategic organization pieces like the under-shelf produce drawers, clear stackable bins, adjustable shelf risers, lazy susans, and the custom labels, all chosen for their functionality and value.
- DIY Family Charging Station Components: $145. This cost accounts for all the materials needed to build our custom charging station, including the pegboard, charging strips, and a decorative basket to hide cords. Building this ourselves avoided the higher cost of a pre-made solution.
- Everything else we already had: Including the old IKEA Kallax bookshelf and baskets, which were repurposed from our attic at no additional cost. This highlights the power of using what you already own to reduce expenses.
So there you have it! The total came to $582, comfortably under our $600 target. So far, everything is staying wonderfully organized, and the feeling of having such a functional and beautiful space is incredibly rewarding. I am genuinely surprised and delighted by how much we were able to improve the function of this space with a combination of strategic organization and clever storage solutions, along with some aesthetic tweaks. I’m especially glad that we ultimately decided against ripping out the original shelving and starting from scratch, which was a serious consideration at one point. This budget-friendly approach proved to be far more effective and satisfying. What do you think?
More Kitchen IDEAS
SEE ALL kitchen POSTS
If you loved this pantry makeover, you might be interested in exploring more ways to enhance your kitchen’s style and functionality. From budget-friendly DIY projects to expert design tips, our collection of kitchen-related articles is packed with inspiration and practical advice for every homeowner. Dive into these resources to find your next great kitchen project!
-
Budget-Friendly DIY Backsplash Ideas for Kitchens
-
How Durable are DIY Painted Kitchen Cabinets?
-
How To Refinish Butcher Block Countertops & Maintain Them
-
Designer Tips for Choosing Perfect Kitchen Rug Runners
-
How to Paint Kitchen Cabinets (From a DIYer Who Has Done it 3 Times)
-
Our Kitchen Renovation Reveal- It’s Neutral AND Colorful
Curious about our philosophy for transforming rooms and spaces throughout our home? Discover our comprehensive guide: Designer in a Binder®.
For exclusive content, behind-the-scenes glimpses, and the latest updates on our DIY projects, be sure to subscribe to our newsletter before you go!